跳转到主内容

当前版本的文档还未经巡查,您可以查看最新的已查核版本

你所需要的

  1. 这个步骤还没有翻译 帮忙翻译一下

    : 步骤 1 中的图像 1,2 : 步骤 1 中的图像 2,2
    • Insert a plastic opening tool, or your fingernail, into the opening near the left side of the headphone jack.

    • Pry the opening tool downward to pop the rear case from its clips securing it to the the midframe.

  2. 这个步骤还没有翻译 帮忙翻译一下

    : 步骤 2 中的图像 1,2 : 步骤 2 中的图像 2,2
    • Lift and remove the rear case.

  3. 这个步骤还没有翻译 帮忙翻译一下

    : 步骤 3 中的图像 1,2 : 步骤 3 中的图像 2,2
    • Use the flat end of a spudger, or your fingernail, to press the microSD card slightly deeper into its slot until you hear a click.

    • After the click, release the card and it will pop out of its slot.

    • During reassembly, push the microSD card into the slot until it clicks in place.

  4. 这个步骤还没有翻译 帮忙翻译一下

    : 步骤 4 中的图像 1,1
    • Pull the microSD card away from its slot.

  5. 这个步骤还没有翻译 帮忙翻译一下

    : 步骤 5 中的图像 1,2 : 步骤 5 中的图像 2,2
    • Wedge a plastic opening tool into the crevice between the battery and midframe located near the bottom left corner.

    • Push the plastic opening tool downward to pry the battery up from its housing.

  6. 这个步骤还没有翻译 帮忙翻译一下

    : 步骤 6 中的图像 1,2 : 步骤 6 中的图像 2,2
    • Lift and remove the battery from the midframe.

  7. 这个步骤还没有翻译 帮忙翻译一下

    : 步骤 7 中的图像 1,1
    • Remove the six 4.0 mm Phillips #00 screws securing the midframe to the front panel assembly.

  8. 这个步骤还没有翻译 帮忙翻译一下

    : 步骤 8 中的图像 1,2 : 步骤 8 中的图像 2,2
    • Unless you pry at the right insertion points, you might have a difficult time removing the midframe. This shot of the display assembly, with display glass facing down, is meant to help you locate them.

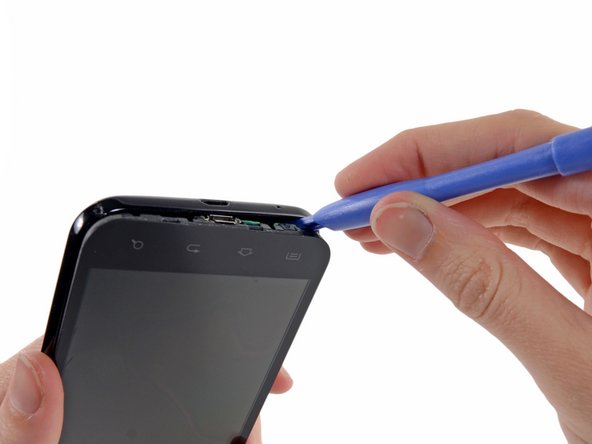
    • The first insertion point is a divot to the left of the micro-USB port.

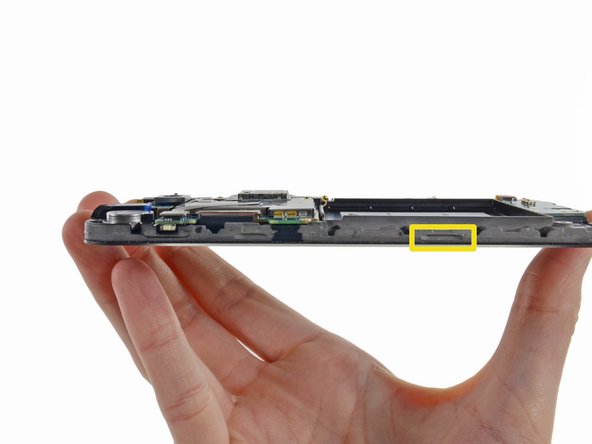
    • The second insertion point is a divot to the right of the micro-USB port near the corner of the phone.

    • The final insertion point is located about two inches to the right of the volume control toggle, toward the corner of the phone. An additional insertion point is located slightly to the right of the volume button if you need it.

  9. 这个步骤还没有翻译 帮忙翻译一下

    : 步骤 9 中的图像 1,2 : 步骤 9 中的图像 2,2
    • Insert a plastic opening tool slightly to the left of the micro-USB port, and pry between the midframe and the display to open a gap.

  10. 这个步骤还没有翻译 帮忙翻译一下

    : 步骤 10 中的图像 1,2 : 步骤 10 中的图像 2,2
    • Wedge a plastic opening tool slightly to the right of the micro-USB port, and pry between the midframe and the display to widen the gap.

  11. 这个步骤还没有翻译 帮忙翻译一下

    : 步骤 11 中的图像 1,2 : 步骤 11 中的图像 2,2
    • Pry again about two inches to the right of the volume control toggles between the midframe and the front panel assembly.

  12. 这个步骤还没有翻译 帮忙翻译一下

    : 步骤 12 中的图像 1,2 : 步骤 12 中的图像 2,2
    • Pull the micro-USB end of the front panel assembly out and away from the midframe and lift up to free it entirely.

终点

6等其他人完成本指南。

0条评论

添加评论

浏览统计数据:

过去 24 小时: 0

过去 7 天: 6

过去 30 天: 13

总计 5,213