跳转到主内容
加入维修社区 - 创建账户

Samsung Epic 4G Touch Front Panel Assembly Replacement

你所需要的

  1. Samsung Epic 4G Touch Front Panel Assembly Replacement, Rear Case: 步骤 1 中的图像 1,2 Samsung Epic 4G Touch Front Panel Assembly Replacement, Rear Case: 步骤 1 中的图像 2,2
    • Insert a plastic opening tool, or your fingernail, into the opening near the left side of the headphone jack.

    • Pry the opening tool downward to pop the rear case from its clips securing it to the the midframe.

    询问修复机器人

    添加评论

  2. Samsung Epic 4G Touch Front Panel Assembly Replacement: 步骤 2 中的图像 1,2 Samsung Epic 4G Touch Front Panel Assembly Replacement: 步骤 2 中的图像 2,2
    • Lift and remove the rear case.

    询问修复机器人

    添加评论

  3. Samsung Epic 4G Touch Front Panel Assembly Replacement, microSD Card: 步骤 3 中的图像 1,2 Samsung Epic 4G Touch Front Panel Assembly Replacement, microSD Card: 步骤 3 中的图像 2,2
    • Use the flat end of a spudger, or your fingernail, to press the microSD card slightly deeper into its slot until you hear a click.

    • After the click, release the card and it will pop out of its slot.

    • During reassembly, push the microSD card into the slot until it clicks in place.

    询问修复机器人

    添加评论

  4. Samsung Epic 4G Touch Front Panel Assembly Replacement: 步骤 4 中的图像 1,1
    • Pull the microSD card away from its slot.

    询问修复机器人

    添加评论

  5. Samsung Epic 4G Touch Front Panel Assembly Replacement, Battery: 步骤 5 中的图像 1,2 Samsung Epic 4G Touch Front Panel Assembly Replacement, Battery: 步骤 5 中的图像 2,2
    • Wedge a plastic opening tool into the crevice between the battery and midframe located near the bottom left corner.

    • Push the plastic opening tool downward to pry the battery up from its housing.

    询问修复机器人

    添加评论

  6. Samsung Epic 4G Touch Front Panel Assembly Replacement: 步骤 6 中的图像 1,2 Samsung Epic 4G Touch Front Panel Assembly Replacement: 步骤 6 中的图像 2,2
    • Lift and remove the battery from the midframe.

    询问修复机器人

    添加评论

  7. Samsung Epic 4G Touch Front Panel Assembly Replacement, Plastic Midframe: 步骤 7 中的图像 1,1
    • Remove the six 4.0 mm Phillips #00 screws securing the midframe to the front panel assembly.

    询问修复机器人

    添加评论

  8. Samsung Epic 4G Touch Front Panel Assembly Replacement: 步骤 8 中的图像 1,2 Samsung Epic 4G Touch Front Panel Assembly Replacement: 步骤 8 中的图像 2,2
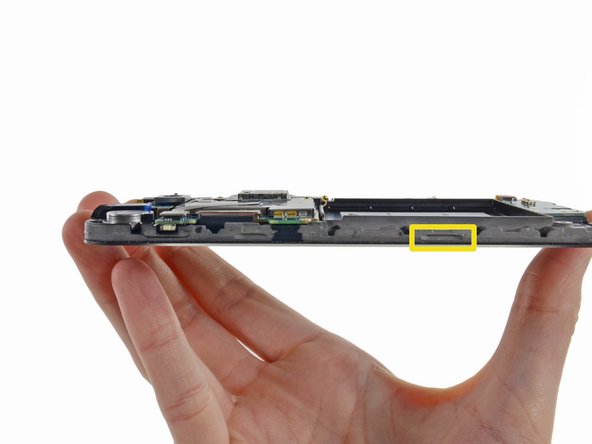
    • Unless you pry at the right insertion points, you might have a difficult time removing the midframe. This shot of the display assembly, with display glass facing down, is meant to help you locate them.

    • The first insertion point is a divot to the left of the micro-USB port.

    • The second insertion point is a divot to the right of the micro-USB port near the corner of the phone.

    • The final insertion point is located about two inches to the right of the volume control toggle, toward the corner of the phone. An additional insertion point is located slightly to the right of the volume button if you need it.

    询问修复机器人

    添加评论

  9. Samsung Epic 4G Touch Front Panel Assembly Replacement: 步骤 9 中的图像 1,2 Samsung Epic 4G Touch Front Panel Assembly Replacement: 步骤 9 中的图像 2,2
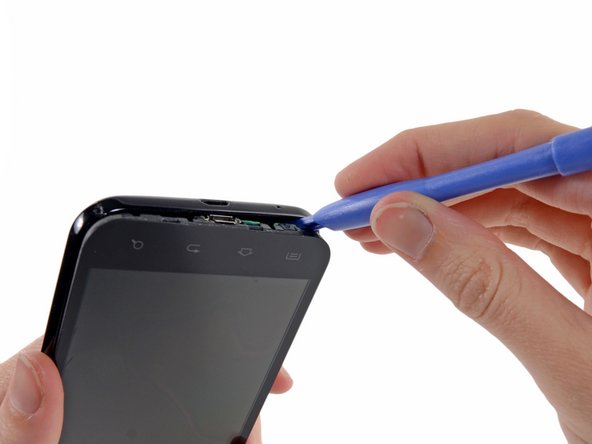
    • Insert a plastic opening tool slightly to the left of the micro-USB port, and pry between the midframe and the display to open a gap.

    询问修复机器人

    添加评论

  10. Samsung Epic 4G Touch Front Panel Assembly Replacement: 步骤 10 中的图像 1,2 Samsung Epic 4G Touch Front Panel Assembly Replacement: 步骤 10 中的图像 2,2
    • Wedge a plastic opening tool slightly to the right of the micro-USB port, and pry between the midframe and the display to widen the gap.

    询问修复机器人

    添加评论

  11. Samsung Epic 4G Touch Front Panel Assembly Replacement: 步骤 11 中的图像 1,2 Samsung Epic 4G Touch Front Panel Assembly Replacement: 步骤 11 中的图像 2,2
    • Pry again about two inches to the right of the volume control toggles between the midframe and the front panel assembly.

    询问修复机器人

    添加评论

  12. Samsung Epic 4G Touch Front Panel Assembly Replacement: 步骤 12 中的图像 1,2 Samsung Epic 4G Touch Front Panel Assembly Replacement: 步骤 12 中的图像 2,2
    • Pull the micro-USB end of the front panel assembly out and away from the midframe and lift up to free it entirely.

    询问修复机器人

    添加评论

  13. Samsung Epic 4G Touch Front Panel Assembly Replacement, Motherboard Connectors: 步骤 13 中的图像 1,1
    • Headphone jack/vibrator assembly cable connector

    • Front-facing camera cable connector

    • Digitizer cable connector

    • Display cable connector

    询问修复机器人

    添加评论

  14. Samsung Epic 4G Touch Front Panel Assembly Replacement, Headphone Jack/Vibrator Connector: 步骤 14 中的图像 1,2 Samsung Epic 4G Touch Front Panel Assembly Replacement, Headphone Jack/Vibrator Connector: 步骤 14 中的图像 2,2
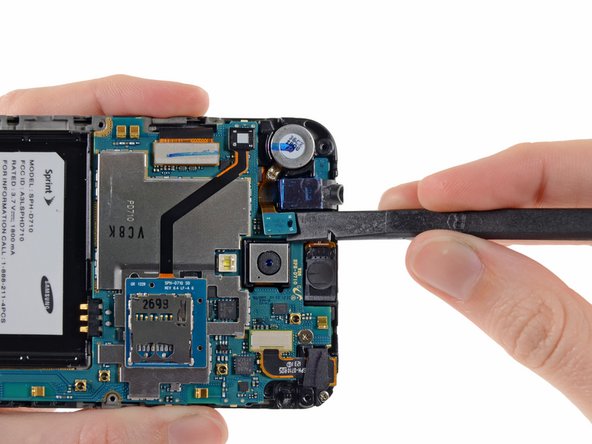
    • Use the flat end of a spudger to disconnect the headphone jack/vibrator assembly cable.

    询问修复机器人

    添加评论

  15. Samsung Epic 4G Touch Front Panel Assembly Replacement, Motherboard Assembly: 步骤 15 中的图像 1,2 Samsung Epic 4G Touch Front Panel Assembly Replacement, Motherboard Assembly: 步骤 15 中的图像 2,2
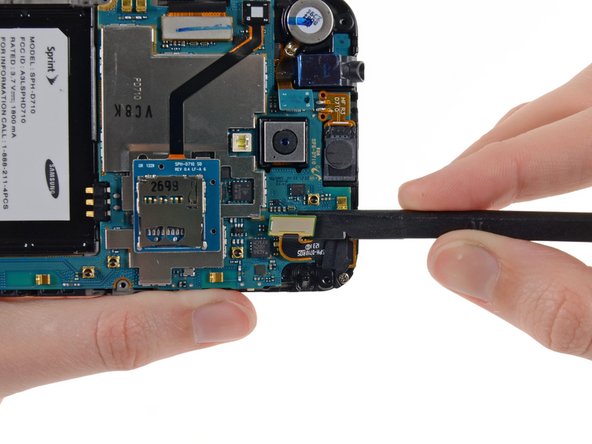
    • Use the flat end of a spudger to disconnect the front-facing camera cable connector.

    询问修复机器人

    添加评论

  16. Samsung Epic 4G Touch Front Panel Assembly Replacement: 步骤 16 中的图像 1,1
    • Carefully disconnect the digitizer display cable.

    询问修复机器人

    添加评论

  17. Samsung Epic 4G Touch Front Panel Assembly Replacement: 步骤 17 中的图像 1,1
    • Use a spudger to disconnect the display cable connector.

    询问修复机器人

    添加评论

  18. Samsung Epic 4G Touch Front Panel Assembly Replacement: 步骤 18 中的图像 1,1
    • Remove the two 3 mm Phillips #00 screws.

    询问修复机器人

    添加评论

  19. Samsung Epic 4G Touch Front Panel Assembly Replacement: 步骤 19 中的图像 1,3 Samsung Epic 4G Touch Front Panel Assembly Replacement: 步骤 19 中的图像 2,3 Samsung Epic 4G Touch Front Panel Assembly Replacement: 步骤 19 中的图像 3,3
    • Lift the micro-USB end of the motherboard away from the display assembly and pull it down.

    • Be mindful that you don't snag the motherboard on any cables as you remove it.

    询问修复机器人

    添加评论

  20. Samsung Epic 4G Touch Front Panel Assembly Replacement, Microphone Cover: 步骤 20 中的图像 1,2 Samsung Epic 4G Touch Front Panel Assembly Replacement, Microphone Cover: 步骤 20 中的图像 2,2
    • The microphone cover fits in a notch and over a small peg in the display assembly, ensure it is well seated before sealing your device.

    • Make sure the microphone cover stays in its slot on the display assembly.

    • When you removed the motherboard, the microphone cover may have remained stuck on the microphone. Put it back in its notch in the display assembly to avoid losing it.

    询问修复机器人

    添加评论

  21. Samsung Epic 4G Touch Front Panel Assembly Replacement, Front Facing Camera/Earpiece Speaker Assembly: 步骤 21 中的图像 1,1
    • Remove the 2.3 mm Phillips #00 screw securing the front-facing camera bracket to the display assembly.

    询问修复机器人

    添加评论

  22. Samsung Epic 4G Touch Front Panel Assembly Replacement: 步骤 22 中的图像 1,1
    • Remove the front-facing camera bracket from the display assembly.

    询问修复机器人

    添加评论

  23. Samsung Epic 4G Touch Front Panel Assembly Replacement: 步骤 23 中的图像 1,2 Samsung Epic 4G Touch Front Panel Assembly Replacement: 步骤 23 中的图像 2,2
    在这个步骤中使用的工具:
    Tweezers
    $4.99
    • Using a pair of tweezers, or your fingers, remove the front-facing camera/earpiece speaker assembly.

    询问修复机器人

    添加评论

  24. Samsung Epic 4G Touch Front Panel Assembly Replacement, Headphone Jack/Vibrator: 步骤 24 中的图像 1,2 Samsung Epic 4G Touch Front Panel Assembly Replacement, Headphone Jack/Vibrator: 步骤 24 中的图像 2,2
    • Insert the pointed end of a spudger into the gap in the corner of the midframe to free the vibrator from the adhesive.

    • Do not completely remove the vibrator, it is still attached to the headphone jack/vibrator assembly and can only come out with the rest of the unit.

    询问修复机器人

    添加评论

  25. Samsung Epic 4G Touch Front Panel Assembly Replacement: 步骤 25 中的图像 1,1
    • Use the flat end of a spudger to release the headphone jack from the adhesive securing it to the midframe.

    询问修复机器人

    添加评论

  26. Samsung Epic 4G Touch Front Panel Assembly Replacement: 步骤 26 中的图像 1,1
    • Remove the headphone jack/vibrator assembly from the display assembly.

    询问修复机器人

    添加评论

  27. Samsung Epic 4G Touch Front Panel Assembly Replacement, Front Panel Assembly: 步骤 27 中的图像 1,1
    • Front panel assembly remains.

    询问修复机器人

    添加评论

结论

To reassemble your device, follow these instructions in reverse order.

取消:我没有完成这个指南。

18等其他人完成本指南。

Sam Goldheart

于10/18/12注册

477,637 声望

创作了538篇指南

团队

iFixit iFixit 的会员

Staff

122 名成员

创作了27,498篇指南

2指南评论

My display is broken but the touch screen still works. How do you replace the display?

atworktom - 回复 分享
I attempted to replace the display glass alone on a Virgin Mobile Galaxy SII, and was unsuccessful. Removing the Glass from the Digitizer proved to be extremely difficult. It seems as if the Virgin Mobile version of the SII is not meant for repair, so easily.

Edward Weissbard - 回复 分享

添加评论

浏览统计数据:

过去 24 小时: 2

过去 7 天: 8

过去 30 天: 47

总计 19,908