跳转到主内容

SOMNOcomfort and SOMNObalance Ventilator Main Circuit Board Replacement

医疗设备
ifixit 或本维修指南均未获得医疗设备制造商的认可或与任何制造商存在附属关系。

你所需要的

  1. SOMNOcomfort and SOMNObalance Ventilator Main Circuit Board  Replacement, How to Open and Close Housing (SOMNOcomfort and SOMNObalance Ventilator): 步骤 1 中的图像 1,1
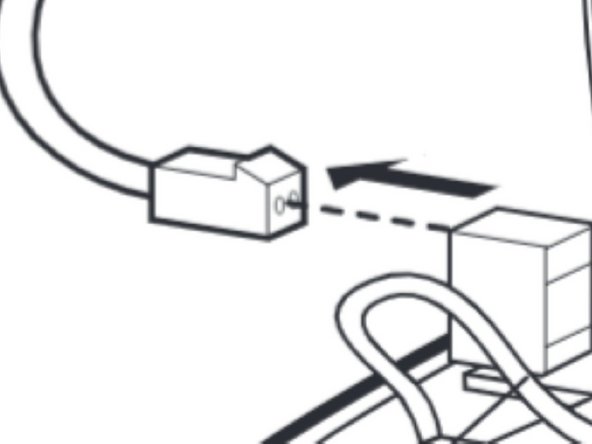
    • Remove the covering cap. (pg. 23)

  2. SOMNOcomfort and SOMNObalance Ventilator Main Circuit Board  Replacement: 步骤 2 中的图像 1,1
    • Place the unit upside down on a non-slip surface and remove the six screws. (pg. 23)

  3. SOMNOcomfort and SOMNObalance Ventilator Main Circuit Board  Replacement: 步骤 3 中的图像 1,1
    • Remove the lower part of the housing with a swiveling motion away to the side. Note the SOMNOcomfort series uses a shorter circuit board than the balance series ventilator. (pg. 23)

  4. SOMNOcomfort and SOMNObalance Ventilator Main Circuit Board  Replacement: 步骤 4 中的图像 1,3 SOMNOcomfort and SOMNObalance Ventilator Main Circuit Board  Replacement: 步骤 4 中的图像 2,3 SOMNOcomfort and SOMNObalance Ventilator Main Circuit Board  Replacement: 步骤 4 中的图像 3,3
    • Remove the connector (X1) from the circuit board.

    • Pull the connecting cable (64) from its mount.

    • Now set aside the lower part of the housing. (pg. 23)

  5. SOMNOcomfort and SOMNObalance Ventilator Main Circuit Board  Replacement: 步骤 5 中的图像 1,2 SOMNOcomfort and SOMNObalance Ventilator Main Circuit Board  Replacement: 步骤 5 中的图像 2,2
    • Next, how to close the compartment and reverse the process.

    • Hold the lower part of the housing to the upper part at an angle

    • Attach the connector (X1) to the main circuit board. When doing so the connector’s nub has to point towards the lock. (pg. 24)

  6. SOMNOcomfort and SOMNObalance Ventilator Main Circuit Board  Replacement: 步骤 6 中的图像 1,2 SOMNOcomfort and SOMNObalance Ventilator Main Circuit Board  Replacement: 步骤 6 中的图像 2,2
    • Properly align the main circuit board inside the unit.

    • Attach the connecting cable (64) to its mount (pg. 24)

  7. SOMNOcomfort and SOMNObalance Ventilator Main Circuit Board  Replacement: 步骤 7 中的图像 1,1
    • Place the lower part of the housing on the upper part (47). Please make sure the main circuit board (44) is aligned properly, and that the connecting cable (64) is not being squeezed anywhere. (pg. 24)

  8. SOMNOcomfort and SOMNObalance Ventilator Main Circuit Board  Replacement: 步骤 8 中的图像 1,1
    • Now reattach the upper part of the housing by tightening the six screws. (pg. 24)

  9. SOMNOcomfort and SOMNObalance Ventilator Main Circuit Board  Replacement: 步骤 9 中的图像 1,1
    • Insert the covering cap. (pg. 24)

  10. SOMNOcomfort and SOMNObalance Ventilator Main Circuit Board  Replacement, Main Circuit Board: 步骤 10 中的图像 1,1
    • Pull the plug X200 and X400 from the main circuit board.

  11. SOMNOcomfort and SOMNObalance Ventilator Main Circuit Board  Replacement: 步骤 11 中的图像 1,1
    • Remove the flat cables from front panel foil and display: To do so, pull the lock. Once you have pulled the lock, you can remove the flat cable.

  12. SOMNOcomfort and SOMNObalance Ventilator Main Circuit Board  Replacement: 步骤 12 中的图像 1,1
    • Remove pressure measurement tube 45 from the pressure sensor or pull out the tube adapter of the pressure measurement tube.

    • Remove the main circuit board 44.

  13. SOMNOcomfort and SOMNObalance Ventilator Main Circuit Board  Replacement: 步骤 14 中的图像 1,1
    • Attach tube 45 to the pressure sensor of a new main circuit board 44 or connect the tube adapter of the pressure measurement tube to the angular bush on the pressure sensor.

  14. SOMNOcomfort and SOMNObalance Ventilator Main Circuit Board  Replacement: 步骤 15 中的图像 1,1
    • Reattach the flat wires of front panel foil and display to the main circuit board: – Pull the lock. – Insert the flat cable into the connector. – Push the lock back in.

  15. SOMNOcomfort and SOMNObalance Ventilator Main Circuit Board  Replacement: 步骤 16 中的图像 1,1
    • Connect plugs X200 and X400 to the main circuit board.

  16. SOMNOcomfort and SOMNObalance Ventilator Main Circuit Board  Replacement: 步骤 17 中的图像 1,1
    • Close the unit

结论

To reassemble your device, follow these instructions in reverse order.

Brandon Yowakim

于01/18/18注册

1,182 声望

创作了2篇指南

团队

Cal Poly, Team S1-G3, Zimmerman Spring 2020 Cal Poly, Team S1-G3, Zimmerman Spring 2020 的会员

CPSU-ZIMMERMAN-S20S1G3

5 名成员

创作了10篇指南

0条评论

添加评论

浏览统计数据:

过去 24 小时: 1

过去 7 天: 3

过去 30 天: 4

总计 188