跳转到主内容

Replacing Sega Dreamcast Power Block (Power Supply)

你所需要的

  1. Replacing Sega Dreamcast Power Block (Power Supply), Expansion Bay: 步骤 1 中的图像 1,2 Replacing Sega Dreamcast Power Block (Power Supply), Expansion Bay: 步骤 1 中的图像 2,2
    • Verify that the console is disconnected from the AC outlet before you begin.

    • Flip the console over on its back.

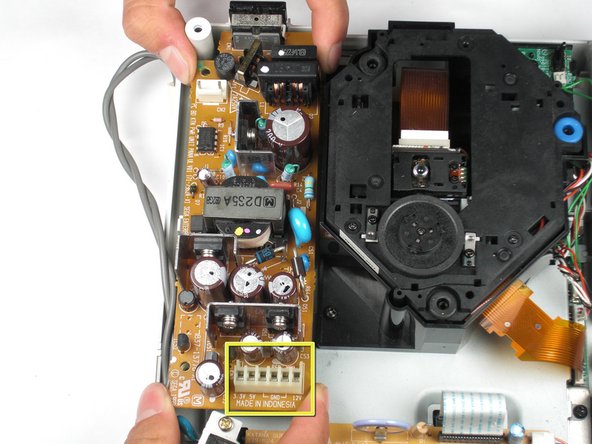
    • Take note of your model number, in case replacement parts are needed.

  2. Replacing Sega Dreamcast Power Block (Power Supply): 步骤 2 中的图像 1,3 Replacing Sega Dreamcast Power Block (Power Supply): 步骤 2 中的图像 2,3 Replacing Sega Dreamcast Power Block (Power Supply): 步骤 2 中的图像 3,3
    • Remove the expansion bay by applying pressure to the small clip on the expansion bay while prying it away from the console.

  3. Replacing Sega Dreamcast Power Block (Power Supply), Top Cover: 步骤 3 中的图像 1,1
    • Locate and remove all four black 12mm Phillips #02 screws from the underside of the console.

    • Note: Remove the expansion bay to locate the fourth screw

  4. Replacing Sega Dreamcast Power Block (Power Supply): 步骤 4 中的图像 1,1
    • Internal components can be loose. Be careful that they do not fall out when removing the cover.

    • Turn the console right side up.

    • Remove the top cover by gently lifting the upper portion of the console.

  5. Replacing Sega Dreamcast Power Block (Power Supply), Power Block (Power Supply): 步骤 5 中的图像 1,2 Replacing Sega Dreamcast Power Block (Power Supply), Power Block (Power Supply): 步骤 5 中的图像 2,2
    • Verify that the console is disconnected from the AC outlet before you begin. If you have just powered off the system, give the capacitors a few minutes to discharge before you begin working.

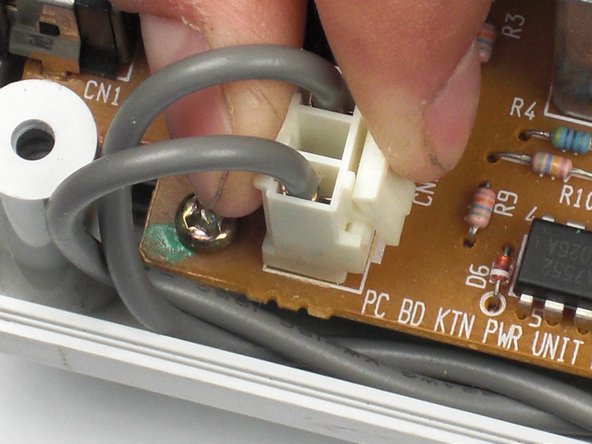
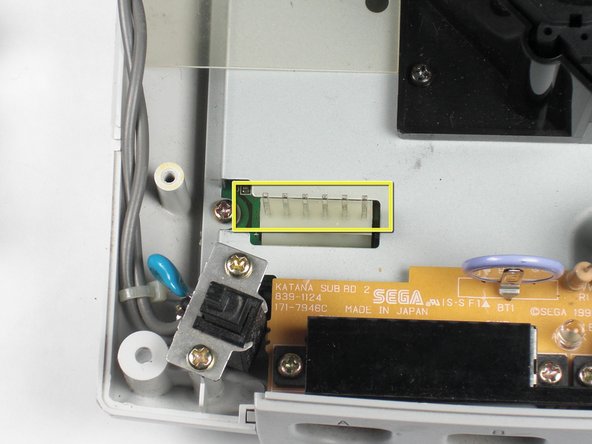
    • Remove the white female pin header by clamping the clip and pulling it up gently from the power board.

  6. Replacing Sega Dreamcast Power Block (Power Supply): 步骤 6 中的图像 1,1
    • Remove the two 10mm Philips #02 screws that are fastened to the power block.

  7. Replacing Sega Dreamcast Power Block (Power Supply): 步骤 7 中的图像 1,2 Replacing Sega Dreamcast Power Block (Power Supply): 步骤 7 中的图像 2,2
    • Do not bend the male pin header between the mounted head when you remove the power supply from the chassis.

    • Remove the power board by using both hands to gently lift the power board away from the console.

  8. Replacing Sega Dreamcast Power Block (Power Supply): 步骤 8 中的图像 1,1
    • Remove the clear plastic film that is tucked between the power supply and the chassis.

结论

To reassemble your device, follow these instructions in reverse order.

8等其他人完成本指南。

wkwong

于11/14/09注册

517 声望

创作了5篇指南

团队

Cal Poly, Team 5-1, Regan Fall 2009 Cal Poly, Team 5-1, Regan Fall 2009 的会员

CPSU-REGAN-F09S5G1

5 名成员

创作了21篇指南

3条评论

All symptoms of dead PSU can be occuring, if by accident flat ribbon cable between motherboard and controller board is disconnected. Check that cable if both ends is firmly plugged.

lauraiss lv - 回复

Hello There!

i turn on my dreamcast, No video, GD don´t spin, but the orange led barely shine, this happened many years ago (2003) , i just bought another DC in those days because i was in a hurry to end Grandia 2, and now i still have the damaged console in my room and im wondering if it is possible to fix it ...thanks!

Mardito Online - 回复

Very good and Panico

Mikesin - 回复

添加评论

浏览统计数据:

过去 24 小时: 2

过去 7 天: 14

过去 30 天: 61

总计 16,203