简介
Problemas con la conectividad inalámbrica? Usa esta guía para remplazar una placa AirPort/Bluetooth inoperante.
你所需要的
-
-
Retire los ocho tornillos Phillips de 4 mm que sujetan la carcasa inferior al MacBook.
-
-
-
Levante ligeramente la tapa inferior cerca de la abertura de ventilación.
-
Continúa pasando los dedos entre la parte superior e inferior hasta que salgan los clips de retención.
Do the retaining clips have to be re-engaged when replacing the lower case?
Answering my own question, the clips re-engage when the lower case is correctly positioned. You can help them by gently pressing the lower case with your thumbs midway along the two short sides. When everything is correctly aligned the eight screw holes line up.
Rather than running your fingernail down the sides to free up the retaining clips, I found that using an old credit card, inserted about 1/4”, to run along the left and right side popped those end retaining clips right off with no problem. You may need to twist the card slightly when in the middle area to help pop those off.
-
-
-
Usar la punta plana de una spudger para levantar el conector de la batería de su enchufe en la placa lógica.
you do not need to remove the battery when replacing the hard drive or ram
Be careful of the corner of the battery cable connector when trying to pry it off with the spudge. I knocked the corner of mine. No operational impact but was not very pleasing!
Not necessary, but a good idea, so as to avoid any spurious charges going through the boards...
@Svenaustx - What could happen if not removing this battery? Worst case? Not a geek on this but did change RAM on my Macbook Pro "15. Can't remember disconneting the battery back then. Shouldn't it be sufficient shutting the Mac off and ensure it has been used for an hour or so before replacing RAM?
-
-
-
Remueve los siguientes tornillos del lado del disco óptico de la rejilla trasera:
-
Dos Torx T8 de 10mm
-
Dos Phillips de 5.2mm
I have a problem with the two middle screws
same here...
-
-
-
Remueve los siguientes tornillos del lado de los puertos de la rejilla trasera:
-
Dos Torx T8 de 10mm
-
Dos Phillips de 5.2mm
-
-
-
Cuidadosamente levanta la rejilla trasera afuera de la carcasa.
you can actually stop disassembling now and try to replace it now. after removing two t6 screws it came off pretty easily
Good tip, thanks! I skipped ahead to step 17 and had no problem getting the magsafe board out from under the logic board and the new one installed. Saves a lot of work disconnecting connectors indicated as Fragile!
matt15 -
Thank You! Saved me an hour or so of work and a lot of stress!
I also did Step 6, then skipped to Step 17 & 18. Once I had the display data cable off, I could remove the 2 T6 Torx screws holding the MagSafe board on and remove it. You can reach under the logic board with the point of the spudger to work the cable out of the socket. Note how you maneuver the board out of the tight space so you can maneuver it back in. When you put the new MagSafe board in, plug in the cable first. If you bend the wires so the plug approaches the socket at the appropriate angle, you can nudge it in with the pointed end of the spudger.
Thanks a lot for this hint! You saved my macbook, when I failed to unscrew the fan because of one completely destroyed screw. Thanks to your comment I skipped steps 7-16 and went straight to replacing the magsafe board without problems. The spudger and some 3D imagination and done,
-
-
-
-
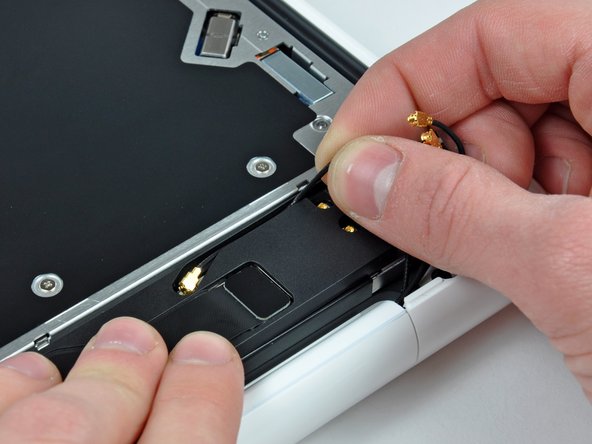
Usa el lado plano de un spudger para levantar el conector del cable AirPort/Bluetooth de la placa lógica.
-
-
-
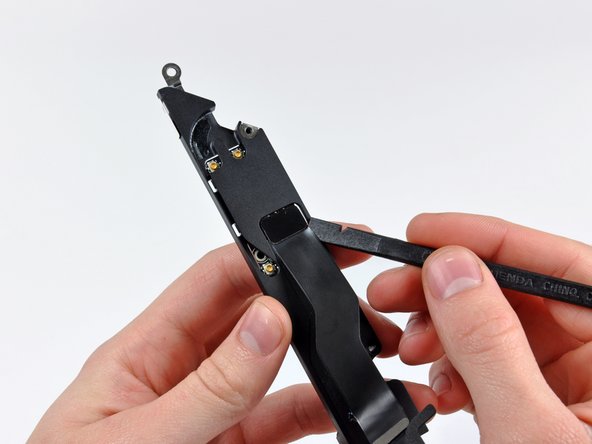
Usa el lado plano de un spudger para levantar el conector del cable de la placa lógica.
This step is NOT necessary!!!
Agreed- this step is not needed. If you do detach it, you will have to reattach it. I used my mom's nail glue. I applied a 1mm dot of it on the logic board using a paperclip. I also applied a small amount to the back of the connector. I let it air dry til it was tacky, then carefully placed it on, and got the contacts aligned. Took me two tries, but after the second, I rebooted and had sound!
I wasn't able to reconnect this cable and feel like I broke it. There's 2 other cables near that too and part of one seems broken as well. Honestly, why did I even have to remove that cable? Now I'm stuck without good sounds for a while.. :(
And now that I have disconnected the connector how to put it back?
Hilfe. Wie befestige ich dieses Kabel vom neuen Lautsprecher? er hält nicht, sowie auch der alte Stecker. Warum?
Hi - how is this step not necessary when you have to remove the old speaker assembly? Does it detach at the other end? I’m about to get my speaker replacement in the mail and I will go through this tutorial.
David Myer - 回复
If you're replacing the rear speaker then, of course this is not optional. If you're following these instructions in order to replace some other component (the MagSafe connector seems to be one example), then it probably is optional. FWIW I repaired a damaged speaker by applying some flexible rubbery glue with a toothpick to the cone surround to seal the hole. It doesn't look pretty but it sounds fine.
-


Para re-ensamblar tu dispositivo, sigue estas instrucciones en el orden inverso.
Para re-ensamblar tu dispositivo, sigue estas instrucciones en el orden inverso.
29等其他人完成本指南。


3条评论
Terrific guide; no problems, at all! Don't forget you need to add the Wi-Fi service back to the list of services:
1. Go to System Preferences → Network and click the + button to add a service.
2. Select Wi-Fi as the Interface and provide a service name.
For more info, please see http://apple.stackexchange.com/questions....
Hello!
Does anyone know where I could find this bt card but with Bt 4.0 LE in order to get handoff and continuity to work on this A1342 Macbook?
Thanks!
According to this page http://support.apple.com/kb/HT1651?viewl..., the 8 screws are not identical.
Can anybody tell me where each kind of screw is supposed to go?
Gregoire - 回复
They are all 100% Identical. You were probably looking at a different model, or Apple has entered the wrong information... Hey, It happens...
Owen Davies -
The screws on the Late 2009 are identical. The blue lock compound might make tightening some require a little more effort.
svenaustx - 回复
Can I replace it with a SATA 3 cable?
nm - 回复
A1342 macbook does not have the right controller to support sata III
Owen Davies -
hi, i just got back from the apple store and they are really keen for me to upgrade to a new laptop since my battery is old and the screen is cracked, so glad i found ifixit i would love to upgrade this puppy! gonna make it a real sleeper! styler hall wrote about sticking 16 gb of ram in his a 1342 ? is this a simply mather of ordering 3 4gb sticks ?aslo i currently have 4 gb and would like to upgrade to 8 ( or indeed 16) does that mean i need to buy all new sticks or can i continue to use the old one and stick a new one next to it ?
thanks again mick van aar, perth western aus.
michelvanaar - 回复
The A1342 will take up to 16 GB of RAM, however, there are only two RAM slots, so use two 8-GB RAM modules. Other World Computing (OWC) is a great reference source for info on exactly which RAM to use with which model; prices are usually much better on EBay though. Add an SSD from OWC and your machine will really scream!
I hope that helps!
gdesbrisay -
Gregoire is right. The 8 screws are absolutely NOT identical, I’m looking at them right now, weeowey weeowey.
John Guzman - 回复
I just wanted to say that, in 2020, i used these instructions to replace the magsafe socket on my A1286, mid-2012, pre-Retina MacBook Pro. The internal layout is not quite the same but close enough for me to do the job. I skipped the steps of fully disconnecting the fans and speakers because of what others had said about breaking the sockets. it just meant I had to be extremely careful when lifting up the main board so that I did not tear and break the connections. I was able to disconnect the old magsafe socket with the board flat and in situ, but there was no where near enough room to be able to aline and press home the new par home. Reluctantly i had to lever up the board. This was difficult as there is a tapped post that holds a screw in the way close to where the USB sockets are, that prevented the board lifting up and out. I had to be quite forceful to manouevre the sockets out from the edge of the case.
Paul Burridge - 回复