简介
如果您的笔记本电脑电池较旧或报告不正确,则可以重新校准电池。 这可以纠正报告的容量或电池电量,以延长电池的使用寿命。
重要提示:重新校准只能修正磨损电池的容量。 没有办法逆转衰老过程。
如需帮助了解什么是校准、为什么它很重要以及如何校准其他类型设备中的电池,请查看 电池校准 Wiki
指南
- 如果电池温度超过 30-40 °C (86-104 °F),请更换电池!
- 您可能会看到容量下降。 这很好 - 还不错。
- 尽量避免在充电时使用笔记本电脑。 这可能会影响校准。
- 不一致的报告可能表明电池已停产。 适当的护理可以延迟这种情况,但无法避免或逆转。
- 如果您的电池较旧,请考虑约 10% 的放电。 完全放电可能会损坏电池。
如何重新校准电池
- 将笔记本电脑充电至 100%。 使用它直到它关闭并且不再打开。
- 请参阅 HP 和 Lenovo 笔记本电脑的“BIOS 锁定和 EOL 怪癖”。
- 立即给电池充电。 如果可能,请勿使用笔记本电脑。
BIOS 锁定和 EOL 怪癖
- (BIOS 锁定)HP 笔记本电脑有 15% BIOS 锁定,需要绕过才能完全放电。 笔记本电脑关闭后立即为电池充电。
- “所有 HP 和大多数 Compaq 笔记本电脑。”
- (BIOS 锁定) 某些 Lenovo 笔记本电脑具有 7% 的关键容量锁定 (0190)。
- 仅在笔记本电脑提前关闭时才会发生。 很容易被绕过。
- (EOL 怪癖)某些戴尔电池一旦严重磨损或寿命终止,就会保存不正确的数据。 这个问题会随着时间的推移而自我纠正。 我在一些 OEM 戴尔电池上看到过这种情况。 值得注意的是,NX31D(DOM 未知/2x 有相同问题)65Wh (2014 DOM/E6440) 和 RMJFW 65Wh Extended (2014 DOM/E6220)。 45Wh 34GKR 很容易出现这种情况,但程度较轻 (2014 DOM/E7440)。
- (固件怪癖)一些笔记本电脑喜欢在 BatteryInfoView 中显示 0% 磨损 - 尤其是大多数 HP 型号。 为了通过 HP 访问数据,您必须运行诊断程序(可能需要 UEFI),或使用 HP Support Assistant 电池检查并查找高级信息。 这不是硬件故障,而是 HP 的怪癖。
你所需要的
-
-
-
以管理员身份运行命令提示符。输入 powercfg /batteryreport。
-
当报告准备好时,您将收到一条消息,指示其存储位置。检查数据以确保其一致性。
-
-
-
将笔记本电脑插上电源并打开它;当其启动后,就拔掉电源适配器。按下ESC键并选择系统诊断。
-
打开Component Tests子菜单。选择内存或Memory or Hard Drive。
-
选择Extensive test。选择Loop until error。
-
当笔记本电脑关机时,请立即给电池充电。
-
-
-
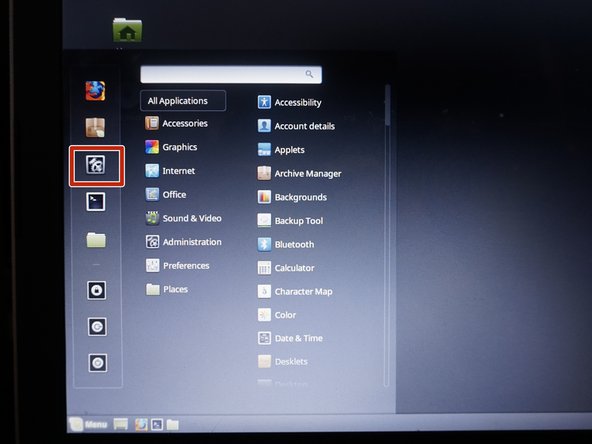
将笔记本电脑启动到Linux Mint Cinnamon实时会话中。打开 Settings 并进行以下更改:
-
打开 Power Management。将 When the battery is critically low 改为 Do nothing。
-
使用笔记本电脑直到关机。本次会话中所有内容都将丢失。
-
14等其他人完成本指南。
由衷感谢以下译者:
100%
这些译者帮助我们修补全世界! 您也想加入吗?
开始翻译 ›
4条评论
Did not help at all.
I have a Windows tablet, pretty old one - previously it was showing 39% battery wear (it actually was holding for about an hour, battery itself is a bir inflated).
A couple days ago it hard crashed and wear level was reseted to 0%. Now some weird stuff started: turning off when reaching 14% battery charge, screen dimming etc.
Tried this method, and as I said in the beginning - it did not help, still shows 0% wear.
Late response, but some laptops and Windows based tablets (notably HP) always show 0% wear in Batteryinfoview. You need to go into the UEFI diagnostics or use use HP Support Assistant and grab it from the advanced data on HP. If it’s Dell, UEFI SupportAssist (newer systems) or ePSA (legacy).
Nothing to worry about, but another quirk like the EOL capacity reporting response on some Dell batteries. Added a note in the quirks section about this.
Nick -
I’m curious, can we send command through the I2C interface from the laptop itself to the battery and do some calibration from there? is the built-in BMS has the capability to do that?
May battery charging shows 39% and it should be always plug in (windows 11) on Asus laptop.


