跳转到主内容

Razer Naga Trinity LED Light Ribbon Cable Replacement

你所需要的

  1. Razer Naga Trinity LED Light Ribbon Cable Replacement, Razer Naga Trinity Disassembly: 步骤 1 中的图像 1,2 Razer Naga Trinity LED Light Ribbon Cable Replacement, Razer Naga Trinity Disassembly: 步骤 1 中的图像 2,2
    • Remove the interchangeable side plate.

  2. Razer Naga Trinity LED Light Ribbon Cable Replacement: 步骤 2 中的图像 1,2 Razer Naga Trinity LED Light Ribbon Cable Replacement: 步骤 2 中的图像 2,2
    • Remove the mouse's feet using the opening pick.

  3. Razer Naga Trinity LED Light Ribbon Cable Replacement: 步骤 3 中的图像 1,1
    • Remove the four 6mm screws by using a JIS #1 screwdriver.

  4. Razer Naga Trinity LED Light Ribbon Cable Replacement: 步骤 4 中的图像 1,2 Razer Naga Trinity LED Light Ribbon Cable Replacement: 步骤 4 中的图像 2,2
    • Separate the top mouse housing from the bottom mouse housing using the opening pick.

    • Be careful not to tug too hard on the ribbon connector.

  5. Razer Naga Trinity LED Light Ribbon Cable Replacement: 步骤 5 中的图像 1,1
    • Unlock the ribbon connector that is held down by the main board clips using the spudger's pointed end.

  6. Razer Naga Trinity LED Light Ribbon Cable Replacement: 步骤 6 中的图像 1,1
    • Remove the side housing using the opening pick.

  7. Razer Naga Trinity LED Light Ribbon Cable Replacement: 步骤 7 中的图像 1,2 Razer Naga Trinity LED Light Ribbon Cable Replacement: 步骤 7 中的图像 2,2
    • Remove the top housing LED 3-Pin connector that is near the main board.

  8. Razer Naga Trinity LED Light Ribbon Cable Replacement, LED Light Ribbon Cable: 步骤 8 中的图像 1,2 Razer Naga Trinity LED Light Ribbon Cable Replacement, LED Light Ribbon Cable: 步骤 8 中的图像 2,2
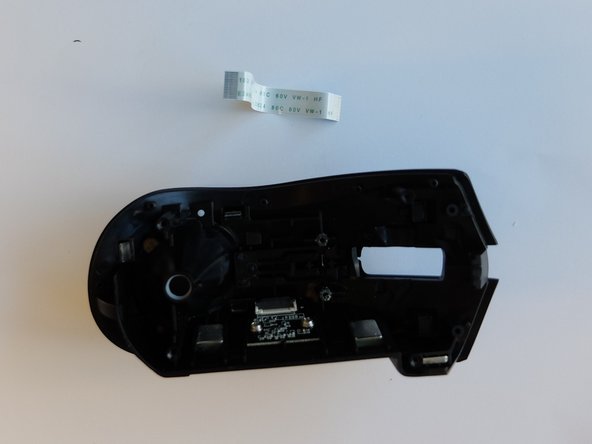
    • Using the flat end of a spudger, unlock the ribbon cable holding the clips.

    • Remove the ribbon cable.

结论

To reassemble your device, follow these instructions in reverse order.

0条评论

添加评论

浏览统计数据:

过去 24 小时: 3

过去 7 天: 4

过去 30 天: 18

总计 1,503