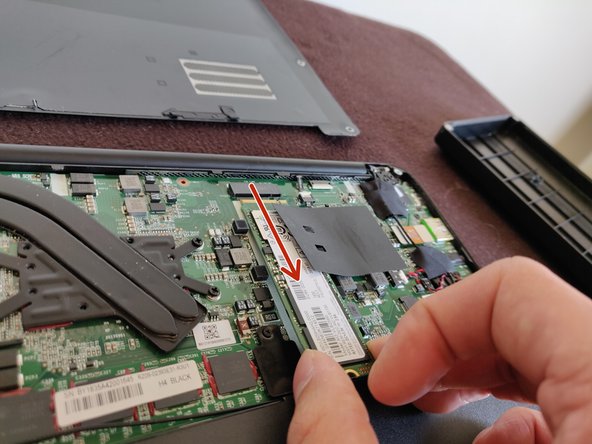
跳转到主内容

Razer Blade Stealth 2017 SSD Replacement

已存档的指南
本指南只作为历史记录保留。请使用指南的最新版本来进行维修。

你所需要的

  1. Razer Blade Stealth 2017 SSD Replacement, SSD: 步骤 1 中的图像 1,1
    • Use a Torx T5 screwdriver to remove the eight, 3mm screws on the bottom cover of the laptop.

    • Whenever removing screws from the device, remember to save and label them.

    • Ensure the laptop is fully powered off before beginning!

  2. Razer Blade Stealth 2017 SSD Replacement: 步骤 2 中的图像 1,1
    • Remove the bottom cover of the laptop by sliding it away from the hinge.

    • Do not force the cover up!

  3. Razer Blade Stealth 2017 SSD Replacement: 步骤 3 中的图像 1,1
    • Use the Philips #00 screwdriver to remove the screw securing the SSD.

  4. Razer Blade Stealth 2017 SSD Replacement: 步骤 4 中的图像 1,1
    • Gently lift the side where you just removed the screw.

    • Do not lift the SSD too much or you might cause damage to your SSD, or your computer.

  5. Razer Blade Stealth 2017 SSD Replacement: 步骤 5 中的图像 1,1
    • Gently pull the SSD towards you to remove it

  6. Razer Blade Stealth 2017 SSD Replacement: 步骤 6 中的图像 1,2 Razer Blade Stealth 2017 SSD Replacement: 步骤 6 中的图像 2,2
    • Congratulations! You can now insert the desired SSD M.2 drive that you desire. Install it in the port you just freed.

结论

To reassemble your device, do what you just did but in reverse order, and BAM, more storage.

另外一个人完成了本指南。

Joaquin RP

于03/13/20注册

133 声望

撰写一个指南

0指南评论

添加评论

浏览统计数据:

过去 24 小时: 0

过去 7 天: 0

过去 30 天: 0

总计 67