跳转到主内容

PowerBook G4 Aluminum 17" 1-1.67 GHz Display Inverter Replacement

你所需要的

  1. PowerBook G4 Aluminum 17" 1-1.67 GHz Display Inverter Replacement, Rear Display Bezel: 步骤 1 中的图像 1,2 PowerBook G4 Aluminum 17" 1-1.67 GHz Display Inverter Replacement, Rear Display Bezel: 步骤 1 中的图像 2,2
    • Remove the two 6.3 mm Phillips screws near the lower left and right corners of the display.

    • Removing these two screws may be difficult. It is helpful to open the display as much as possible for clearance to use a screwdriver. Also, a combination of #00 Phillips and small flathead screwdrivers along with a pair of tweezers may aid in removal.

  2. PowerBook G4 Aluminum 17" 1-1.67 GHz Display Inverter Replacement: 步骤 2 中的图像 1,1
    • The picture at left (rear panel already removed) shows the locations of the metal clips (shown in red) that snap on to the front display bezel. In the next few steps, you will use a small flathead screwdriver to release these clips from a ridge around the perimeter of the front display bezel.

    • When prying in the following steps, be sure not to damage the antenna cables that run around the perimeter of the front display bezel.

  3. PowerBook G4 Aluminum 17" 1-1.67 GHz Display Inverter Replacement: 步骤 3 中的图像 1,3 PowerBook G4 Aluminum 17" 1-1.67 GHz Display Inverter Replacement: 步骤 3 中的图像 2,3 PowerBook G4 Aluminum 17" 1-1.67 GHz Display Inverter Replacement: 步骤 3 中的图像 3,3
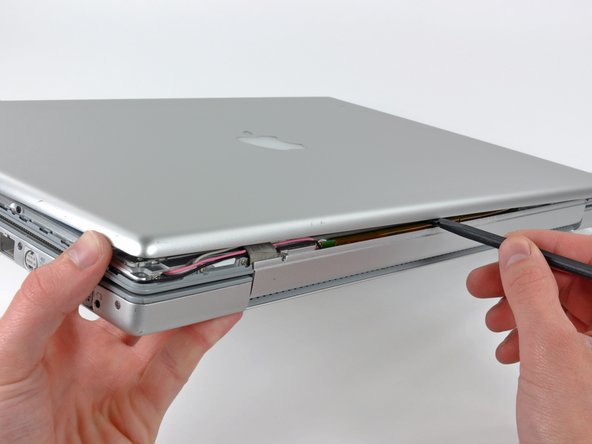
    • Insert the flat end of a spudger between the rear display bezel and the plastic rim attached to the front display bezel near the lower right corner of the display.

    • Do not try to insert the spudger between the front display bezel and its plastic surround.

    • While carefully prying the rear display bezel away from the display assembly, use a small flathead screwdriver to pry the small steel clip nearest the bottom right corner of the display away from the edge of the front display bezel.

    • Repeat the above procedure until you've released all the clips along the right side of the display.

  4. PowerBook G4 Aluminum 17" 1-1.67 GHz Display Inverter Replacement: 步骤 4 中的图像 1,1
    • Slightly lift the recently-freed corner of the rear display bezel to separate the clips with a spudger along the span of the clutch hinges.

  5. PowerBook G4 Aluminum 17" 1-1.67 GHz Display Inverter Replacement: 步骤 5 中的图像 1,2 PowerBook G4 Aluminum 17" 1-1.67 GHz Display Inverter Replacement: 步骤 5 中的图像 2,2
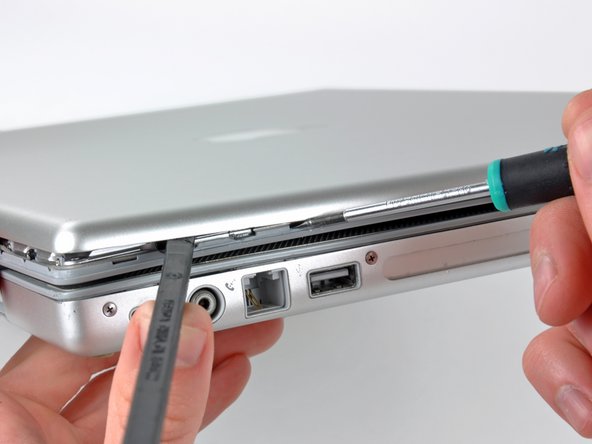
    • Insert the flat end of a spudger between the rear display bezel and the plastic surround of the front display bezel near the lower left corner of the display.

    • Carefully pry the rear display bezel away from the front display bezel to expose the metal clips along the left side of the display.

    • Repeat the previous procedure to release the clips along the left side of the rear display bezel.

  6. PowerBook G4 Aluminum 17" 1-1.67 GHz Display Inverter Replacement: 步骤 6 中的图像 1,2 PowerBook G4 Aluminum 17" 1-1.67 GHz Display Inverter Replacement: 步骤 6 中的图像 2,2
    • Slightly lift the lower edge of the rear display bezel and push it toward the top edge of the display, releasing the clips along the top edge of the rear display bezel.

    • Remove the rear display bezel and set it aside.

  7. PowerBook G4 Aluminum 17" 1-1.67 GHz Display Inverter Replacement, Display Inverter: 步骤 7 中的图像 1,1
    • If necessary, remove the tape covering the display inverter.

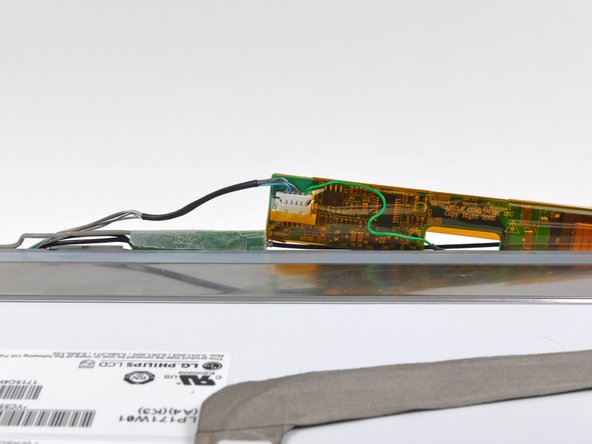
    • Carefully lift the display inverter board from the side nearest the display data cable connector.

    • The display inverter is an extremely thin circuit board that is easily broken. Do not excessively bend or twist it during removal.

  8. PowerBook G4 Aluminum 17" 1-1.67 GHz Display Inverter Replacement: 步骤 8 中的图像 1,2 PowerBook G4 Aluminum 17" 1-1.67 GHz Display Inverter Replacement: 步骤 8 中的图像 2,2
    • Use your fingernails to pull the ears on both sides of the inverter cable connector away from its socket on the inverter board.

  9. PowerBook G4 Aluminum 17" 1-1.67 GHz Display Inverter Replacement: 步骤 9 中的图像 1,1
    • Carefully lift the display inverter out of the clutch cover.

    • Don't try to remove the inverter just yet. It is still attached via the backlight cables.

  10. PowerBook G4 Aluminum 17" 1-1.67 GHz Display Inverter Replacement: 步骤 10 中的图像 1,2 PowerBook G4 Aluminum 17" 1-1.67 GHz Display Inverter Replacement: 步骤 10 中的图像 2,2
    • Use your fingers to pull the backlight connector away from its socket on the inverter board.

    • Remove the display inverter from the display assembly.

结论

To reassemble your device, follow these instructions in reverse order.

附加文件

0条评论

添加评论

浏览统计数据:

过去 24 小时: 0

过去 7 天: 3

过去 30 天: 19

总计 8,284