跳转到主内容

Poin2 Chromebook 11 Touchpad Replacement

你所需要的

  1. Poin2 Chromebook 11 Touchpad Replacement, Battery: 步骤 1 中的图像 1,2 Poin2 Chromebook 11 Touchpad Replacement, Battery: 步骤 1 中的图像 2,2
    • Power down the Poin2 Chromebook 11 and disconnect the power adapter.

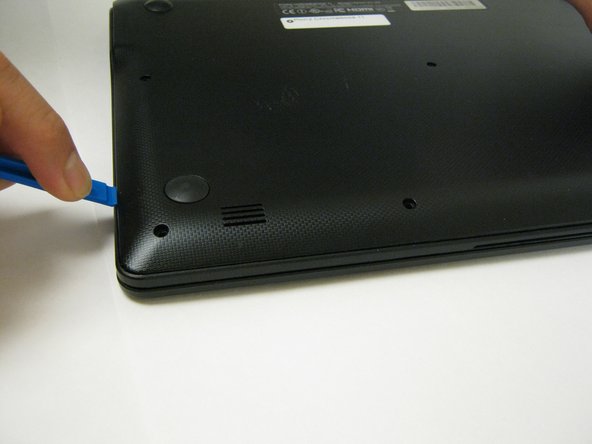
    • Close the Chromebook and position it with the base facing up.

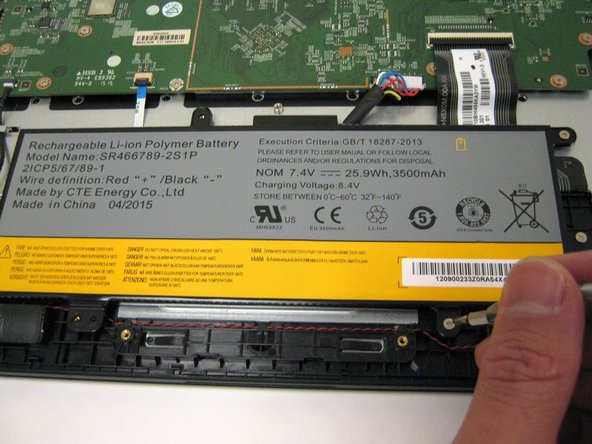
    • Use a #0 Phillips screwdriver to unscrew the ten 7mm screws that hold the base to the rest of the frame

    • Poin2 Chromebook 11 does not have screws under its rubber feet at the base.

  2. Poin2 Chromebook 11 Touchpad Replacement: 步骤 2 中的图像 1,3 Poin2 Chromebook 11 Touchpad Replacement: 步骤 2 中的图像 2,3 Poin2 Chromebook 11 Touchpad Replacement: 步骤 2 中的图像 3,3
    • Insert a 1cm-wide plastic opening tool between the base and top frame.

    • Applying pressure up and down with the tool may be necessary. When you hear a "click," this indicates the separation of the frame.

    • Pry (up and down) around the entire border of the Chromebook to separate.

    • Use your hands to gently lift the base away from the frame.

  3. Poin2 Chromebook 11 Touchpad Replacement: 步骤 3 中的图像 1,3 Poin2 Chromebook 11 Touchpad Replacement: 步骤 3 中的图像 2,3 Poin2 Chromebook 11 Touchpad Replacement: 步骤 3 中的图像 3,3
    • Disconnect the white 8-wire battery connector from the motherboard using a spudger to push the two L-shaped clips out of the port.

    • The connector is a tight fit and requires careful pressure for release.

  4. Poin2 Chromebook 11 Touchpad Replacement: 步骤 4 中的图像 1,2 Poin2 Chromebook 11 Touchpad Replacement: 步骤 4 中的图像 2,2
    • Remove the six 4mm screws using a Phillips #0 screwdriver.

  5. Poin2 Chromebook 11 Touchpad Replacement: 步骤 5 中的图像 1,1
    • Lift the battery from the frame.

  6. Poin2 Chromebook 11 Touchpad Replacement, Touchpad: 步骤 6 中的图像 1,3 Poin2 Chromebook 11 Touchpad Replacement, Touchpad: 步骤 6 中的图像 2,3 Poin2 Chromebook 11 Touchpad Replacement, Touchpad: 步骤 6 中的图像 3,3
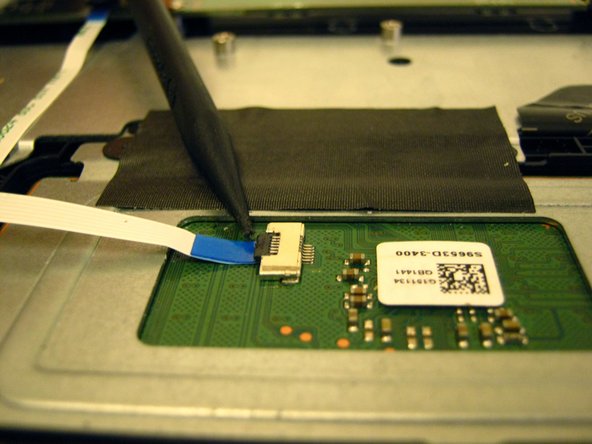
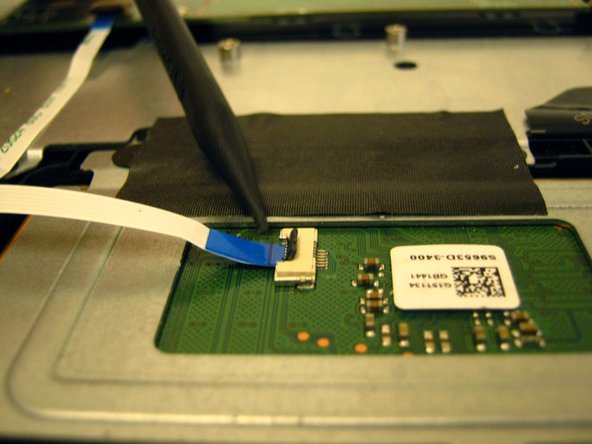
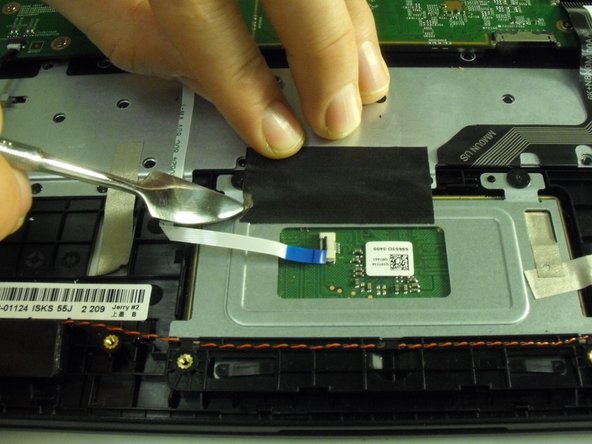
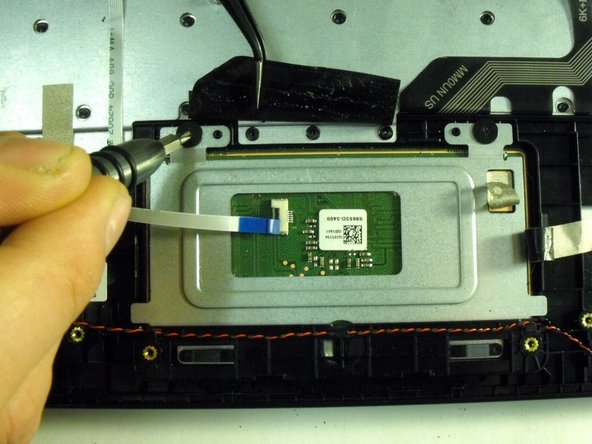
    • Locate the ZIF connector on the touchpad's circuit board.

    • Use the tip of the spudger to flip the locking flap to the perpendicular position and pull the cable out.

    • See also the Connectors Guide for detailed instructions, as well as iFixit's cable connectors guide.

  7. Poin2 Chromebook 11 Touchpad Replacement: 步骤 7 中的图像 1,3 Poin2 Chromebook 11 Touchpad Replacement: 步骤 7 中的图像 2,3 Poin2 Chromebook 11 Touchpad Replacement: 步骤 7 中的图像 3,3
    • Remove the black tape holding down the touchpad.

    • Remove the strips of gold electrostatic tape also holding down the touchpad.

    • Use a metal spudger or tweezers to help pry up the corners of the tape, but be careful not to use to much force or risk damaging the heat sink.

    • Applying new tape is suggested, but the tape can be re-used.

  8. Poin2 Chromebook 11 Touchpad Replacement: 步骤 8 中的图像 1,2 Poin2 Chromebook 11 Touchpad Replacement: 步骤 8 中的图像 2,2
    • Use a Phillips #00 screwdriver to remove the two 2 mm screws securing the metal plate that holds the touchpad in place

  9. Poin2 Chromebook 11 Touchpad Replacement: 步骤 9 中的图像 1,1
    • Slide the touchpad plate in the direction of the screw holes to free the plates bottom edge from under the plastic frame.

  10. Poin2 Chromebook 11 Touchpad Replacement: 步骤 10 中的图像 1,1
    • Remove touchpad from the opposite side of the metal plate.

结论

To reassemble your device, follow these instructions in reverse order.

0条评论

添加评论

浏览统计数据:

过去 24 小时: 0

过去 7 天: 0

过去 30 天: 0

总计 232