跳转到主内容

你所需要的

这个拆解是不是维修指南。 要维修你的的PlayStation Vita,请使用我们的维修手册

  1. PlayStation Vita拆解, PlayStation Vita拆解: 步骤 1 中的图像 1,1
    • 这是一台 SONY PS Vita。当然一定程度上它看起来像是一台旧的 PSP 设备,但是它包含了一些很酷的新特性:

    • ARM架构Cortex-A9四核心中央处理器

    • SGX543MP4 + 四核绘图处理器

    • 512 MB RAM(运行内存)+128 MB(显存)

    • 5 寸全彩多点触控OLED屏幕运行24位彩色,960 x 544像素,16:9 显示和后电容多点触摸板。

    • 前端相机,背面相机 最大分辨率: 640×480(VGA)

    • 两个模拟操纵杆

  2. PlayStation Vita拆解: 步骤 2 中的图像 1,3 PlayStation Vita拆解: 步骤 2 中的图像 2,3 PlayStation Vita拆解: 步骤 2 中的图像 3,3
    • PSV正面有四个菱形布局的不同图案的按键(△键/○键/□键/×键),一组十字方向键,两个类比摇杆。如果您觉得这还不够,别忘了还有两个肩键,以及位于两个摇杆或者屏幕下方的三个小按键。

    • PSV的底部有充电接口、耳机接口,以及内存卡槽。

    • PSV的顶部装饰着音量调整键、电源键、游戏卡带插槽,以及配件插槽。

    • 您的配件也许会有更多的功能并且看上去不那么花里胡哨。

  3. 这个步骤还没有翻译 帮忙翻译一下

    PlayStation Vita拆解: 步骤 3 中的图像 1,1
    • When we turn the Vita over, we are instantly thrilled to see a secret code!

    • It appears to be a cheat code. We postulate that pressing all of the action buttons in order, starting with the triangle and rotating clockwise -- roughly 410 times -- will give you unlimited lives, moneys, manas, likes, whatever!

    • Apparently the hidden cheat code does more than make your team in NFL Blitz 12 into a pack of running hotdogs. For the first time, this handheld device actually has a rear capacitive multi-touch pad. Curious how it could be used? Check out this demonstration!

    • Above the rear touchpad lies the first camera ever seen in a handheld PlayStation device.

  4. PlayStation Vita拆解: 步骤 4 中的图像 1,1
    • “哪种内存卡可以在我的PSV中正常工作?”我们给您一个提示:有标记到“Sony PS Vita”的。

    • 不要被PSV内存卡的尺寸和形状愚弄了。尽管它看起来与周围那些microSD卡很相似,但它们是完全不兼容的。没错,如果您需要更多的储存,您就得去买索尼专门的内存卡。

    • 以上同样适用于游戏卡带。卡带看起来很像SD卡,但它的引脚和形状的不同都使得它们完全不可能兼容。抱歉了破解。

  5. PlayStation Vita拆解: 步骤 5 中的图像 1,2 PlayStation Vita拆解: 步骤 5 中的图像 2,2
    • 3G版本的PSV能够通过WiFi或者正确插入SIM卡连接至AT&T 3G网络的方式连接至互联网。

    • 目前索尼仅提供AT&T的按月数据套餐服务。

  6. 这个步骤还没有翻译 帮忙翻译一下

    PlayStation Vita拆解: 步骤 6 中的图像 1,3 PlayStation Vita拆解: 步骤 6 中的图像 2,3 PlayStation Vita拆解: 步骤 6 中的图像 3,3
    • Common Phillips #00 screws hold the case halves together. All are easily accessible, though two are cleverly hidden under the accessory port cover.

    • 10 points to Gryffindor!

  7. PlayStation Vita拆解: 步骤 7 中的图像 1,2 PlayStation Vita拆解: 步骤 7 中的图像 2,2
    • 我们拆下了所有的螺丝,但外壳仍然紧紧固定住。哦好吧,如果它自己会给自己打开那拆解还有什么意思呢?我们更喜欢有点挑战。

    • 我们的塑料开启工具很容易就把外壳撬开并展现出内部装配着的大量电子零件。

  8. 这个步骤还没有翻译 帮忙翻译一下

    PlayStation Vita拆解: 步骤 8 中的图像 1,2 PlayStation Vita拆解: 步骤 8 中的图像 2,2
    • The battery is secured to the back case with a pair of Phillips #00 screws and... well that's it. There's no adhesive!

    • The Vita's battery runs at a standard 3.7 V and packs an impressive 2210 mAh punch.

    • We're confident that between the Wi-Fi, Bluetooth, 3G, 5" qHD display and two touch pads, every bit of capacity in the battery will be put to good use.

  9. PlayStation Vita拆解: 步骤 9 中的图像 1,2 PlayStation Vita拆解: 步骤 9 中的图像 2,2
    • 从这些杂乱的无线天线接线就能很容易找到无线网卡。

    • 用我们这魔术撬棒轻翘取下无线网卡以观察。

  10. PlayStation Vita拆解: 步骤 10 中的图像 1,1
    • 如同做外科手术一样细致和小心,我们从无线网卡上移除屏蔽罩后展现出来的是:

    • 高通PM8028电源管理芯片

    • 安华高 ACPM-7868线性四频段功放模块

    • 爱普科斯7964表面声波双向器

    • 安华高 ACPM-5001 CDMA band 1功放模块

    • 安华高 ACPM-5002 CDMA band 2功放模块

    • 安华高 ACPM-5005 CDMA band 5功放模块

    • 安华高 ACPM-5008 CDMA band 8功放模块

  11. PlayStation Vita拆解: 步骤 11 中的图像 1,1
    • 让我们把注意力放到无线网卡的背面,我们可以找到:

    • 高通MDM6200,支持HSPA+速度最高可达14.4Mbps

    • 东芝TY890A111222KA 移动SDR SDRAM

    • 索尼CXM3555ER天线开关模块

  12. PlayStation Vita拆解: 步骤 12 中的图像 1,2 PlayStation Vita拆解: 步骤 12 中的图像 2,2
    • PSV非常模块化,让我们看看这些接口!

    • 所有部件用一个扁平电缆或者用PCB连接会使得维修困难且成本高。PSV的部件都是单独分开的,维修起来应该会很简单。

    • 我们分离了几个接线以从PSV众多部件中拆卸下SIM卡主板。

  13. 这个步骤还没有翻译 帮忙翻译一下

    PlayStation Vita拆解: 步骤 13 中的图像 1,2 PlayStation Vita拆解: 步骤 13 中的图像 2,2
    • Recruiting the help of our spudger, we remove the rear-facing camera.

    • Though the Vita is the first Sony handheld device to boast a camera, you shouldn't cancel your D800 pre-order quite yet. The 640x480 pixel VGA quality (0.3 MP) camera isn't likely to wow the folks browsing your Flickr stream.

    • On a related note, the camera is of perfect quality to turn your world into an Augmented Reality.

  14. PlayStation Vita拆解: 步骤 14 中的图像 1,3 PlayStation Vita拆解: 步骤 14 中的图像 2,3 PlayStation Vita拆解: 步骤 14 中的图像 3,3
    • 在大量的拆卸工作后,我们碰到了我们的宿敌:黏着剂!

    • 我们使用我们信任的塑料开启工具很容易就从与该死的胶水大战中胜利,我们得以将后部的多点触控板从它的边框上分开。

    • 我们找到装配在后置触控板上的是爱梅特尔触屏控制器。

  15. 这个步骤还没有翻译 帮忙翻译一下

    PlayStation Vita拆解: 步骤 15 中的图像 1,2 PlayStation Vita拆解: 步骤 15 中的图像 2,2
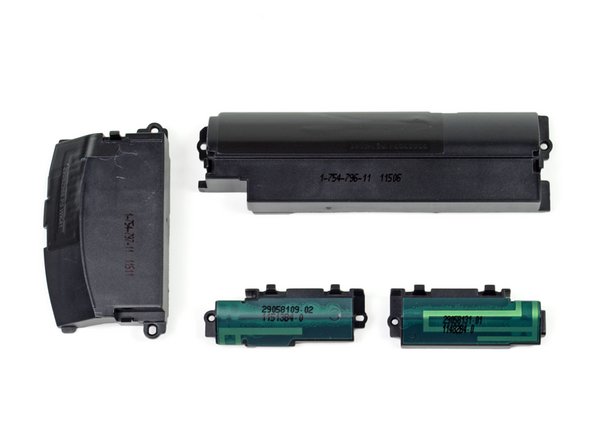
    • Once the back case is off, components start flying out of the PS Vita faster than you can say "PlayStation."

    • The speakers come out without much fuss thanks in part to their pressure contacts. These types of connections are common in devices where space is a concern and there's no room for routing and soldering speaker wires.

    • With many modes of connectivity comes a whole bundle of antennas. Head-to-head gaming sure has come a long way.

  16. PlayStation Vita拆解: 步骤 16 中的图像 1,2 PlayStation Vita拆解: 步骤 16 中的图像 2,2
    • 肩键非常容易拆卸,简单的模块化设计。意味着更容易且更便宜的维修。

    • 如果它没有坏,就不要去修它。索尼在PSV的左右肩键上沿用了最早的PSP肩键设计。

  17. PlayStation Vita拆解: 步骤 17 中的图像 1,2 PlayStation Vita拆解: 步骤 17 中的图像 2,2
    • 按键电路板仅被几个螺丝固定住。

    • PSV的控制电路板可以分成数个小部件,进一步增强了设备的可维修性。

  18. PlayStation Vita拆解: 步骤 18 中的图像 1,3 PlayStation Vita拆解: 步骤 18 中的图像 2,3 PlayStation Vita拆解: 步骤 18 中的图像 3,3
    • 随着我们从主板上拆卸下螺丝,我们慢慢发现...

    • 彩色的螺丝!粉色的螺丝负责固定主板,而蓝色的螺丝负责将其他配件固定住。

    • 就像螺丝男孩和螺丝女孩开派对一般!

    • 看完这些彩色的螺丝后,我们提起主板,并将主板和OLED显示屏以及触屏从接线处分开。

  19. PlayStation Vita拆解: 步骤 19 中的图像 1,2 PlayStation Vita拆解: 步骤 19 中的图像 2,2
    • 用撬棒加上一点点的力就能把前置摄像头从主板上卸下。

    • 这个小摄像头和后置摄像头的兄弟一样只有640 x 480的像素。

  20. PlayStation Vita拆解: 步骤 20 中的图像 1,2 PlayStation Vita拆解: 步骤 20 中的图像 2,2
    • 随着主板全部被拆解下来,我们可以开始看看上面的芯片了:

    • 索尼CXD5315GG四核处理器以及系统内存

    • 三星KLM4G1FE3A-F001 NAND闪存

    • 富士通MB44C026A

    • 迈威科技88W878S-BKB2 Avastar无线局域网/蓝牙/FM单芯片SoC

    • 欧胜微电子WM1803E音频解码芯片

    • 意法半导体3GA51H陀螺仪

    • Kionix KXTC9三轴微系统加速度计

  21. 这个步骤还没有翻译 帮忙翻译一下

    PlayStation Vita拆解: 步骤 21 中的图像 1,3 PlayStation Vita拆解: 步骤 21 中的图像 2,3 PlayStation Vita拆解: 步骤 21 中的图像 3,3
    在这个步骤中使用的工具:
    iFixit Opening Picks (Set of 6)
    $4.99
    购买
    • We baked our Vita in order to separate the front plastic (and fused OLED display) from the frame. Our quick recipe for frame removal:

    • Pre-heat oven to 200 F.

    • Place PS Vita front panel assembly in the oven and set timer for 10 minutes.

    • Remove the PS Vita from the oven and carefully peel the plastic off the front case using several guitar picks. Watch out -- it's hot!

    • Take 10 points back from Gryffindor.

    • Baking electronics: much easier than baking bread. All the ingredients are pre-mixed!

  22. 这个步骤还没有翻译 帮忙翻译一下

    PlayStation Vita拆解: 步骤 22 中的图像 1,3 PlayStation Vita拆解: 步骤 22 中的图像 2,3 PlayStation Vita拆解: 步骤 22 中的图像 3,3
    • The front plastic and OLED display slowly came off from the frame. Note that the OLED display is fused to the plastic, making this procedure very precarious.

    • Underneath we find another Atmel mXT224 touchscreen controller, which has graced tons of teardown devices in the past, including this one!

    • We also found a grid of what appears to be a smörgåsbord of capacitors, resistors (and one lonely diode) under the frame. Interesting...

  23. 这个步骤还没有翻译 帮忙翻译一下

    PlayStation Vita拆解: 步骤 23 中的图像 1,2 PlayStation Vita拆解: 步骤 23 中的图像 2,2
    • After much deliberation, the council of iFixit has deemed appropriate a reparability score of 8 out of 10.

    • All screws are standard Phillips #00. No security or proprietary bits here.

    • Modular design means lower repair costs because small parts can be replaced individually.

    • Only one component was held in place with adhesive: the rear touch panel.

    • Battery is not easily accessible, but it is definitely serviceable by the average user armed with the appropriate screwdriver.

    • The front plastic is fused to the OLED (and difficult to separate from the frame), making replacement of the display more expensive.

由衷感谢以下译者:

en zh

68%

这些译者帮助我们修补全世界! 您也想加入吗?
开始翻译 ›

31条评论

I am just curious, is it possible to replace the PSVita 2000 LCD screen with the OLED screen of the regular Vita?

z4n7h3r - 回复

No it aint possible

Damian -

where do you get one of the wireless cards

omer minhaj - 回复

can someone tell where is the sixaxis motion sensor located?

aliefbimo adipancoro - 回复

It's the gyroscope it is on the mother board

scruffy dynamite -

添加评论

浏览统计数据:

过去 24 小时: 41

过去 7 天: 318

过去 30 天: 1,422

总计 270,438