跳转到主内容

当前版本的文档还未经巡查,您可以查看最新的已查核版本

你所需要的

  1. , 供电变压器组件: 步骤 1 中的图像 1,2 , 供电变压器组件: 步骤 1 中的图像 2,2
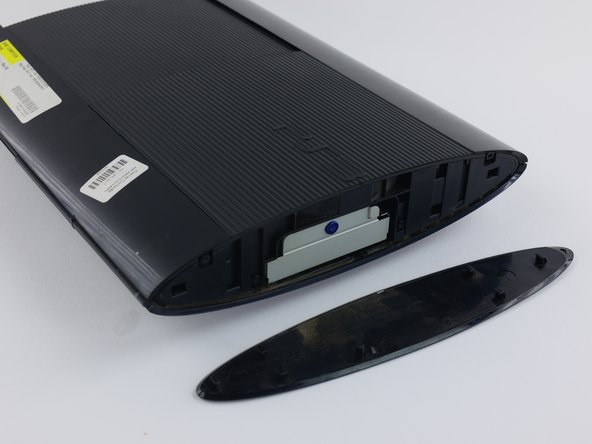
    • 向后推硬盘盒的盖子来移除它

    • 盖子位于设备的右侧

  2. : 步骤 2 中的图像 1,2 : 步骤 2 中的图像 2,2
    • 使用T-8 六角螺丝刀拧下3颗黑色9.8毫米长的螺丝

    • 使用飞利浦#1螺丝刀拧下蓝色7.9毫米长的螺丝

  3. : 步骤 3 中的图像 1,2 : 步骤 3 中的图像 2,2
    • 拉出硬盘盒

    • 卸下的硬盘盒要放在安全的地方以避免数据损坏

  4. : 步骤 4 中的图像 1,2 : 步骤 4 中的图像 2,2
    • 在设备底部,使用金属的小撬棍,撬下3个橡胶防滑底座

    • 使用十字螺丝刀拧下4个长度为36.3毫米的螺丝

    • 其中一颗螺丝隐藏在保修贴纸下面,你可以撕掉它或用螺丝刀穿破它。

  5. : 步骤 5 中的图像 1,2 : 步骤 5 中的图像 2,2
    • 在设备的正面的最右侧,使用撬棍工具插入前盖板与设备之间的缝隙,撬开其塑料卡扣

    • 第二个卡扣位置如图所示

    • 使用开机片向左滑动,撬开所有的卡扣

    • 这是此维修指南中最难的步骤,如果你打不开这些卡扣,你可以尝试大力出奇迹,注意,你会很容易的损坏他们,您自行承担风险。

  6. : 步骤 6 中的图像 1,1
    • 按压右侧并向左推动可以移除后面板

  7. : 步骤 7 中的图像 1,3 : 步骤 7 中的图像 2,3 : 步骤 7 中的图像 3,3
    • 使用十字螺丝刀拧下5颗长度为20.8毫米的银色螺丝

    • 在光驱旁边,使用六角螺丝刀拧下2颗长度为9.9毫米的螺丝

    • 移除上盖

  8. : 步骤 8 中的图像 1,3 : 步骤 8 中的图像 2,3 : 步骤 8 中的图像 3,3
    • 向旁边移开光驱可以看见一颗长度为8.8毫米的银色螺丝

    • 使用十字螺丝刀拧下它

  9. : 步骤 9 中的图像 1,3 : 步骤 9 中的图像 2,3 : 步骤 9 中的图像 3,3
    • 拔出白色的插头

    • 注意:拔时要抓塑料的连接头,而不是线

    • 卸下电源组件。(竖直向上提起电源,可能需要一点点力气)

  10. , 光驱: 步骤 10 中的图像 1,3 , 光驱: 步骤 10 中的图像 2,3 , 光驱: 步骤 10 中的图像 3,3
    • 向上提分离白色连接线,使其与底座分离

    • 抓住黑色卡片,拔出黑蓝连接线

  11. : 步骤 11 中的图像 1,3 : 步骤 11 中的图像 2,3 : 步骤 11 中的图像 3,3
    • 180度旋转设备

    • 从底座上拔出黑白连接线

    • 卸下光驱

  12. 这个步骤还没有翻译 帮忙翻译一下

    : 步骤 12 中的图像 1,3 : 步骤 12 中的图像 2,3 : 步骤 12 中的图像 3,3
    • Lift up the free end of the laser lens to separate the two layers.

    • On the bottom of the laser lens, flip up the black plastic latch to remove the flex ribbon cable.

  13. 这个步骤还没有翻译 帮忙翻译一下

    : 步骤 13 中的图像 1,3 : 步骤 13 中的图像 2,3 : 步骤 13 中的图像 3,3
    • Remove the 4 rubber bushings.

    • Remove the metal faceplate from the laser lens.

    • When inserting your new lens, attach the top metal casing to the replacement laser lens.

终点

6等其他人完成本指南。

Joseph O'Connor

于04/14/16注册

2,383 声望

创作了5篇指南

团队

Cal Poly, Team 34-13, Maness Spring 2016 Cal Poly, Team 34-13, Maness Spring 2016 的会员

CPSU-MANESS-S16S34G13

4 名成员

创作了21篇指南

6条评论

so i did follow this to a tee and not only does the laser not want to work but it keeps makeing this buzzing sound whenever the disk tray is closed

is there something i might be doing wrong

dave raschke - 回复

Very Good but please show us how to remove lens only

wtersad - 回复

like the video,

Where is the parts purchased from?

Thanks Joe

jdpassanisi - 回复

Laser is KEM-850a. You can order them from ebay. gamesunlimited and ep game supply are good stores. You can also order these from groupvertical.com or sourcleyplus.com

Eddie Switek -

I am replacing the optical drive in my console. But didn't note where the drive ribbon was positioned!? Every video I have found, they just pop right in...my original and replacement drives, have larger receptacles than the ribbon it self. There are at least 5 pins, that don't have (potentially) anything connecting them, to the ribbon. I don't want to randomly place the ribbon in one of the possible (7?) positions and fry something in the process...so where do I connect the smaller ribbon?!

Robert Shelton - 回复

添加评论

浏览统计数据:

过去 24 小时: 5

过去 7 天: 40

过去 30 天: 168

总计 10,553