跳转到主内容

当前版本的文档还未经巡查,您可以查看最新的已查核版本

你所需要的

  1. , 智能板: 步骤 1 中的图像 1,2 , 智能板: 步骤 1 中的图像 2,2
    • 使用一个撬棒的尖端从PS3的侧面去除黑色橡胶螺丝盖。

    • 这个螺丝盖也许在保修贴纸的下面。贴纸被移除后将会改变外观并且 显示“无效”(移除保修贴纸将使你的设备失去厂家/商家的保修)。

  2. : 步骤 2 中的图像 1,1
    • 从智能板上取下一个8.5毫米的T10安全Torx螺丝钉。

  3. : 步骤 3 中的图像 1,3 : 步骤 3 中的图像 2,3 : 步骤 3 中的图像 3,3
    • 把智能板拉向硬盘驱动器,然后把它从PS3主体上抬起并且拿下来。

  4. : 步骤 4 中的图像 1,1
    • 请注意一定要注意一下松松地放在顶盖上的小金属支架,如果你的机器配备了这样东西的话。

  5. , 顶盖: 步骤 5 中的图像 1,1
    • 拆卸这图片中的7个螺丝

    • 6个52毫米的菲利普斯螺丝(十字)

    • 1个30毫米的菲利普斯螺丝(十字)

  6. : 步骤 6 中的图像 1,1
    • 从后边缘抬起顶盖并且把它旋转到PS3的前部。

    • 拆掉顶盖

  7. , 蓝光驱动器: 步骤 7 中的图像 1,1
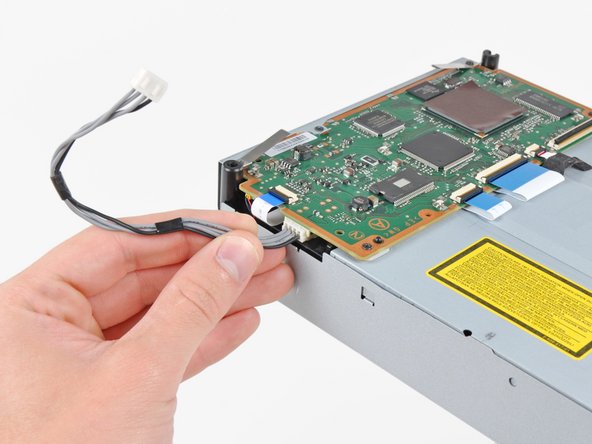
    • 从主板断开蓝光的电缆

    • 如图,将插头垂直拉出插座

  8. : 步骤 8 中的图像 1,1
    • 从最靠近电源的边缘抬起蓝光驱动器,并且把它从机箱旋转到足够接近带状电缆。

  9. : 步骤 9 中的图像 1,3 : 步骤 9 中的图像 2,3 : 步骤 9 中的图像 3,3
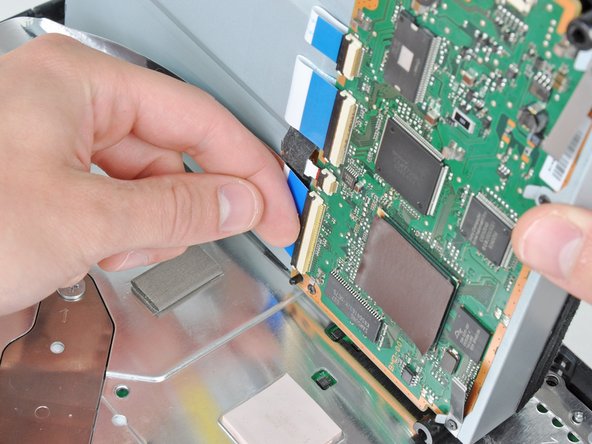
    • 用你的指甲在蓝光带状电缆插座上翻转固定襟翼。

    • 确保翘起襟翼而不是插座本身。

    • 把带状电缆从插座上拔出。

    • 从PS3上取下蓝光光驱。

    • 如果更换新的蓝光驱动器,请将电源移到您新的驱动器上。

  10. , 主板: 步骤 10 中的图像 1,1
    • 将控制板上的带状电缆直接从主板上的插座中拔出。

  11. : 步骤 11 中的图像 1,2 : 步骤 11 中的图像 2,2
    • 拆掉两个12毫米的Phillips螺丝,把控制板固定到底部外壳。

    • 从PS3上拆掉控制板以及它的附属电缆。

  12. : 步骤 12 中的图像 1,1
    • 拆掉图中8个螺丝把主板组件固定到较低外壳上。

    • 7个12毫米菲利普斯螺丝

    • 1个30毫米的菲利普斯螺丝

  13. : 步骤 13 中的图像 1,1
    • 拆下主板支架。

  14. : 步骤 14 中的图像 1,2 : 步骤 14 中的图像 2,2
    • 用撬棍的平底撬起硬盘驱动器支架使其远离低的一端。

    • 拆下硬盘盖。

  15. : 步骤 15 中的图像 1,1
    • 从底板上抬起主板组件。

  16. 这个步骤还没有翻译 帮忙翻译一下

    : 步骤 16 中的图像 1,1
    • Disconnect the PRAM battery from the motherboard.

    • Be careful when separating the connector from its socket, as the socket easily breaks of the motherboard. If possible, hold down the socket as you lift the connector.

  17. 这个步骤还没有翻译 帮忙翻译一下

    : 步骤 17 中的图像 1,3 : 步骤 17 中的图像 2,3 : 步骤 17 中的图像 3,3
    • Rotate the PRAM battery counter-clockwise and remove it from the chassis.

终点

23等其他人完成本指南。

7条评论

Ok…tell me why the !&&* the PRAM battery doesnt last in these %#*@ ps3's…they should have to replace this $@$* for free. My ps3 is lucky if it has 60 hours on it…I made sure it didn't go more than 2 months without playing it. Now I have to pay Sony to fix this $@$*. I'm !#^&@@ cause I paid $500 for this %#*@ thing when it came out. If anyone knows anything I don't…please email me at tadheath95@gmail.com put in the subject…..”about ur broken ps3’. Thank you in advance!!!

Tad heath - 回复

Hey Tad the ps3 was made 9 years ago a cmos battery lasts 8-10.

Steven Van -

The PS3 is over ten years old, way past the average life span of a lithium battery (up to 10 years). Maybe a tad shortsighted of them to embed it so deeply into the console but at least they put it somewhere that decreases the chances of damage if it leaks. That’s worlds apart from the original Xbox where they used capacitors that failed and trashed the motherboard. Xbox 360 I believe doesn’t even have the facility to retain the date/time and had far more serious issues.

alexatkin - 回复

its insane that its buried so deep on the ps3, the Wii and Wii U both had a draw on the side with one screw to remove to replace the battery!

Steve Fox -

This guide didn’t work for my PS3 (fat). I dismantled the PS3 up to the motherboard, and found the PRAM battery there, directly on the motherboard itself, no connector attached. The video https://www.youtube.com/watch?v=yn1OqCw-... was a huge help in combination with this guide.

Johan Janssens - 回复

添加评论

浏览统计数据:

过去 24 小时: 23

过去 7 天: 197

过去 30 天: 740

总计 97,135