跳转到主内容

当前版本的文档还未经巡查,您可以查看最新的已查核版本

你所需要的

  1. , 智能板: 步骤 1 中的图像 1,2 , 智能板: 步骤 1 中的图像 2,2
    • 使用一个撬棒的尖端从PS3的侧面去除黑色橡胶螺丝盖。

    • 这个螺丝盖也许在保修贴纸的下面。贴纸被移除后将会改变外观并且 显示“无效”(移除保修贴纸将使你的设备失去厂家/商家的保修)。

  2. : 步骤 2 中的图像 1,1
    • 从智能板上取下一个8.5毫米的T10安全Torx螺丝钉。

  3. : 步骤 3 中的图像 1,3 : 步骤 3 中的图像 2,3 : 步骤 3 中的图像 3,3
    • 把智能板拉向硬盘驱动器,然后把它从PS3主体上抬起并且拿下来。

  4. : 步骤 4 中的图像 1,1
    • 请注意一定要注意一下松松地放在顶盖上的小金属支架,如果你的机器配备了这样东西的话。

  5. , 顶盖: 步骤 5 中的图像 1,1
    • 拆卸这图片中的7个螺丝

    • 6个52毫米的菲利普斯螺丝(十字)

    • 1个30毫米的菲利普斯螺丝(十字)

  6. : 步骤 6 中的图像 1,1
    • 从后边缘抬起顶盖并且把它旋转到PS3的前部。

    • 拆掉顶盖

  7. 这个步骤还没有翻译 帮忙翻译一下

    : 步骤 7 中的图像 1,2 : 步骤 7 中的图像 2,2
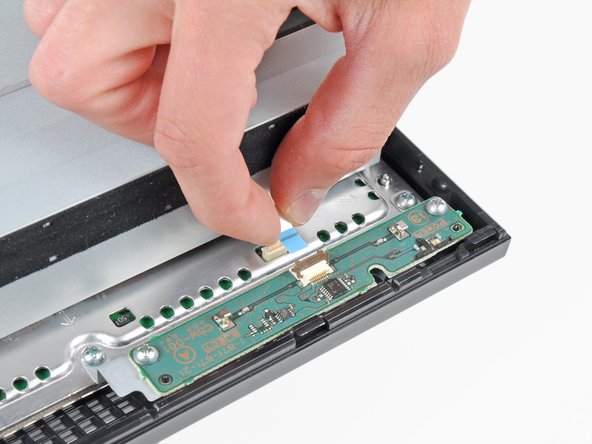
    • Use your fingernail to flip up the retaining flap on the control board ribbon cable socket.

    • Be sure you are prying up on the retaining flap, not the socket itself.

    • Pull the control board ribbon cable out of its socket.

  8. 这个步骤还没有翻译 帮忙翻译一下

    : 步骤 8 中的图像 1,1
    • Remove the two 12 mm Phillips screws securing the control board to the lower case.

  9. 这个步骤还没有翻译 帮忙翻译一下

    : 步骤 9 中的图像 1,1
    • Remove the control board from the lower case.

终点

17等其他人完成本指南。

2条评论

I don't have the same ps3 as in the tutorial and my control board is broken. What can i do now?

McGarvey - 回复

Could anyone tell me if they would have the connection pin of this board, as I would like to fit it into a motherboard.

Allan Fabian Santos Souza - 回复

添加评论

浏览统计数据:

过去 24 小时: 2

过去 7 天: 22

过去 30 天: 110

总计 49,495