跳转到主内容

PlayStation 2 Slimline SCPH-900xx Sensor Phalanx Replacement

你所需要的

  1. PlayStation 2 Slimline SCPH-900xx Sensor Phalanx Replacement, Lower Smart Plate: 步骤 1 中的图像 1,1
    • Turn off your PlayStation 2 and remove the disc and Memory Card.

    • Turn over the PlayStation 2 and put it on a soft surface (e.g. a towel).

  2. PlayStation 2 Slimline SCPH-900xx Sensor Phalanx Replacement: 步骤 2 中的图像 1,1
    • Locate the six covers.

    • Two are located underneath the feet.

    • One cover is located underneath the Void sticker.

  3. PlayStation 2 Slimline SCPH-900xx Sensor Phalanx Replacement: 步骤 3 中的图像 1,1
    • Remove the Void sticker with a Spudger and some cleaning alcohol

    • Removing the Void sticker will void the warranty of your device!

    • Some versions of that console maybe don’t have the sticker or it’s relocated.

  4. PlayStation 2 Slimline SCPH-900xx Sensor Phalanx Replacement: 步骤 4 中的图像 1,2 PlayStation 2 Slimline SCPH-900xx Sensor Phalanx Replacement: 步骤 4 中的图像 2,2
    • Remove the covers by using either a Spudger, Opening Picks or your fingernail.

  5. PlayStation 2 Slimline SCPH-900xx Sensor Phalanx Replacement: 步骤 5 中的图像 1,1
    • Remove the six Phillips #1 screws with a screwdriver.

    • The screws on the right are a bit deeper inside the shell as like the rest but are the same size.

  6. PlayStation 2 Slimline SCPH-900xx Sensor Phalanx Replacement: 步骤 6 中的图像 1,2 PlayStation 2 Slimline SCPH-900xx Sensor Phalanx Replacement: 步骤 6 中的图像 2,2
    • Separate the clips at the front and the overhanging side from their mounting using a Prying Tool.

    • Separate the two halves.

  7. PlayStation 2 Slimline SCPH-900xx Sensor Phalanx Replacement, Sensor Phalanx: 步骤 7 中的图像 1,2 PlayStation 2 Slimline SCPH-900xx Sensor Phalanx Replacement, Sensor Phalanx: 步骤 7 中的图像 2,2
    • Pull the ribbon cable straight out from the socket.

    • To reinstall the cable, hold it near the end and push it straight into the connector, being careful not to kink the cable. If you can, apply the force to the plastic reinforcement rather than the cable itself.

    • Lift the phalanx up and out of the PS2.

结论

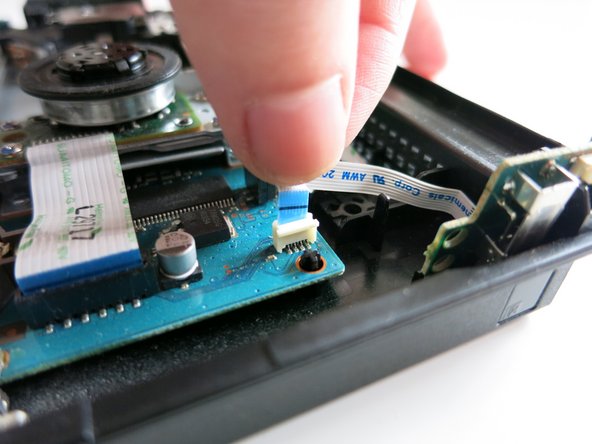
To reassemble your device, follow the above steps in reverse order.

由衷感谢以下译者:

de en

100%

MrJulian正在帮助我们修复这个世界! 您也想加入吗?
开始翻译 ›

MrJulian

于10/22/20注册

1,543 声望

创作了7篇指南

0条评论

添加评论

浏览统计数据:

过去 24 小时: 1

过去 7 天: 7

过去 30 天: 49

总计 479