跳转到主内容

当前版本的文档还未经巡查,您可以查看最新的已查核版本

你所需要的

  1. 这个步骤还没有翻译 帮忙翻译一下

    : 步骤 1 中的图像 1,1
    • Disconnect all cables from the console and flip the unit over to reveal its base.

  2. 这个步骤还没有翻译 帮忙翻译一下

    : 步骤 2 中的图像 1,3 : 步骤 2 中的图像 2,3 : 步骤 2 中的图像 3,3
    • Locate the 6 feet on the base of the unit. Pry them off using a spudger to reveal the screws.

    • Note: One of the feet is located under the sticker shown in the photo. Removing this sticker will void any warranty with Sony.

  3. 这个步骤还没有翻译 帮忙翻译一下

    : 步骤 3 中的图像 1,3 : 步骤 3 中的图像 2,3 : 步骤 3 中的图像 3,3
    • Remove all six 4.0 mm screws from the base of the unit using a #1 Phillips screwdriver.

  4. 这个步骤还没有翻译 帮忙翻译一下

    : 步骤 4 中的图像 1,3 : 步骤 4 中的图像 2,3 : 步骤 4 中的图像 3,3
    • Starting at the corner at which the power and Ethernet ports are located, pry open the outer shell using a spudger and continue around the entire unit.

    • Note: You may use your hands for additional force to separate the two pieces of the outer shell.

  5. 这个步骤还没有翻译 帮忙翻译一下

    : 步骤 5 中的图像 1,2 : 步骤 5 中的图像 2,2
    • Locate the fan at the front, left section of the unit.

  6. 这个步骤还没有翻译 帮忙翻译一下

    : 步骤 6 中的图像 1,2 : 步骤 6 中的图像 2,2
    • Peel off the sticker holding the power cords to the unit.

  7. 这个步骤还没有翻译 帮忙翻译一下

    : 步骤 7 中的图像 1,2 : 步骤 7 中的图像 2,2
    • Lift the connector from the motherboard with a pair of tweezers using a firm, upward force.

  8. 这个步骤还没有翻译 帮忙翻译一下

    : 步骤 8 中的图像 1,3 : 步骤 8 中的图像 2,3 : 步骤 8 中的图像 3,3
    • Remove all three 1.6 mm screws fastening the fan to the unit using a #1 Phillips screwdriver.

    • Gently lift and remove the fan from its compartment.

  9. 这个步骤还没有翻译 帮忙翻译一下

    : 步骤 9 中的图像 1,1
    • Locate the clock battery at the front, right section of the unit. The battery has a circular shape with red (+) and black (-) wires connecting to the motherboard.

  10. 这个步骤还没有翻译 帮忙翻译一下

    : 步骤 10 中的图像 1,2 : 步骤 10 中的图像 2,2
    • Lift the connector from the motherboard with a pair of tweezers using a firm, upward force.

  11. 这个步骤还没有翻译 帮忙翻译一下

    : 步骤 11 中的图像 1,2 : 步骤 11 中的图像 2,2
    • Gently lift and remove the battery from its compartment using a spudger.

  12. 这个步骤还没有翻译 帮忙翻译一下

    : 步骤 12 中的图像 1,1
    • Locate the IR sensor at the front, right corner of the unit.

  13. 这个步骤还没有翻译 帮忙翻译一下

    : 步骤 13 中的图像 1,1
    • Gently detach the ribbon cable connecting the IR sensor to the motherboard.

    • Caution: Always remove ribbon cables by the plastic handles located on either end. Gripping a ribbon cable anywhere but the provided handles can damage the cable and render the component useless.

  14. 这个步骤还没有翻译 帮忙翻译一下

    : 步骤 14 中的图像 1,1
    • Gently lift and remove the IR Sensor from its designated slot.

  15. 这个步骤还没有翻译 帮忙翻译一下

    : 步骤 15 中的图像 1,2 : 步骤 15 中的图像 2,2
    • Locate the optical drive which occupies most of the space on the right side of the unit. It can be identified by the four screws with wide-diameter heads fastening the optical drive to the motherboard.

  16. 这个步骤还没有翻译 帮忙翻译一下

    : 步骤 16 中的图像 1,2 : 步骤 16 中的图像 2,2
    • Remove the four 4.0 mm screws using a #1 Phillips screwdriver.

  17. 这个步骤还没有翻译 帮忙翻译一下

    : 步骤 17 中的图像 1,1
    • Locate the three ribbon cables connecting the optical drive to the motherboard.

  18. 这个步骤还没有翻译 帮忙翻译一下

    : 步骤 18 中的图像 1,3 : 步骤 18 中的图像 2,3 : 步骤 18 中的图像 3,3
    • Gently detach the ribbon cables from the motherboard using a pair of tweezers.

    • Note: The ribbon cable in the center must be unlocked by lifting up the black tab. Remember to push the tab down upon re-installation to secure the cable.

    • Caution: Always remove ribbon cables by the plastic handles located on each end. Gripping a ribbon cable anywhere but the provided handles can damage the cable and render the component useless.

  19. 这个步骤还没有翻译 帮忙翻译一下

    : 步骤 19 中的图像 1,3 : 步骤 19 中的图像 2,3 : 步骤 19 中的图像 3,3
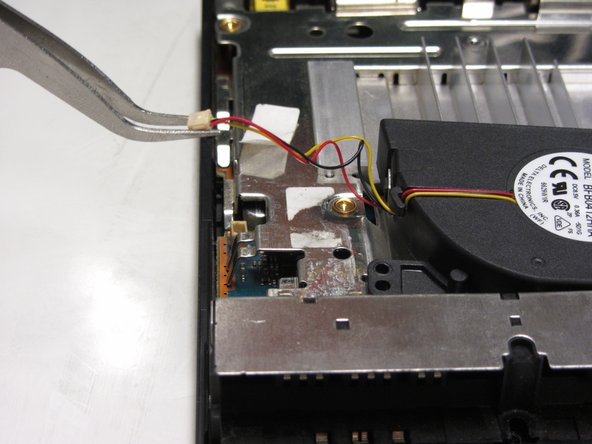
    • Remove any tape fastening the cables to the motherboard and gently lift and remove the optical drive.

    Be really careful when dealing with the orange ribbon cable attached to the optical lens, as it is glued on the metal surface underneath it. From normal usage months or years, and the optical lens natural movement, this ribbon might lose some glue and start lifting upwards, sometimes even touching the CD surface. This could start scratching your games to an unplayable extent. Reapply glue if needed.

    Americo Santos Oliveira - 回复

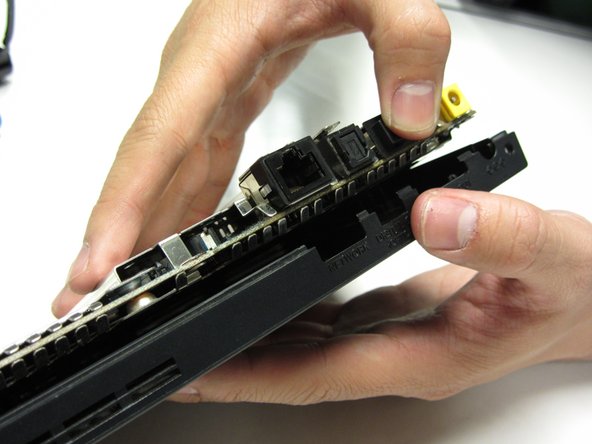
    You don't necessarily need to remove the ribbon cable from the shield. After you detached the cable from the motherboard, flip the optical drive and detach the other end of the cable.

    Vincenzo Quinci - 回复

  20. 这个步骤还没有翻译 帮忙翻译一下

    : 步骤 20 中的图像 1,1
    • Remove the 2.4 mm screw located in between the controller ports using a #1 Phillips screwdriver.

  21. 这个步骤还没有翻译 帮忙翻译一下

    : 步骤 21 中的图像 1,3 : 步骤 21 中的图像 2,3 : 步骤 21 中的图像 3,3
    • Gently lift and remove the motherboard and chassis from the outer shell.

  22. 这个步骤还没有翻译 帮忙翻译一下

    : 步骤 22 中的图像 1,3 : 步骤 22 中的图像 2,3 : 步骤 22 中的图像 3,3
    • There are a total of five 1.6 mm screws which mount the metal chassis to the motherboard.

    • Remove the screw on top and the four screws on the bottom with a #1 Phillips screwdriver.

  23. 这个步骤还没有翻译 帮忙翻译一下

    : 步骤 23 中的图像 1,3 : 步骤 23 中的图像 2,3 : 步骤 23 中的图像 3,3
    • Gently separate the two metal plates from the motherboard.

终点

33等其他人完成本指南。

Thomas Sullivan

于10/23/13注册

3,927 声望

创作了6篇指南

2条评论

نرجو اضافة اللغة العربية

Muammar lmgaroush - 回复

Mi placa no tiene corriente, seguro tiene un corto quien me ayuda a solucionar, es la 77001, ya tiene botón y flex nuevo y no me da luz Led

gasper6913 - 回复

添加评论

浏览统计数据:

过去 24 小时: 7

过去 7 天: 50

过去 30 天: 206

总计 24,980