跳转到主内容

Philips DVP642 Disc Tray Replacement

你所需要的

  1. Philips DVP642 Disc Tray Replacement, Top Panel: 步骤 1 中的图像 1,2 Philips DVP642 Disc Tray Replacement, Top Panel: 步骤 1 中的图像 2,2
    • Remove four 7.5 mm Phillips screws on the both sides (2 on each side).

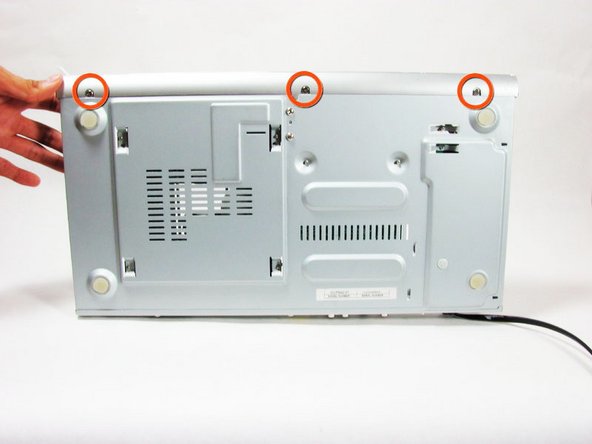
    • Remove five 7.5 mm Phillips screws on the back of the player.

  2. Philips DVP642 Disc Tray Replacement: 步骤 2 中的图像 1,2 Philips DVP642 Disc Tray Replacement: 步骤 2 中的图像 2,2
    • Lift the top panel from the back and remove. It should come off without being forced. There is a lip near the front so you many need to slide the top panel back slightly to remove it.

  3. Philips DVP642 Disc Tray Replacement, Disc Tray: 步骤 3 中的图像 1,2 Philips DVP642 Disc Tray Replacement, Disc Tray: 步骤 3 中的图像 2,2
    • Remove two 7.5 mm screws, one on each side of the player.

    • Remove three 7.5mm screws from the bottom of the player.

    • Note that the three screws from the bottom are slightly different screws.

  4. Philips DVP642 Disc Tray Replacement: 步骤 4 中的图像 1,1
    • Detach all the ribbon wires (4) attached to the motherboard

  5. Philips DVP642 Disc Tray Replacement: 步骤 5 中的图像 1,3 Philips DVP642 Disc Tray Replacement: 步骤 5 中的图像 2,3 Philips DVP642 Disc Tray Replacement: 步骤 5 中的图像 3,3
    • The first 3 ribbon wires can be removed by grasping near the head and gently pulling up.

    • Locate the skinny fourth ribbon wire near the top right of the motherboard.

    • Remove the fourth ribbon wire by grasping both sides of the black clip and pulling up. When reinserting, pull the black clip up, insert the ribbon ribbon, and push the black clip back down.

    • Be firm, but gentle when pulling to avoid pulling the wires off the head.

  6. Philips DVP642 Disc Tray Replacement: 步骤 6 中的图像 1,1
    • Now remove the remaining three 7.5 mm Phillips screws that hold the disc tray to the body.

    • Remove the 12 mm Phillips screw that secures the tray to the upright metal frame.

    • Remove the two 7.5 mm Phillips screws that attach the disc tray to the motherboard and front panel.

  7. Philips DVP642 Disc Tray Replacement: 步骤 7 中的图像 1,1
    • Gently pull forward and upward to free disc tray.

  8. Philips DVP642 Disc Tray Replacement: 步骤 8 中的图像 1,1
    • Tilt the tray sideways and then pull back gently to separate the tray from the front panel.

结论

To reassemble your device, follow these instructions in reverse order.

6等其他人完成本指南。

团队

Cal Poly, Team 21-20, Maness Fall 2011 Cal Poly, Team 21-20, Maness Fall 2011 的会员

CPSU-MANESS-F11S21G20

4 名成员

创作了7篇指南

3条评论

If you work at it, inserting a small screwdriver at appropriate places, you can get the drawer front off (do this with drawer open). This is easier than removing the front panel from the player.

Steve Emerson - 回复

I failed huhuhu

Hello kitty - 回复

not useful without source for parts. i believe the dvd drive is a sony oem.

mapatouli - 回复

添加评论

浏览统计数据:

过去 24 小时: 0

过去 7 天: 0

过去 30 天: 9

总计 9,174