跳转到主内容

Petnet SmartFeeder SF10E Battery Replacement

你所需要的

  1. Petnet SmartFeeder SF10E Battery Replacement, Battery: 步骤 1 中的图像 1,3 Petnet SmartFeeder SF10E Battery Replacement, Battery: 步骤 1 中的图像 2,3 Petnet SmartFeeder SF10E Battery Replacement, Battery: 步骤 1 中的图像 3,3
    • Eject the SmartBowl by pressing the button located at the front of the SmartFeeder base.

    • Remove the metal tray by using both hands and pulling out the bowl towards you.

  2. Petnet SmartFeeder SF10E Battery Replacement: 步骤 2 中的图像 1,2 Petnet SmartFeeder SF10E Battery Replacement: 步骤 2 中的图像 2,2
    • Turn the bowl tray side down by using both hands.

    • Remove seven 11 mm screws by using the Phillips #1 screwdriver.

  3. Petnet SmartFeeder SF10E Battery Replacement: 步骤 3 中的图像 1,2 Petnet SmartFeeder SF10E Battery Replacement: 步骤 3 中的图像 2,2
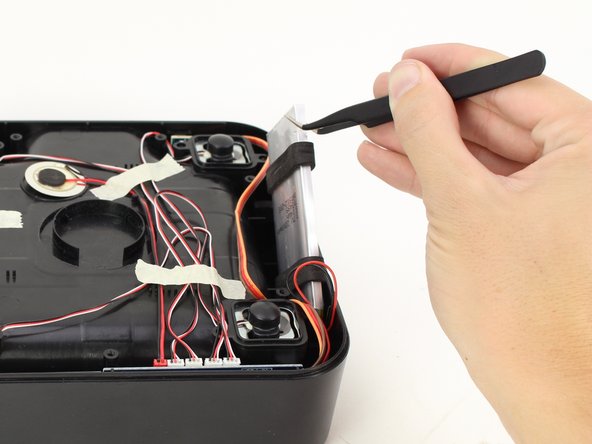
    • Take the battery out of the SmartBowl with tweezers, avoid pulling on any wires.

    • Hold the SmartBowl down using one hand while using the other hand to remove the battery.

  4. Petnet SmartFeeder SF10E Battery Replacement: 步骤 4 中的图像 1,2 Petnet SmartFeeder SF10E Battery Replacement: 步骤 4 中的图像 2,2
    • Remove the tape, closest to the four white connectors, with your hands.

    • Keep the wires attached to the tape for easy reassembly.

  5. Petnet SmartFeeder SF10E Battery Replacement: 步骤 5 中的图像 1,2 Petnet SmartFeeder SF10E Battery Replacement: 步骤 5 中的图像 2,2
    • Trace the wires with your hands from the battery to the motherboard.

    • Detach the three-prong connector between the battery and the motherboard by pulling the white connectors with your hands.

    • Hold on to the sockets on the motherboard or you could accidentally pull off the entire assembly.

结论

To reassemble your device, follow these instructions in reverse order.

另外一个人完成了本指南。

团队

Cal Poly, Team S13-G7, White Fall 2018 Cal Poly, Team S13-G7, White Fall 2018 的会员

CPSU-WHITE-F18S13G7

4 名成员

创作了5篇指南

0条评论

添加评论

浏览统计数据:

过去 24 小时: 0

过去 7 天: 0

过去 30 天: 1

总计 538