跳转到主内容

本指南有最近更改,您可查看未经巡查的最新版本

Palm v LCD screen assembly replacement

你所需要的

  1. Palm v LCD screen assembly replacement, Outer Case: 步骤 1 中的图像 1,1
    • Lay device face down on surface.

  2. Palm v LCD screen assembly replacement: 步骤 2 中的图像 1,2 Palm v LCD screen assembly replacement: 步骤 2 中的图像 2,2
    • Heat the left and top edges with hairdryer for one minute.

    • Move hairdryer back and forth to evenly heat up surface.

    • Caution: directly heating the screen can melt or distort the screen.

  3. Palm v LCD screen assembly replacement: 步骤 3 中的图像 1,1
    • Use tweezers to hold Palm right side down on it's side.

    • Use a plastic opening tool to pry open front and back casing.

    • If you are unable to open you may need to heat with hairdryer for longer.

    • Be sure not to touch case directly with fingers, it will be hot!

  4. Palm v LCD screen assembly replacement: 步骤 4 中的图像 1,1
    • Leave plastic opening tools in between front and back casing.

    • Rotate Palm and repeat steps 2 and 3 for right and back edges.

  5. Palm v LCD screen assembly replacement: 步骤 5 中的图像 1,3 Palm v LCD screen assembly replacement: 步骤 5 中的图像 2,3 Palm v LCD screen assembly replacement: 步骤 5 中的图像 3,3
    • Now pry open front and back casing with plastic opening tools.

    • Separate front and back casing completely.

    • Power button will fall off once front and back casing have been removed. Be sure not to lose it.

  6. Palm v LCD screen assembly replacement, Screen: 步骤 6 中的图像 1,2 Palm v LCD screen assembly replacement, Screen: 步骤 6 中的图像 2,2
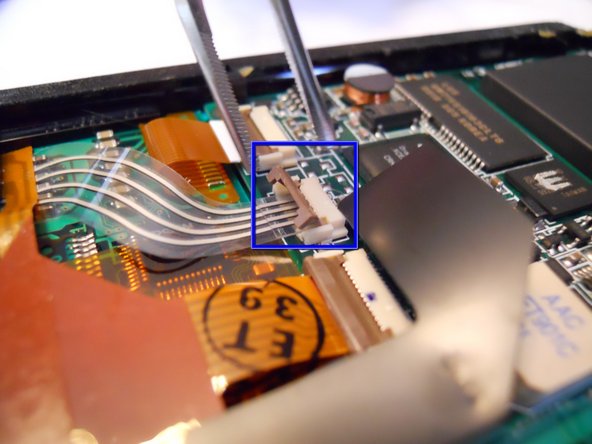
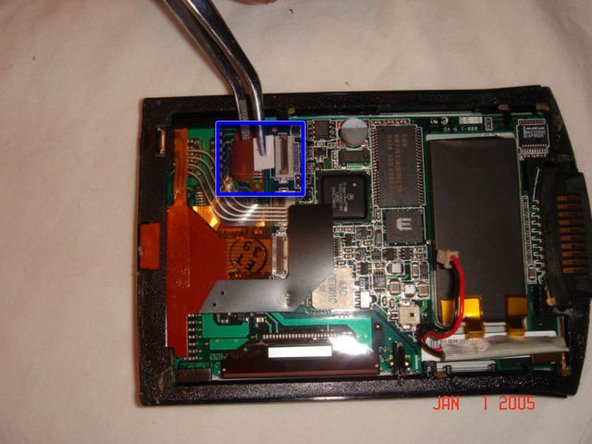
    • In order to seperate the screen from the motherboard you must disconnect the ribbon attached to the screen.

    • To do this, using tweezers, flip up the cable clamp that is connecting the ribbon to the screen.

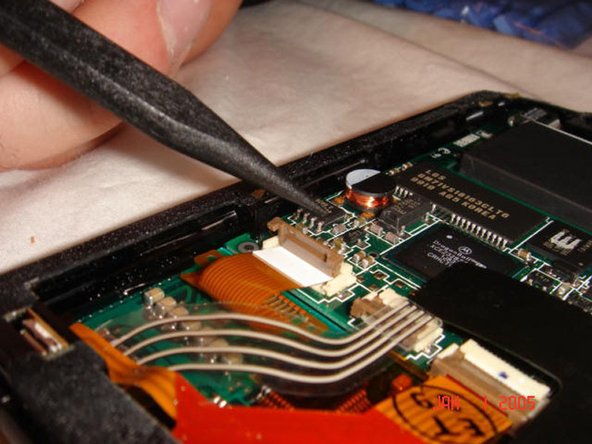
    • Once the clamp is up you can use the tweezers to gently detach the ribbon.

  7. Palm v LCD screen assembly replacement: 步骤 7 中的图像 1,3 Palm v LCD screen assembly replacement: 步骤 7 中的图像 2,3 Palm v LCD screen assembly replacement: 步骤 7 中的图像 3,3
    • Now you must flip up the adjacent clamp as well, using tweezers like before.

    • After the clamp is flipped you can gently remove the second ribbon with tweezers.

  8. Palm v LCD screen assembly replacement: 步骤 8 中的图像 1,2 Palm v LCD screen assembly replacement: 步骤 8 中的图像 2,2
    • Before removing the screen you must detach one more wire, the battery connector.

    • Using the tweezers, squeeze the connector attached to the wire and genlty pull.

    • Do not pull from the wire.

  9. Palm v LCD screen assembly replacement: 步骤 9 中的图像 1,1
    • Now that both ribbons and the wire are disconeccted, you can apply a downward pressure to the battery. You will have to carefully rotate the frame so that the battery can go through.

终点

另外一个人完成了本指南。

Adam Rianda

于01/19/10注册

22 声望

撰写一个指南

团队

Cal Poly, Team 13-25, Maness Winter 2010 Cal Poly, Team 13-25, Maness Winter 2010 的会员

CPSU-MANESS-W10S13G25

4 名成员

创作了4篇指南

一条评论

Can the electroluminescent backlight panel be separated from the LCD? Then clip out the wires related to the LCD? Is that possible or are they fused?

Daniel Hargett - 回复

添加评论

浏览统计数据:

过去 24 小时: 1

过去 7 天: 1

过去 30 天: 6

总计 3,162