跳转到主内容

P775DM3 BIOS Battery

你所需要的

  1. P775DM3 BIOS Battery, Battery: 步骤 1 中的图像 1,2 P775DM3 BIOS Battery, Battery: 步骤 1 中的图像 2,2
    • Unlock the lock circled in red.

  2. P775DM3 BIOS Battery: 步骤 2 中的图像 1,3 P775DM3 BIOS Battery: 步骤 2 中的图像 2,3 P775DM3 BIOS Battery: 步骤 2 中的图像 3,3
    • Lift the battery while unlocking the lock circled in red.

  3. P775DM3 BIOS Battery, Access to major components: 步骤 3 中的图像 1,2 P775DM3 BIOS Battery, Access to major components: 步骤 3 中的图像 2,2
    • Unscrew the five screws circled in red.

  4. P775DM3 BIOS Battery: 步骤 4 中的图像 1,2 P775DM3 BIOS Battery: 步骤 4 中的图像 2,2
    • Slide the plate in the direction of the red arrow.

  5. P775DM3 BIOS Battery: 步骤 5 中的图像 1,2 P775DM3 BIOS Battery: 步骤 5 中的图像 2,2
    • Lift the plate.

  6. P775DM3 BIOS Battery, Keyboard: 步骤 6 中的图像 1,2 P775DM3 BIOS Battery, Keyboard: 步骤 6 中的图像 2,2
    • Unscrew the two screws circled in red

  7. P775DM3 BIOS Battery: 步骤 7 中的图像 1,3 P775DM3 BIOS Battery: 步骤 7 中的图像 2,3 P775DM3 BIOS Battery: 步骤 7 中的图像 3,3
    • Press a paper clip in the three places marked in red

    • Lift the keyboard and feel free to put some strength

  8. P775DM3 BIOS Battery: 步骤 8 中的图像 1,2 P775DM3 BIOS Battery: 步骤 8 中的图像 2,2
    • Disconnect the three framed connectors in red

  9. P775DM3 BIOS Battery: 步骤 9 中的图像 1,2 P775DM3 BIOS Battery: 步骤 9 中的图像 2,2
    • Pull the white drawer in the direction of the arrow to unlock the connector

    • Disconnect the red circled connector

  10. P775DM3 BIOS Battery: 步骤 10 中的图像 1,2 P775DM3 BIOS Battery: 步骤 10 中的图像 2,2
    • Pull the black drawer in the direction of the arrow to unlock the connector

    • Disconnect the red circled connector

  11. P775DM3 BIOS Battery: 步骤 11 中的图像 1,3 P775DM3 BIOS Battery: 步骤 11 中的图像 2,3 P775DM3 BIOS Battery: 步骤 11 中的图像 3,3
    • Lift the flap that holds the connector circled in red

    • Disconnect the red circled connector

    • Remove the keyboard

  12. P775DM3 BIOS Battery, BIOS Battery: 步骤 12 中的图像 1,3 P775DM3 BIOS Battery, BIOS Battery: 步骤 12 中的图像 2,3 P775DM3 BIOS Battery, BIOS Battery: 步骤 12 中的图像 3,3
    • Disconnect the connector circled in red.

    • Remove the battery.

结论

To reassemble your device, follow the instructions in the reverse order.

2等其他人完成本指南。

由衷感谢以下译者:

fr en

100%

这些译者帮助我们修补全世界! 您也想加入吗?
开始翻译 ›

Felice Suglia

于06/15/13注册

30,884 声望

创作了263篇指南

一条评论

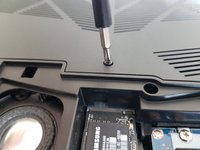
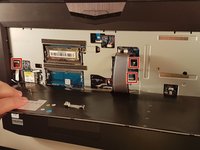
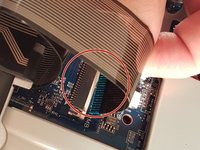
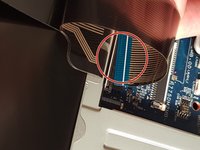
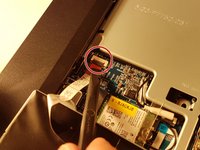
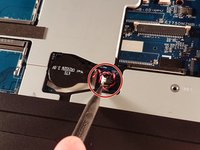
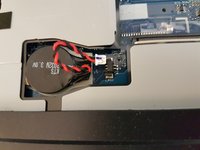
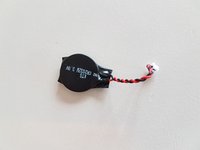
When sourcing a replacement battery note which connector pin has the red wire. This is shown most clearly in the middle photo for step 12. Be careful, as similar batteries have the reverse polarity.

I bought a ten-pack of batteries for less than some suppliers were selling a single battery. EEMB CR2032-Molex51021-RP (CR2032-MX51021-RP). The connecting wires were longer than the original, but were easy to fit into the battery space.

Very many thanks for this great guide - it saved me a lot of unnecessary work.

Terry Payman - 回复

添加评论

浏览统计数据:

过去 24 小时: 3

过去 7 天: 11

过去 30 天: 62

总计 1,738