跳转到主内容

Ozeri Pronto ZK14-S Wire Replacement

你所需要的

  1. Ozeri Pronto ZK14-S Wire Replacement, Panel Removal: 步骤 1 中的图像 1,2 Ozeri Pronto ZK14-S Wire Replacement, Panel Removal: 步骤 1 中的图像 2,2
    • Twist the plastic plate slowly to the left to pull it away.

  2. Ozeri Pronto ZK14-S Wire Replacement: 步骤 2 中的图像 1,1
    • Lift up the sticker at the bottom where the “Ozeri” logo is to reveal a screw.

    • The sticker does not need to be completely removed.

  3. Ozeri Pronto ZK14-S Wire Replacement: 步骤 3 中的图像 1,1
    • Using a 2.0 Flathead screwdriver, remove the 9.50 mm Phillips head screw under the sticker.

  4. Ozeri Pronto ZK14-S Wire Replacement: 步骤 4 中的图像 1,2 Ozeri Pronto ZK14-S Wire Replacement: 步骤 4 中的图像 2,2
    • Using a 2.0 Flathead screwdriver, remove the two 18.76 mm Phillips head screws in the plate stand.

  5. Ozeri Pronto ZK14-S Wire Replacement: 步骤 5 中的图像 1,2 Ozeri Pronto ZK14-S Wire Replacement: 步骤 5 中的图像 2,2
    • Using a 2.0 Flathead screwdriver, remove the 9.44 mm Phillips head screw on the edge opposite to the LCD screen.

  6. Ozeri Pronto ZK14-S Wire Replacement: 步骤 6 中的图像 1,1
    • Turn the device over so the back panel is facing up.

  7. Ozeri Pronto ZK14-S Wire Replacement: 步骤 7 中的图像 1,1
    • Using the iFixit opening tool, pry off the two rubber stubs on the right side and the two rubber stubs on the left side of the bottom of the device.

  8. Ozeri Pronto ZK14-S Wire Replacement: 步骤 8 中的图像 1,1
    • Using a 2.0 Flathead screwdriver, remove the four 9.46 mm Phillips head screws that were under the rubber stubs.

  9. Ozeri Pronto ZK14-S Wire Replacement: 步骤 9 中的图像 1,2 Ozeri Pronto ZK14-S Wire Replacement: 步骤 9 中的图像 2,2
    • Pry apart the two panels to separate them from each other.

    • Flip the device over so the LCD is facing up. Flip the front panel over on its side.

    • Be careful when separating the panels to avoid damaging the wires they are connected by.

  10. Ozeri Pronto ZK14-S Wire Replacement, Wire: 步骤 10 中的图像 1,2 Ozeri Pronto ZK14-S Wire Replacement, Wire: 步骤 10 中的图像 2,2
    在这个步骤中使用的工具:
    Flathead 3/32" or 2.5 mm Screwdriver
    $5.49
    购买
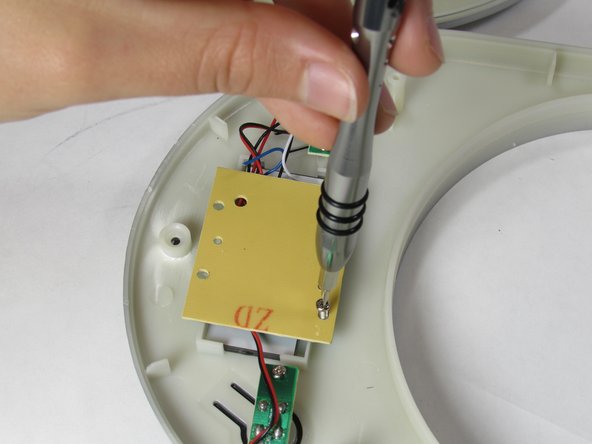
    • Using the 2.0 Flathead screwdriver, remove the three 7.20 mm screws on the back of the center LCD motherboard.

  11. Ozeri Pronto ZK14-S Wire Replacement: 步骤 11 中的图像 1,1
    • Stand the center motherboard up.

    • Be careful when standing up the LCD motherboard to avoid damaging the wires it is connected to.

  12. Ozeri Pronto ZK14-S Wire Replacement: 步骤 12 中的图像 1,1
    • Desolder the post the damaged wire is attached to on the motherboard.

    • Use caution when handling the soldering iron since it can get very hot.

  13. Ozeri Pronto ZK14-S Wire Replacement: 步骤 13 中的图像 1,1
    • Using the iOpener, warm the glue on the weight sensor the other end of the damaged wire is attached to.

    • Use caution when handling the iOpener since it can get very hot.

    • Refer to the following guide for detailed instructions on how to use the iOpener: iOpener (Legacy) Instructions

  14. Ozeri Pronto ZK14-S Wire Replacement: 步骤 14 中的图像 1,1
    • Using the nylon or metal spudger, detach the end of the damaged wire from the weight sensor.

    • Repeat steps 13 and 14 to remove the end of a damaged wire from the other two motherboards.

结论

To reassemble your device, follow these instructions in reverse order.

Oneika White

于10/01/15注册

709 声望

创作了4篇指南

团队

USF Tampa, Team 1-4, Leahy Fall 2015 USF Tampa, Team 1-4, Leahy Fall 2015 的会员

USFT-LEAHY-F15S1G4

4 名成员

创作了5篇指南

0条评论

添加评论

浏览统计数据:

过去 24 小时: 2

过去 7 天: 18

过去 30 天: 54

总计 4,228