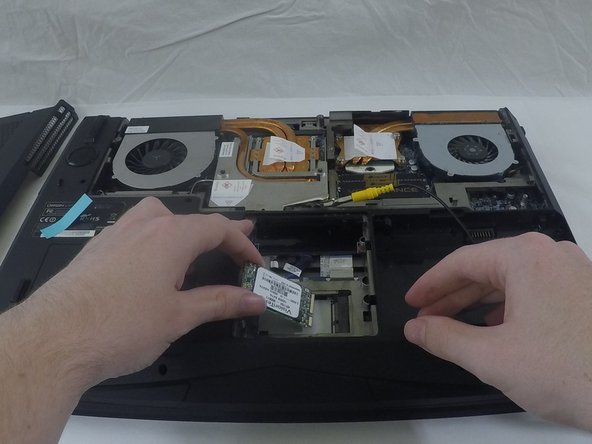
跳转到主内容

Origin EON17-S mSATA SSDs Replacement

你所需要的

  1. Origin EON17-S mSATA SSDs Replacement, mSATA SSDs: 步骤 1 中的图像 1,1
    • Opening your computer can be dangerous; give it at least 10 minutes to cool down after shutdown and ensure the power supply and battery are disconnected.

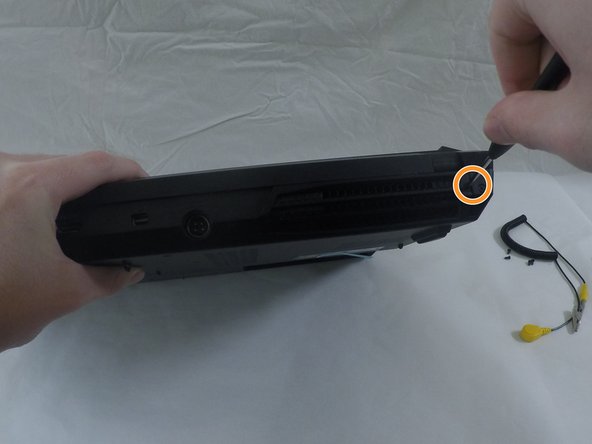
    • Disconnect all peripherals.

    • Disconnect the power cord.

    • Lay the computer upside-down.

  2. Origin EON17-S mSATA SSDs Replacement: 步骤 2 中的图像 1,2 Origin EON17-S mSATA SSDs Replacement: 步骤 2 中的图像 2,2
    • Push both locking tabs inward. One is spring loaded and will need to be held while removing the battery.

    • Remove the battery by pulling up on the tab.

    • To replace the drive in mSATA bay 1, continue to Step 3.

    • To replace the drive in mSATA bay 2, proceed to Step 7.

    • If you are unsure which drive you are replacing, follow all of the remaining steps.

  3. Origin EON17-S mSATA SSDs Replacement: 步骤 3 中的图像 1,3 Origin EON17-S mSATA SSDs Replacement: 步骤 3 中的图像 2,3 Origin EON17-S mSATA SSDs Replacement: 步骤 3 中的图像 3,3
    • Performing the following actions incorrectly can damage your hard drive and could result in lost data. Consider backing up your hard drive(s) before proceeding.

    • Remove the component cover by removing the six screws with a 3/32" screwdriver.

    • Remove the screws from the bottom of the computer.

    • Remove the screws from the back of the computer.

  4. Origin EON17-S mSATA SSDs Replacement: 步骤 4 中的图像 1,1
    • Remove the cover by gently pulling back and up.

  5. Origin EON17-S mSATA SSDs Replacement: 步骤 5 中的图像 1,1
    • An electrostatic discharge could damage your computer. Use an electrostatic wrist strap when working inside the computer.

    • Put on the electrostatic wrist strap and attach the alligator clip to a sturdy piece of metal inside the case.

  6. Origin EON17-S mSATA SSDs Replacement: 步骤 6 中的图像 1,2 Origin EON17-S mSATA SSDs Replacement: 步骤 6 中的图像 2,2
    • You will see the mSATA drive in the lower right hand corner of the component area.

    • Remove the screw on the far right side of the drive.

    • The drive will rise up to an angle.

    • Remove the drive by pulling in the direction the drive is positioned.

  7. Origin EON17-S mSATA SSDs Replacement: 步骤 7 中的图像 1,2 Origin EON17-S mSATA SSDs Replacement: 步骤 7 中的图像 2,2
    • Unscrew the two screws holding the hard drive cover to reveal the second mSATA bay.

    • There are two snaps on this cover, pull firmly but carefully to remove it without breaking them.

  8. Origin EON17-S mSATA SSDs Replacement: 步骤 8 中的图像 1,2 Origin EON17-S mSATA SSDs Replacement: 步骤 8 中的图像 2,2
    • Removing the hard drive is necessary to get to the second mSATA bay.

    • Remove the hard drive by sliding it towards you.

    • Once it is free of the port, use a screwdriver to gently pry it from the bay.

  9. Origin EON17-S mSATA SSDs Replacement: 步骤 9 中的图像 1,1
    • Remove the small, silver, rectangular plate below the hard drive bay.

    • Remove the small screw at the front of the plate.

    • Pull the plate up and out.

  10. Origin EON17-S mSATA SSDs Replacement: 步骤 10 中的图像 1,2 Origin EON17-S mSATA SSDs Replacement: 步骤 10 中的图像 2,2
    • Remove the small screw on the upper left of the hard drive.

    • The drive will rise up at an angle.

    • Remove the drive by pulling in the direction the drive is currently positioned.

结论

To reassemble your device, do anything you did in reverse.

另外一个人完成了本指南。

Caelan Langdon

于09/29/15注册

125 声望

撰写一个指南

团队

Cal Poly, Team 15-2, Green Fall 2015 Cal Poly, Team 15-2, Green Fall 2015 的会员

CPSU-GREEN-F15S15G2

4 名成员

创作了4篇指南

0条评论

添加评论

浏览统计数据:

过去 24 小时: 2

过去 7 天: 6

过去 30 天: 17

总计 3,751