跳转到主内容

Oregon Scientific Meep! X2 Power Button Replacement

你所需要的

  1. Oregon Scientific Meep! X2 Power Button Replacement, Rear Casing: 步骤 1 中的图像 1,1
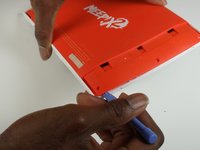
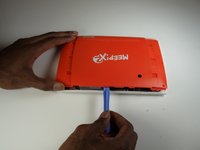
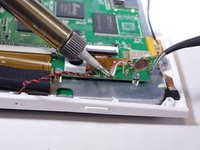
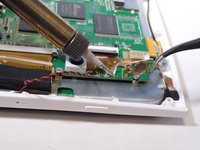
    • Remove the orange covers from the left and right sides of the device by sliding up against the tabs.

  2. Oregon Scientific Meep! X2 Power Button Replacement: 步骤 2 中的图像 1,3 Oregon Scientific Meep! X2 Power Button Replacement: 步骤 2 中的图像 2,3 Oregon Scientific Meep! X2 Power Button Replacement: 步骤 2 中的图像 3,3
    • You can remove the rear casing by unscrewing all six phillips #00(3.5mm x 4.5mm)screws from the left and right side of the device.

  3. Oregon Scientific Meep! X2 Power Button Replacement: 步骤 3 中的图像 1,3 Oregon Scientific Meep! X2 Power Button Replacement: 步骤 3 中的图像 2,3 Oregon Scientific Meep! X2 Power Button Replacement: 步骤 3 中的图像 3,3
    • Use the plastic opening tools to undo the clips around the edges of the device.

  4. Oregon Scientific Meep! X2 Power Button Replacement, Power Button: 步骤 4 中的图像 1,2 Oregon Scientific Meep! X2 Power Button Replacement, Power Button: 步骤 4 中的图像 2,2
    • Use a tweezer to gently pull the power button sensor out of the case's slot.

  5. Oregon Scientific Meep! X2 Power Button Replacement: 步骤 5 中的图像 1,2 Oregon Scientific Meep! X2 Power Button Replacement: 步骤 5 中的图像 2,2
    • Use the soldering station to unsolder and remove the power button from the motherboard.

    • In the case of screen or screen sensor replacement, disregard desoldering steps.

结论

To reassemble your device, follow these instructions in reverse order.

另外一个人完成了本指南。

J'mel Henneman

于01/20/15注册

864 声望

创作了8篇指南

团队

USF Tampa, Team 9-1, Blackwell Winter 2015 USF Tampa, Team 9-1, Blackwell Winter 2015 的会员

USFT-BLACKWELL-W15S9G1

3 名成员

创作了16篇指南

0条评论

添加评论

浏览统计数据:

过去 24 小时: 0

过去 7 天: 1

过去 30 天: 3

总计 932