跳转到主内容

Oontz Angle 3 ULTRA Back Panel Replacement

你所需要的

  1. Oontz Angle 3 ULTRA Back Panel Replacement, Back Panel: 步骤 1 中的图像 1,3 Oontz Angle 3 ULTRA Back Panel Replacement, Back Panel: 步骤 1 中的图像 2,3 Oontz Angle 3 ULTRA Back Panel Replacement, Back Panel: 步骤 1 中的图像 3,3
    • Remove the two black rubber sheaths around the edges of the speaker.

    • Under the symbol-marked sheath there is a white rubber covering for the buttons. Peel this away to reveal the panel underneath.

    • On two corners of its triangular face there is a small divot, which allows you to use your fingernails or a pair of tweezers to grip and peel away the covering.

  2. Oontz Angle 3 ULTRA Back Panel Replacement: 步骤 2 中的图像 1,3 Oontz Angle 3 ULTRA Back Panel Replacement: 步骤 2 中的图像 2,3 Oontz Angle 3 ULTRA Back Panel Replacement: 步骤 2 中的图像 3,3
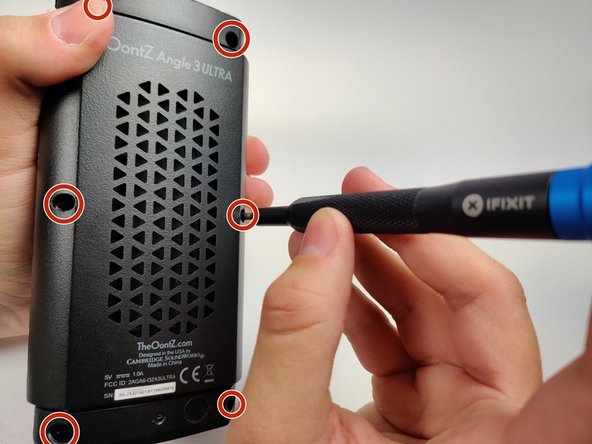
    • Use a JIS #0 screwdriver to remove the six screws to expose the motherboard.

  3. Oontz Angle 3 ULTRA Back Panel Replacement: 步骤 3 中的图像 1,3 Oontz Angle 3 ULTRA Back Panel Replacement: 步骤 3 中的图像 2,3 Oontz Angle 3 ULTRA Back Panel Replacement: 步骤 3 中的图像 3,3
    • Using a pair of tweezers, pinch and pull the rubber fillings obstructing the screws.

  4. Oontz Angle 3 ULTRA Back Panel Replacement: 步骤 4 中的图像 1,3 Oontz Angle 3 ULTRA Back Panel Replacement: 步骤 4 中的图像 2,3 Oontz Angle 3 ULTRA Back Panel Replacement: 步骤 4 中的图像 3,3
    • Using a JIS #0 screwdriver, remove the 6 screws holding the backplate in.

    • Remove the back panel off of the device.

结论

To reassemble your device, follow these instructions in reverse order.

另外一个人完成了本指南。

0条评论

添加评论

浏览统计数据:

过去 24 小时: 0

过去 7 天: 5

过去 30 天: 15

总计 616