跳转到主内容

本指南有最近更改,您可查看未经巡查的最新版本

Olympus Stylus 1030 SW Motherboard Replacement

你所需要的

  1. Olympus Stylus 1030 SW Motherboard Replacement, Olympus Stylus 1030 SW Camera Disassembly: 步骤 1 中的图像 1,3 Olympus Stylus 1030 SW Motherboard Replacement, Olympus Stylus 1030 SW Camera Disassembly: 步骤 1 中的图像 2,3 Olympus Stylus 1030 SW Motherboard Replacement, Olympus Stylus 1030 SW Camera Disassembly: 步骤 1 中的图像 3,3
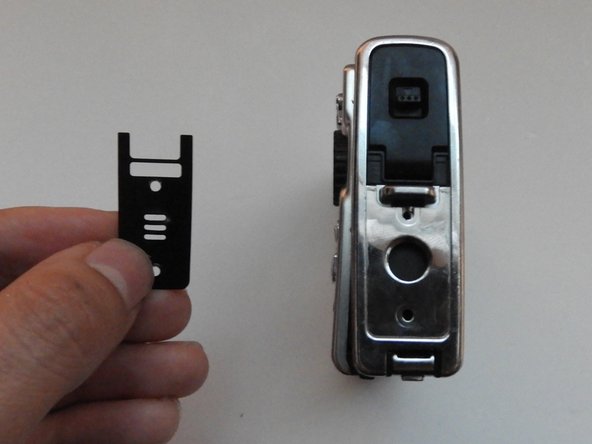
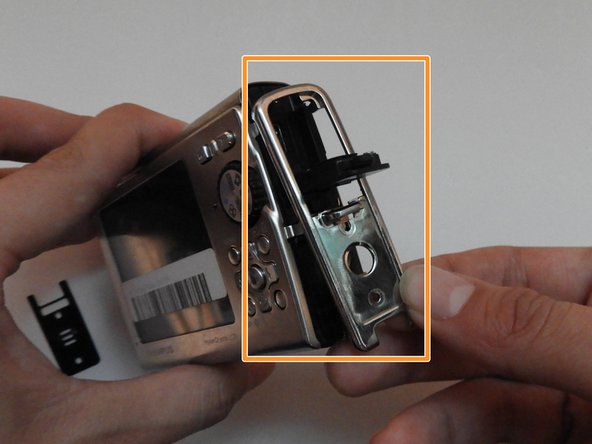
    • Using the iFixit Opening Tool, pry off the plastic part of the lens.

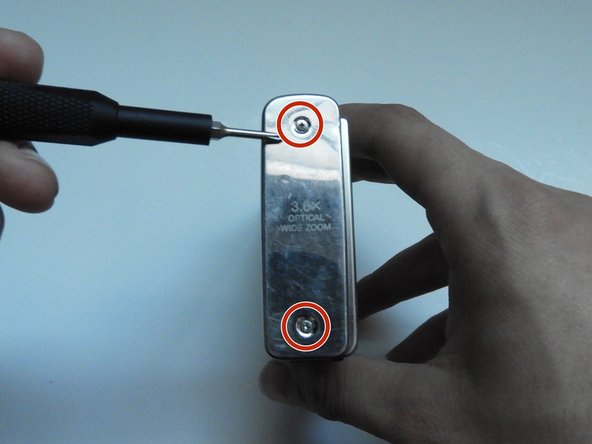
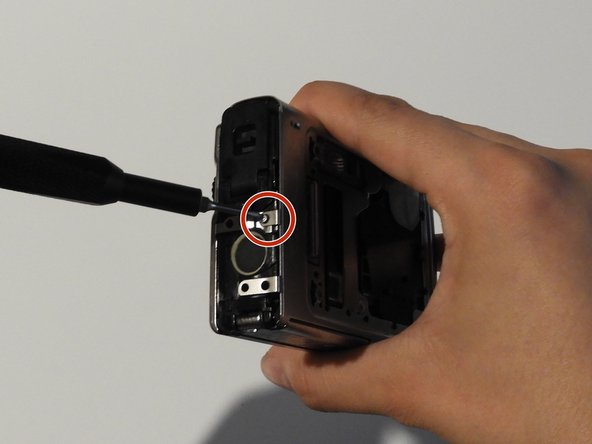
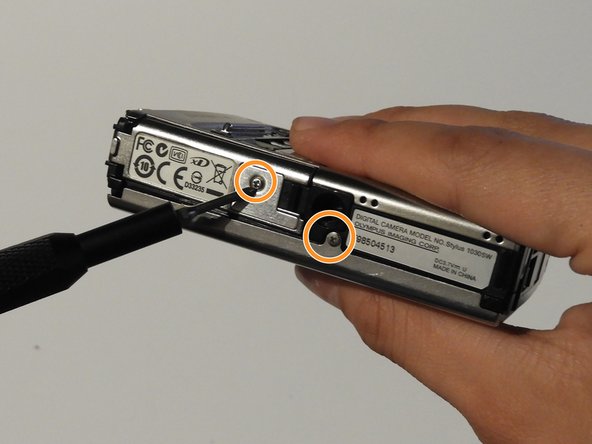
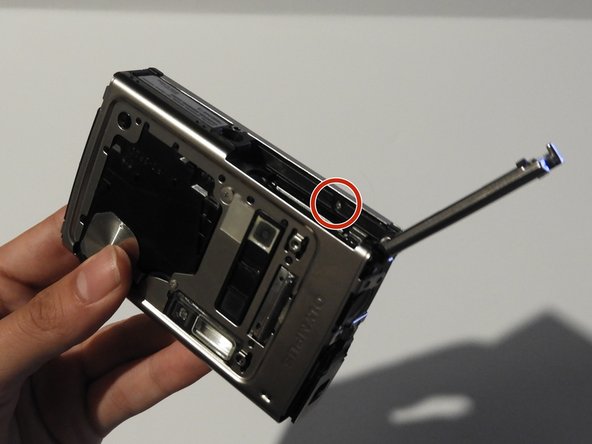
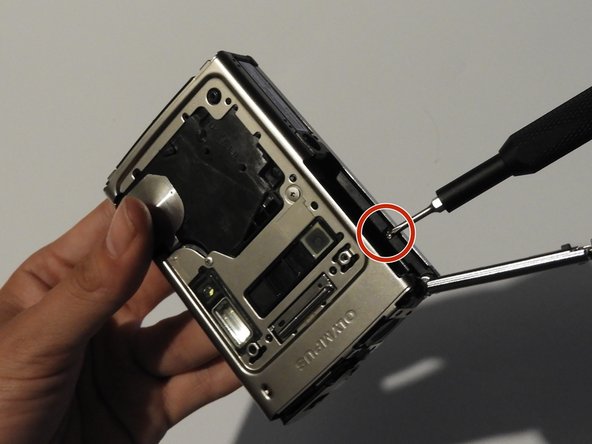
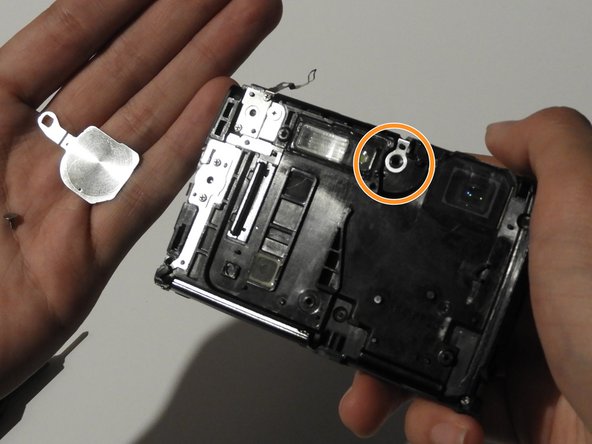
    • Using the T6 Torx screwdriver, unscrew the three screws.

  2. Olympus Stylus 1030 SW Motherboard Replacement: 步骤 2 中的图像 1,3 Olympus Stylus 1030 SW Motherboard Replacement: 步骤 2 中的图像 2,3 Olympus Stylus 1030 SW Motherboard Replacement: 步骤 2 中的图像 3,3
    • Using the Phillips #00 screwdriver, unscrew the three screws.

    • Carefully swivel the metal cover out towards you.

    • Using tweezers, remove the metal washer.

  3. Olympus Stylus 1030 SW Motherboard Replacement: 步骤 3 中的图像 1,2 Olympus Stylus 1030 SW Motherboard Replacement: 步骤 3 中的图像 2,2
    • Using the tweezers, slowly peel off the plate.

  4. Olympus Stylus 1030 SW Motherboard Replacement: 步骤 4 中的图像 1,3 Olympus Stylus 1030 SW Motherboard Replacement: 步骤 4 中的图像 2,3 Olympus Stylus 1030 SW Motherboard Replacement: 步骤 4 中的图像 3,3
    • Using the Phillips #00 screwdriver, unscrew the two screws on the side of the camera.

  5. Olympus Stylus 1030 SW Motherboard Replacement: 步骤 5 中的图像 1,3 Olympus Stylus 1030 SW Motherboard Replacement: 步骤 5 中的图像 2,3 Olympus Stylus 1030 SW Motherboard Replacement: 步骤 5 中的图像 3,3
    • On the opposite side, use the Phillips #00 screwdriver to unscrew both screws.

    • Take out the speaker plate.

    • Open the multi-connector cover and slide off the side panel.

  6. Olympus Stylus 1030 SW Motherboard Replacement: 步骤 6 中的图像 1,3 Olympus Stylus 1030 SW Motherboard Replacement: 步骤 6 中的图像 2,3 Olympus Stylus 1030 SW Motherboard Replacement: 步骤 6 中的图像 3,3
    • Using the Phillips #00 screwdriver, unscrew the screw above the speaker.

    • On the bottom side of the camera, unscrew the two screws.

  7. Olympus Stylus 1030 SW Motherboard Replacement: 步骤 7 中的图像 1,3 Olympus Stylus 1030 SW Motherboard Replacement: 步骤 7 中的图像 2,3 Olympus Stylus 1030 SW Motherboard Replacement: 步骤 7 中的图像 3,3
    • Open the battery compartment cover.

    • Use the Phillips #00 screwdriver to unscrew the screw in the battery compartment.

  8. Olympus Stylus 1030 SW Motherboard Replacement: 步骤 8 中的图像 1,3 Olympus Stylus 1030 SW Motherboard Replacement: 步骤 8 中的图像 2,3 Olympus Stylus 1030 SW Motherboard Replacement: 步骤 8 中的图像 3,3
    • On the front of the camera, unscrew the two screws shown.

    • Gently pull on the side until the camera is separated from the back panel.

    • Remove the shutter and power button.

  9. Olympus Stylus 1030 SW Motherboard Replacement: 步骤 9 中的图像 1,3 Olympus Stylus 1030 SW Motherboard Replacement: 步骤 9 中的图像 2,3 Olympus Stylus 1030 SW Motherboard Replacement: 步骤 9 中的图像 3,3
    • Use the Phillips #00 screwdriver to unscrew the four screws on the front of the camera.

    • Unscrew the shutter using the Phillips #00 screwdriver.

  10. Olympus Stylus 1030 SW Motherboard Replacement: 步骤 10 中的图像 1,2 Olympus Stylus 1030 SW Motherboard Replacement: 步骤 10 中的图像 2,2
    • Release the top holding using a spudger.

    • Slowly and carefully separate the front and back of the camera, exposing the electrical ribbons.

  11. Olympus Stylus 1030 SW Motherboard Replacement: 步骤 11 中的图像 1,3 Olympus Stylus 1030 SW Motherboard Replacement: 步骤 11 中的图像 2,3 Olympus Stylus 1030 SW Motherboard Replacement: 步骤 11 中的图像 3,3
    • Using the spudger and tweezers if needed, remove the ribbons from the computer chips.

  12. Olympus Stylus 1030 SW Motherboard Replacement, Motherboard: 步骤 12 中的图像 1,2 Olympus Stylus 1030 SW Motherboard Replacement, Motherboard: 步骤 12 中的图像 2,2
    • Remove screws.

    • Peel of tape.

  13. Olympus Stylus 1030 SW Motherboard Replacement: 步骤 13 中的图像 1,3 Olympus Stylus 1030 SW Motherboard Replacement: 步骤 13 中的图像 2,3 Olympus Stylus 1030 SW Motherboard Replacement: 步骤 13 中的图像 3,3
    • Release ribbon ports by pushing outside edges in the direction of the ribbon’s location.

    • Disconnect top ribbon.

    • Disconnect right ribbon.

  14. Olympus Stylus 1030 SW Motherboard Replacement: 步骤 14 中的图像 1,3 Olympus Stylus 1030 SW Motherboard Replacement: 步骤 14 中的图像 2,3 Olympus Stylus 1030 SW Motherboard Replacement: 步骤 14 中的图像 3,3
    • Push A/V port inwards to release the motherboard from the interior plastic camera casing.

    • Collect the metal washer plate from the top right corner of the motherboard (now loose).

    • Pry capacitor from the plastic camera casing (only held by small tape strip).

  15. Olympus Stylus 1030 SW Motherboard Replacement: 步骤 15 中的图像 1,3 Olympus Stylus 1030 SW Motherboard Replacement: 步骤 15 中的图像 2,3 Olympus Stylus 1030 SW Motherboard Replacement: 步骤 15 中的图像 3,3
    • Slowly remove motherboard (and attached components) from the camera casing.

    • Be careful not to disconnect the wires by pulling it too hard.

    • Unscrew speaker bracket.

    • Lift up copper speaker plate.

  16. Olympus Stylus 1030 SW Motherboard Replacement: 步骤 16 中的图像 1,1
    • Remove speaker from casing (be careful not to disconnect wires).

    • Battery clasp spring is now loose in the casing. Remove and set these aside

结论

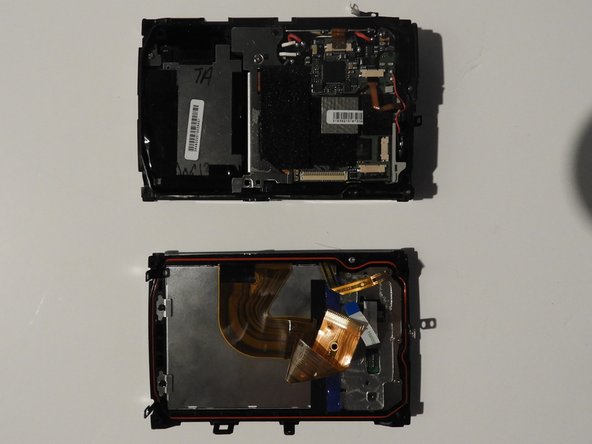
To reassemble your device, follow these instructions in reverse order.

另外一个人完成了本指南。

3条评论

what is the voltage, and capacitance of the main flash capacitor? diameter and length? I want to replace mine as my 'flash charging' symbol constantly flashes and flash does not fire.

thanks for the writeup! I have more confidence in repairing my 10+ year old camera

Kevin Kay - 回复

the cap is 330uF and 90V

dimensions:

11.94mm diameter

25.65mm length

Kevin Kay - 回复

How would I go about extracting the camera module and hooking it up to an arduino?

My cam got saltwater damage however it still turns on for a few seconds before turning off again

GoodNight Tea - 回复

添加评论

浏览统计数据:

过去 24 小时: 0

过去 7 天: 0

过去 30 天: 8

总计 1,091