视频概述
-
-
-
这绝对是史上最轻巧的Oculus——轻便,舒适,和嵌入式耳机带来最大的沉浸感。
-
一个厚泡棉垫避免大家出现 “Oculus形状的脸”。这是用夹扣固定的。
-
更少的螺丝意味着更轻的重量!
-
框架拆除,我们从头显的显示屏拔出单一电缆。
-
-
-
拆除可调式耳机不能再简单了。
-
一个嵌入式平头螺丝固定了扬声器支架,弹簧触点连接了头显带子中的电线。太棒了!
-
我们已经见识过了昂贵的、无法修复和拆卸的耳机,所以这是一个令人愉悦的惊喜。
-
特别是考虑到这些小东西是头显“摔落”到地面时会主要损坏的部件。
I agree that more detailed teardown of the headphones themselves would be nice. I still wonder if they are made by KOSS or someone else.
Hey, thanks! Totally missed that screw in the inside of the headphone connection
This one picture just saved me from replacing my headset due to a failed earpiece. Turns out, after a year of passing the headset around for Beat Saber, we managed to unscrew one. That side felt a smidge loose, and then the sound went out. We assumed a bad wire, but we just needed to line the pegs up and tighten the flathead cover on the inside of the band. Thanks guys!
-
-
-
这个框架还包括一个小基点,供头显带子使用。
-
但是怎么拆除它呢?我们一度不知所措——直到我们的拆解工程师发现了内部隐藏的夹扣,这些夹扣固定了框架。在使用小撬棒,并在关键点撬上几下之后,框架就拆下来了。
-
就这样,我们拆开了这个 青蜂侠面具 ,我们能够一窥究竟了!
Guys this is the hardest part and you just forgot to explain it. Here is a link to the mask: http://imgur.com/lDhwvfV Note the 3 interior clips. Here is another image where it clips in: http://imgur.com/VJaI52O I recommend starting with the ones on the bottom.
Zsolt - how did you get the clips off from around the lenses? Did you have to do it from over the cloth?
Please be specific how you removed the bottom 4 screws. The T3 bit and driver are not enough. It keeps occurring like the heads will strip. Hope you can take time to provide support for this!
For anyone that gets stuck here, there are six T3 Torx screws (4 bottom, 2 top), clips around the outside of the mask that are pretty easy with a spudger, and then three clips per eyepiece/lens as pictured in Zsolts’s post above. I couldn’t get the eyepiece clips started by prying around the lenses so I ended up prying the mask open as much as possible at the top and getting the top ones nearest to the nose open with the small pointy end of the spudger. After that I was able to get the rest from the gap made around the lenses from releasing that first clip for each.
I wish you all the best of luck with your projects, but as stated in the banner at the top of this page: this is not a guide. iFixit teardowns are meant to be a first look at the hardware and overall repairability, and should not be used as instructions.
I spent over an hour trying to remove the %#*@ cowl. Turns out, I had to apply a LOT more pressure than I thought would be necessary. No, I have not broken anything but make sure to use plastic tools (spudgers) I had to pry my thumb between the cowl and the main housing in the lower right hand side up first as it turned out to be the easier side, to reveal the cowl’s clip that’s over and around the lens. After popping that one off, I did the same to the left. Now, at that point, run your thumb/finger over the cloth and along the ring where the other two clips are latches around the lens. Now, after running your finger across it, part of the ring should separate thus allowing you to use that as leverage to wiggle the other two clips free.
Couple comments based on previous posts: 1) “The T3 bit and driver are not enough. It keeps occurring like the heads will strip” - I ran into the same things where it felt like I was stripping the screw, ended up using a T4 bit instead and it fit perfectly, 2) The clips around the lens as pictured in the 2nd post from Zsolt were super helpful, once I knew where the clips were used a 0.46mm guitar pick to wedge in-between the lens and cover to unfasten and the cover came of easily.
Comments on Paul Not Bunyan's post. Confirmed T4 bit. I originally thought I needed a longer T4 bit, but the iFixit bit worked fine. The T4 screws near the nose were difficult, but let the plastic housing of the kato mask guide your bit to the head of the T4. On the subject of the kato mask clips: start on the left lens without the IPD slider. Once you have bottom lens clip unfastened, run your plastic spudger on the inside of the clip on either side of the lens to free the other two clips. Indeed, the cover came off easily once you figure out the puzzle. Thanks Paul Not Bunyan!
I had an easier time with the clips by adjusting the IPD to the maximum and then going in for the center nose bridge clips because of the extra room, as then I could simply wiggle the other two clips off each lens with the extra slack. This might be harder if your tool is rounder or larger. Definitely not much force needed.
-
-
-
开发者版第二版使用了 从三星 Galaxy Note 3 那拿过来的 单一1080p 显示屏。但是这次,有一些不同。。。
-
Oculus 不只使用智能手机显示屏,而是使你的购买双倍地划算了!它里面有两个显示屏,直接架在透镜上,通过旋钮来调节!
-
直到 眼睛手机 被制造出来之前,这个都能有用。
-
这是什么?看起来像
一个脸部识别器一个环境光传感器,用于确认你是否佩戴了Oculus,或者可以调节屏幕亮度,以弥补泄漏到头显中的光。
This little Sensor is a proximity Sensor. It is used to detect if the User wears the Glasses. If the Oculus Software isn't opened yet, it will open automatically after some seconds. Its like the Sensor on your Smartphone which turns of the Display while calling sombody.
Timo Meyer - 回复
-
-
-
把盖子揭开,可以看到几个标准的排线。空余的地方让眼部周围的配件可以自由来回移动以调节瞳间距(即双眼之间的距离)。
-
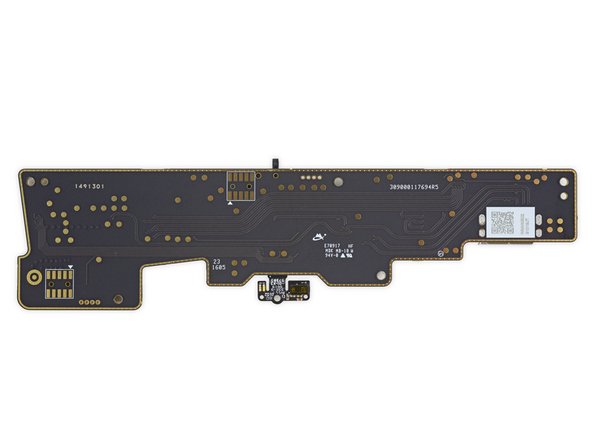
3条排线把LED控制板连接在红外LED序列上,围绕在头显外壳内部的各处。
-
Oculus内部的干货(赤裸裸肉体)来了!
Is there a gap between the top housing and the ribbon cable? (i.e. would you be able to accidentally press down on the ribbon cable if you squeezed the housing? )
not to sound like a jerk but this is the least descriptive teardown of anything ever……..
The cowl took me over an hour to remove cause I was being very careful trying not to break any clips but a lot of force was required to get that SOB off. Now, I’m stuck trying to figure out how to remove this part! I wish someone would update this with a lot more pictures and a step by step video.
I’ve disassembled mine today, so I’ll add a few words to ease this step :)
NOTE: this can be done without force, there are no clips once you undo all screws.
Photos + instructions: https://imgur.com/a/9UAM737
1. 3 more torx T3/T4 screws marked in red (two holding front plate to the bottom wall, plus one holding the lens slider assembly)
2. 4 big X-screws holding the front plate in the corners, marked in green (only the biggest ones need to be unscrewed)
3. Tricky hidden top-center screw: DEEP directly on the front plate. Push the lenses to the sides first, or it won’t be accessible from the inside! Use a thin, long and well magnetized small cross screwdriver. The 2nd photo shows exactly where the screw was. With good lighting it should be visible from the inside with the lenses moved away.
4. Unclip the lens slider slider (3rd photo): insert a prying tool from the inside and it will pop out — do not lose the tiny springs!
5. Now the front plate should come off easily with some wiggling.
Thank you so much for this update! That made my life 1000x easier. I never would’ve found that hidden phillips deep between the lenses!
-
-
-
-
把大肉留到主餐吧,我们先偷偷看一眼
色拉LED灯序列。 -
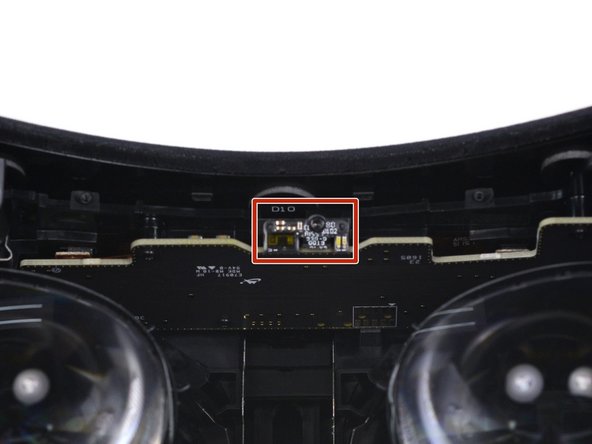
那些隐藏的排线和3个红外LED灯序列连接:头显上、下和后部。
-
每个LED灯都做了标识,D8到D10的灯孤零零地在 "隐藏的" 麦克风外面。我们想知道,那到底是为什么。
Where is the "hidden" microphone?
-
-
-
透镜组件上部有主板和芯片!
-
东芝 TC358870XBG 4K HDMI 转 MIPI 双 DSI 转换器
-
赛普拉斯半导体 CYUSB3304 USB 3.0 Hub 控制器
-
意法半导体 STM32F072VB ARM Cortex-M0 32-bit RISC Core 微控制器
-
华邦电子 W25Q64FVZPIG 64 Mb 串行闪存
-
北欧半导体 nRF51822 智能蓝牙2.4GHz低功耗系统芯片
-
骅讯电子 CM119BN USB 音频控制器
-
博世 Sensortec BMI055 6轴惯性传感器
Hi, it's actually "MIPI", as in http://mipi.org/ , not "MIP". There's a typo in the headline of the linked press-release.
Yes it is a typo, MIPI instead of MIP. And here is the link to the Toshiba device:
"Nordic Semiconductor nRF51822", interesting... I assume that is a the RF link to the Clicker and (probably) Touch. If so, this is somewhat disappointing as it will mean that the touch controllers are only compatible with Oculus headset and can not be used separately or with another headset configuration.
Simon Wood - 回复
True - it seems like a proprietary 2.4GHz ref. FCC filing.
The left display on my headset stopped working and went completely dark. I am normally brave enough to open devices and fix them myself, but the hidden clips and fragile housing makes me worried I might make things worse. I'm not even sure if I can even fix the issue or if the display itself went bad.
Parts are not available for the Rift main assembly at all after the warranty period. Oculus does not offer a repair service or a replacement program. You will have to rely on someone selling a broken unit that has a working component you need, or buy an entire new kit. Post warranty support for the main unit is non-existent.
do you know what TE connector is used on this board?
I did 2 tear down on 2 different units bought a year apart.
The newer board does not have Winbond W25Q64FVIG 64 Mb Serial Flash Memory on it.
Newer board is 330-00030-03 REV A 2016. Where the chip was in now 4 square flat shapes of solder.
They remove it? Why?
Great info thx for the knowledge. I had an interesting discovery on one of my head sets.
I have 2 different headsets I bought a year apart. I tore both apart and discovered something missing on newer board.
The newer board does not have Winbond 64 Mb Serial Flash Memory on it. Newer board is marked with 330-00030-03 REV A 2016. Where the chip was is now in its place 4 square flat shapes of solder.
I am curious to why they removed the Flash Memory.
I did 2 tear down on 2 different units bought a year apart. The newer board does not have Winbond W25Q64FVIG 64 Mb Serial Flash Memory on it. Newer board is 330-00030-03 REV A 2016. Where the chip was in now 4 square flat shapes of solder.
-
-
-
继续来辨认主板上的集成电路:
-
意法半导体 VL53L1X ToF 飞行时间传感器(应该是)
-
意法半导体 BALF-NRF01D3 蓝牙巴伦
-
德州仪器 显示器电源管理
-
安森美半导体 CAT93C46B 1 Kb 串行 EEPROM
-
意法半导体 M24C64-F 8 Kb 串行 EEPROM
-
德州仪器 TPS22908 负载开关
-
理光 R1202L721A 升压DC-DC转换器
-
-
-
分离透镜组件,我们看到了定制的、非Note外观、比镜头光圈还要大的显示屏!
-
OLED显示屏是边长为90 mm的正方形,像素密度为456ppi。 作为对比,iPhone 6s Plus 显示屏像素密度为401 ppi,Galaxy S7 像素密度高达576 ppi。
-
所以至少就目前而言,单个像素点仍然是可见的,或者叫“单视”,这是我们生造的一个科技词汇。
What is the sub-pixel structure of the display? Is it pentile as everyone expected, or is it RGB? And who's the manufacturer? Microscope shots of the display in action would have been great too.
-
-
-
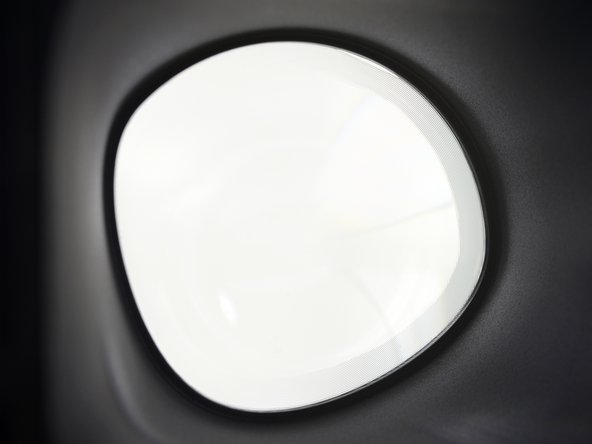
前两个版本的 Oculus Rift 附带的是可互换的圆形镜片(左图),而消费者版则使用了一套不可拆卸式的非对称镜片(右图)。
-
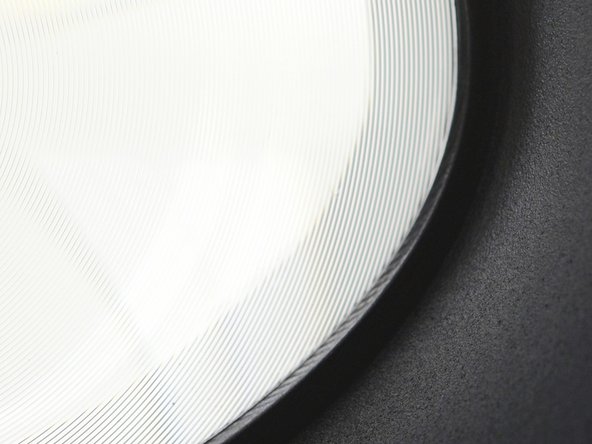
来一个 CV1透镜的特写,我们看到透镜上有很多同心圆,这是菲涅尔透镜的明显特征。相比于前几代笨重、突出的曲面圆形镜片,菲涅尔透镜的重量大大减轻——它使用重量轻得多的同心棱镜薄阵列。
-
加分点:通过改变同心棱镜的尺寸和形状,Oculus能够根据具体情况微调镜头,最大限度地减少了传统曲面镜头可能导致的球面像差(或扭曲)。这可能就解释了镜片不对称的形状。
What is the diameter of the lens? (I know its not round but in the widest part)
It's approximately 49.82mm. I had to measure a rubbing of the lens (pencil over paper) in order to cut lens protectors for them. I measured with a cheap digital caliper.
Nate -
-
-
-
透镜: 搞定。硅胶垫: 搞定。
-
现在是时候拆头显带子了。塑料撬棒在手,我们撬开了带有 FCC 标签的头显带子以寻找 LED 灯和耳机电线。
-
把外面的一层布剥开,我们发现了缠绕在头部周围的黑色排线,它被用来给后部的 LED 灯供电。棒!
-
但是等一下——这些机械的部件是什么?
My right strap snapped off the Rift and broke the ribbon cable inside. So no speakers or back tracking LEDs. Any way to replace or solder it back together?
Same Problem , I am trying to repair the ribbon cable : fix both sides with glue on a thin sheet (piece of other ribbon cable) , scratch with a scalpell the black lack to expose the copper layer , and restore the connections soldering thin wires . After , seal evething with got glue .
I hope my skills are good enough …
lughi -
Did it work Lughi?, I have the same problem
Did it work? I have the same problem now.
-


90条评论
best
teardown
ever!
Keep checking in to find out ;)
What about the rack and pinion system? The camera? The remote? The cable?
How about a teardown of the headphones!? Palmer Luckey demands it!
Josh Mills - 回复
Why is the video private?
The accelerometer and gyroscope are a single chip (the Bosch BMI055) located on the motherboard. It's highlighted in pink in the above photo. I'm not sure about the magnetometer.
For this application the MEMs are only used to track relative motion, and the camera system tracks absolute motion. Hence magnetometer is un-necessary. There is no magnetometer. BMI055 is the same MEMs used in GearVR CV1 (it gets away with not having a magnetometer by intermittently pulling from the phone's magnetometer to correct for orientation drift).
Robert -
Will you teardown the cable? Wondering if Spectra7 is still the chip. Thanks!!!
the TI 59I C6F3 are OLEDDisplay Power Supply. I dont find any info on these, but the coils and the fact that they are 2, (1 was in dk2) proves my point.
Bosch Sensortec IMU (gyro + accelerometer) BMI055
Thanks marcellinogemel! We've updated the teardown accordingly.
Teardown not complete, Cable and chips in cable still a mystery? Do ur job right or forget about it!!!
macman1519 - 回复
Dear iFixit team, please ignore that guy's rude remark. There are plenty of us here who respect your work who would in fact appreciate it if you did open the cables to see what kind of chips are inside.
Tester -
I need to know if the lenses can be rotated. I suffer from permanent torsional double vision and need to rotate the left lens to match my right eye for the picture to match up. This is the only thing stopping me from seeing in 3d.
Wouldnt it be easier to rotate the Image in software? Or am I just not understanding your condition?
John M -
Weird that Oculus didn't made a headphone jack to use your own headset with microphone.
The step 13 erroneously states that the stereoscopic display permanently focused at infinity relieves eyestrain. In fact fixed focus is a cause of eye strain due to an accommodation-vergence mismatch. In contrast an accommodative/ multifocal/ light field display or a retinal display would alleviate this cause of eye strain.
Jack Hayes - 回复
well… i can stay 8 hours with the vr headset on without feeling eyestrain, but if i spend a few hours looking at the computer screen (and i have a 42” one) my eyes get stuck into a close focus. if i want to drive after spending a few hours at the pc, i have to close one eye because i get double vision because of stuck close focus. doesnt happen with vr tho. and with smaller screens its even worse, thats why i got a 42” tv as a screen…
What about the timing controller? The displays are from samsung i guess?
It would be very interesting to see a teardown of the remote and the touch controllers as well! :)
Any idea of manufacturer and reference of the two display panels? Thanks
Well, you're not wrong but, neither is she :) http://www.merriam-webster.com/dictionar...
The dictionary has this habit of changing the meanings or pronunciations of a words once the incorrect way becomes commonplace. The definition of literally has changed to “figuratively” because so many used it incorrectly. Fresnel lenses are named after french physicist Augustin J. Fresnel. Saying it without a silent “s” is mispronouncing the name of the man who invented them and that shouldn't really be up for debate.
TL;DR the dictionary is wrong. ;)
Virtual Reality SUCKS.. Occulus Rift is already outdated.. ( Yup they are just like you guys and missed the Memo). The best new thing is Augmented Reality. Check out the Augmented Reality here, http://www.cnet.com/videos/we-spent-90-m...
This is an extremely ignorant comment. VR and AR are not competitors, they serve different purposes. For gaming - where frequently you are trying to insert the player into an environment that doesn't exist - VR is required. AR can't put me in the cockpit of an F15 or a starship - VR can. Ideal would be an AR/VR hybrid...an AR headset that can become completely opaque and block out the real world if desired...can current AR devices do that?
Can we expect a further teardown at some point? Cable? Headphones? Etc...?
I don't like the lenses at all. Yes Fresnel lenses are cheaper to make than regular lenses, but they cause significant artifacts. The whole idea that you focus the lenses by moving the whole headset up and down on your head doesn't allow for focussing each eye separately either. All in all it seems like a massive compromise in quality for a small cost saving, and probably singlehandedly explains the comments in most reviews about blurriness.
I would like to know if the lenses have an anti reflective coating on the inside?
Eamon Ho -
Dimensions of the Fresnel lens would be amazing to know. Also the distances of the inner and outer surfaces from the display(s) and the eye. I think this is key to getting the eye focus correct. Are these similar to the ones on the Lenovo ANT VR Headset accessory? (Into which you insert your phone)
I'd like to see the cable busted open as well
Confirmed. It actually contains three S7 chips. See below:
Mackie Research performed an in-house teardown of the cables, which confirmed the inclusion of three of Spectra7's chips - two "VR 7050" and one "VR 7100."
Is this it? When do we get an actual teardown?
Step five is wrong. If you managed to just remove the frame "with a few well-placed flicks of the spudger" then you ripped the small hexagon screws out of their respective threads.
My first time using the ifixit site.
Need to get inside this thing for an on the job examination. I removed the cable and 6 T3 screws from the housing assembly, yet with all the prying I would DARE with 2 spudgers, I still cannot get "Kato's mask" to cleanly pull free from the headset housing. Also, the black fabric seems attached securely to the lenses. I'm stumped right here. Tried calling ifixit direct but could only leave a message.
Any ideas or advice? Thanks - Ernie@ECOTNY
Ernie -
Hi Ernie! This document wasn't intended to serve as instructions, but it sounds like you're in a bind—so, I checked with the tech writer who performed the CV1 teardown. According to him: "The first pic of step 5 shows the clips you've gotta declop—If i recall, it's kinda terrible. I think the trick is pulling up enough to see in there. Everything is pretty flexible." Not sure how much help that is, but good luck with your project! Eventually we hope to have a set of actual repair guides with instructions for the Rift CV1, sometime further down the road. Cheers!
@ernieaecot Did you end up getting the clips off the lenses? Trying to get them off without tearing the fabric seems to be very tricky
Any advice would be greatly appreciated.
My unit came with the headband detached from the head mounted display. Particularly the left side. It leads mo to believe they sent me a returned product from previous customer, because my preorder came in sooner than August. I wish I could post photo because that would tell it all. I tried putting it back but it just breaks off. My problem is the 2 arms that holds the goggles that houses the chip, oled and etc, the left arm is detach and I am not sure if its designed this way. I know it allows some movement for adjustment. Please help.
Hola, buenas tardes, i spoke little english, since you opened it , ¿ they believe can break easily fall to the ground facing the oculus ? I say this because they fell and did not detect the pc
adrian rom - 回复
So after the tear down how would you get rid of the screen door effect?
Hi, Your work is great ! but just have a question is there a way to replace only the HDMI socket and would it work?
In my CV1 the pins in HDMI are bent and it results in seeing red dots and some lines mostly on the dark background.
I checked another cable and all is working fine so it is definitely either only the HDMI socket (most likely as I can see 2-3 bent pins) or the whole cable.
Thank You!
Hi, could you explain how the Headphones connect to allow the adjustable Straps? I have lost audio from the Left Speaker and can only get audio back if I loosen the Right side strap move it in or out!
Hey Terence, did you find a solution to your headphone issue? I'm having the same thing happen, now both don't work..
Jeremy -
Will be the flexible cable that runs through the head band. not much you can do about it. I have 7 Rifts here and only 1 is still working correctly. All under 12months old
Andy -
Do you have any info / insight on the components related to the IPD (inter pupillary distance) slider on the underside of the rift? I ask because it is linked with a digital, in-software readout that reports the current distance and that readout stopped working for me... was curious what kind of component linkage is going on with that slider... ? Didn't see any mention of this element of the Rift in the above article.
I was wondering the same as I seem to have the same problem with my Rift.
Its a small linear potentiometer. Left eye piece bracket moves the pot. possibly dropped out of the holder if it's been dropped. should be an easy fix
Andy -
I want to fix my oculus cv1
How could we contact?!
My oculus was dropped. the right lens has a line going through it. how would I fix it?
PK _Gaming - 回复
Is it possible to remove the lenses so I can clean the inside? I have moisture inside the lenses and it ruins the experience!! I need to know if I can just fix it or RMA.
Is it possible to teardown the rift so I can clean the inside of the lenses? I have moisture on the inside of the lenses which creates unbearable “god rays”. I’m not sure if I’m able to fix it or try to RMA?
It's probably not moisture.. Fresnel lenses just suck like that
Anyone been able to identify the flexible cable that seems to be failing on many of these devices under normal operation (stretching of the side straps to put on/off head) and breaking inbuilt Rift audio?
Mine just broke of course 2 months out of warranty and Oculus basically told me to go eat a d!ck and buy a new one.
Should be an option to replace these for those out of warranty
Would airbrushing the front affect the ir tracking
%#*@^@, still no solution for this known fail of the right earphone and the ribbon ?
where to find a replacement ribbon to fix this ?
net shaman - 回复
Hello,
I'm selling Oculus CV1 Parts, you can contact me by e-mail at: "totto99@gmx.de". I'm from Germany so be aware of shipping cost. Currently I offer a lot of parts, because i bought a broken one Just for a working Screen. Some interesting things might be:
- 1 left Lens
- 1 right Display + Lens Combo
- whole outer housing
- HDMI connection cable for PC
Ofcourse you can also buy ALL the remainings parts (everything execpt the left Screen).
I send you a email
Thanks for the info!!! My headset is starting to freeze. I got in touch with Oculus, they checked some logs, and said it is getting hot, and of course, it is out of warranty. Is there enough space on the cowl to drill little holes in it to get some air flow going?..OR if I cut some foam off the mask, would that do the same thing? Any help would be appreciated
a w e s o m e
Hello I have a HDMI to sell in parts as there is no replacement for mine. check ebay. If your looking for parts.
Thx for the tear down, it helped a lot.
Felipe Gar - 回复
Buenas, una consulta, ¿es posible cambiarle un sola pantalla, volviendo a poner al vacio con el lente???
Is it possible to change a single (only) screen? or are the two synchronized??
do you know if an oculus rift or htc vive replacement cable can fit inside hp vr1000-100?
The audio ribbon cable on my head strap broke. Is there anyway I can fix it to make my OEM headphones work? Can’t I just overlap the two ends and tape it down?
The headband can be removed, but you have to cut the fabric shell of the headset to do it. There’s a pair of clips on each side of the headset holding the top and bottom halves together. If you cut the fabric over the seam, you can separate the halves and slide the headband attachment points out of the shell (after removing the 4 screws holding each in place).
I have a rift and I want to know if you can actually take out the strap off from the sides. I noticed you guys didn't. The Headband springs did not let you take it apart?