跳转到主内容

Nokia 6 Disassembly

你所需要的

  1. Nokia 6 Disassembly, Nokia 6 Disassembly: 步骤 1 中的图像 1,1
    • Nokia 6 (TA-1011): after being in the water, the LEDs light up but the virtual keys (arrow, home and recent applications) do not work.

  2. Nokia 6 Disassembly: 步骤 2 中的图像 1,3 Nokia 6 Disassembly: 步骤 2 中的图像 2,3 Nokia 6 Disassembly: 步骤 2 中的图像 3,3
    • Take off the glass / display from its double-sided adhesive, heating the edges and lifting it with the aid of a suction cup and a thin piece of plastic (playing cards).

  3. Nokia 6 Disassembly: 步骤 3 中的图像 1,2 Nokia 6 Disassembly: 步骤 3 中的图像 2,2
    • Starting from the top (speaker area), gently lift the touch / display and disconnect the flat cable connector, unscrewing the screw and removing the plate that holds it in place.

    • At this point, using hot air if necessary, gently lift the flat to detach it from the underlying double-sided adhesive and remove the touch / display.

  4. Nokia 6 Disassembly: 步骤 4 中的图像 1,2 Nokia 6 Disassembly: 步骤 4 中的图像 2,2
    • Unscrew the screw, remove the plate and disconnect the virtual keys / fingerprint sensor cable.

    • Disassemble the "fingerprint sensor flex" module by uncoupling the flat cable from the double-sided tape

  5. Nokia 6 Disassembly: 步骤 5 中的图像 1,3 Nokia 6 Disassembly: 步骤 5 中的图像 2,3 Nokia 6 Disassembly: 步骤 5 中的图像 3,3
    • Unscrew the screws and unhook the metal plate, gently prizing it with a plastic tool.

    • Lift the metal plate sideways and disconnect the battery to be able to remove it

    • Metal plate with battery and speaker disassembled.

  6. Nokia 6 Disassembly: 步骤 6 中的图像 1,1
    • It can be seen, above the charging connector, that the humidity sensor is pink instead of white; this means that liquids have entered this area.

  7. Nokia 6 Disassembly: 步骤 7 中的图像 1,3 Nokia 6 Disassembly: 步骤 7 中的图像 2,3 Nokia 6 Disassembly: 步骤 7 中的图像 3,3
    • Unscrew the screws of the charging module and disconnect the antenna connector.

    • Insert trAfter uncoupling the flat cable from the underlying double-sided adhesive tape and removing the charging card, unscrew the screw and disconnect the flat cable.anslation here

    • Disassemble the top-up form.

  8. Nokia 6 Disassembly: 步骤 8 中的图像 1,3 Nokia 6 Disassembly: 步骤 8 中的图像 2,3 Nokia 6 Disassembly: 步骤 8 中的图像 3,3
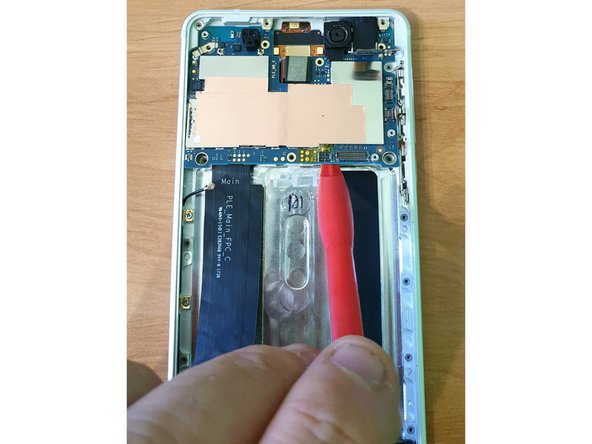
    • After removing the sim / micro sd trolley with the extractor and disconnecting the antenna cable, headphone connector and volume / power buttons, unscrew the screws of the logic board.

    • Gently lift the motherboard by levering with a plastic tool and remove it from its seat.

    • Motherboard with the flat connection of the disassembled charging module

  9. Nokia 6 Disassembly: 步骤 9 中的图像 1,1
    • To check that there are no burnt components or oxidations inside the motherboard, the flex cable must be disconnected and the insulation / dissipation sheets of the various components of the logic board removed.

  10. Nokia 6 Disassembly: 步骤 10 中的图像 1,1
    • Looking closely at the microscope the part most exposed to water (as can be seen in step 6), small oxidations were found on the connection pins of the flat cable and the charging module that prevented communication with the motherboard of the sensor of fingerprints and virtual keys.

结论

To reassemble the device, follow these instructions in reverse order.

另外一个人完成了本指南。

由衷感谢以下译者:

it en

100%

Lucy Smith正在帮助我们修复这个世界! 您也想加入吗?
开始翻译 ›

MTM1011

于07/22/19注册

221 声望

撰写一个指南

0条评论

添加评论

浏览统计数据:

过去 24 小时: 1

过去 7 天: 11

过去 30 天: 89

总计 2,680