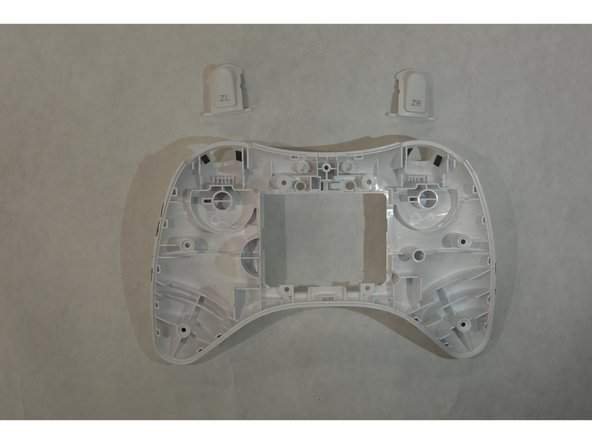
跳转到主内容

Nintendo Wii U Pro Controller ZL and ZR Button Replacement

你所需要的

  1. Nintendo Wii U Pro Controller ZL and ZR Button Replacement, Battery: 步骤 1 中的图像 1,1
    • Turn the controller over to reveal the battery cover.

    • Use the J000 screwdriver to remove the screw that secures the battery cover.

  2. Nintendo Wii U Pro Controller ZL and ZR Button Replacement: 步骤 2 中的图像 1,2 Nintendo Wii U Pro Controller ZL and ZR Button Replacement: 步骤 2 中的图像 2,2
    • Remove the battery from the controller by inserting the plastic spudger into the small gap on the bottom right of the battery.

    • Use the spudger as a lever to pry up and remove the battery from the compartment.

  3. Nintendo Wii U Pro Controller ZL and ZR Button Replacement, ZL and ZR Buttons: 步骤 3 中的图像 1,1
    • Once the battery has been removed, we will remove the 4 screws in the battery compartment and then the 4 screws around the back of the case. These 8 screws use the Y0 bit. Each of these screws are 5.5 mm.

    • The four screws on the outside are extremely deep into the casing, and the holes are pretty small. You will need to use a 4 mm driver bit extension to reach these screws.

  4. Nintendo Wii U Pro Controller ZL and ZR Button Replacement: 步骤 4 中的图像 1,1
    • Once all of the screws are removed, simply use one hand to hold the front panel in place and lift up on the back panel to remove it. Place the back panel so the insides are facing up towards you.

  5. Nintendo Wii U Pro Controller ZL and ZR Button Replacement: 步骤 5 中的图像 1,2 Nintendo Wii U Pro Controller ZL and ZR Button Replacement: 步骤 5 中的图像 2,2
    • Locate the two triggers (ZL and ZR) and pop them up and out by pressing on them from the outside.

结论

To reassemble your device, follow these instructions in reverse order.

另外一个人完成了本指南。

Jesse Burton

于09/17/15注册

586 声望

创作了3篇指南

团队

IUPUI, Team 2-2, Harley Fall 2015 IUPUI, Team 2-2, Harley Fall 2015 的会员

IUPUI-HARLEY-F15S2G2

4 名成员

创作了13篇指南

0条评论

添加评论

浏览统计数据:

过去 24 小时: 0

过去 7 天: 2

过去 30 天: 16

总计 4,684