跳转到主内容

Nintendo Switch Heat Sink Replacement

你所需要的

  1. Nintendo Switch Heat Sink Replacement, Release the Joy Con controller locking tabs: 步骤 1 中的图像 1,3 Nintendo Switch Heat Sink Replacement, Release the Joy Con controller locking tabs: 步骤 1 中的图像 2,3 Nintendo Switch Heat Sink Replacement, Release the Joy Con controller locking tabs: 步骤 1 中的图像 3,3
    • Before you begin this repair, make sure the device is completely powered off.

    • Press and hold down the small round button on the back of the Joy Con controller.

    • While you hold down the button, slide the controller upward.

  2. Nintendo Switch Heat Sink Replacement, Remove the Joy Con controllers: 步骤 2 中的图像 1,3 Nintendo Switch Heat Sink Replacement, Remove the Joy Con controllers: 步骤 2 中的图像 2,3 Nintendo Switch Heat Sink Replacement, Remove the Joy Con controllers: 步骤 2 中的图像 3,3
    • Continue sliding the Joy Con upward until it's completely removed from the console.

    • Repeat this same process for the other Joy Con.

  3. Nintendo Switch Heat Sink Replacement, Remove the back-side screws: 步骤 3 中的图像 1,1
    在这个步骤中使用的工具:
    Magnetic Project Mat
    $19.95
    购买
    • Use a Y00 screwdriver to remove the four 6.3 mm-long screws securing the rear panel.

    • Throughout this repair, keep track of each screw and make sure it goes back exactly where it came from.

  4. Nintendo Switch Heat Sink Replacement, Remove the top and bottom screws: 步骤 4 中的图像 1,2 Nintendo Switch Heat Sink Replacement, Remove the top and bottom screws: 步骤 4 中的图像 2,2
    • Use a JIS 000 driver or an official iFixit PH 000 driver to remove the following screws securing the rear panel:

    • One 2.5 mm-long screw on the top edge of the device

    • Two 2.5 mm-long screws on the bottom edge of the device

    • To prevent these tight screws from stripping, apply firm downward force, work slowly and try another JIS 000 or PH 000 driver if the screws won't come out.

  5. Nintendo Switch Heat Sink Replacement: 步骤 5 中的图像 1,2 Nintendo Switch Heat Sink Replacement: 步骤 5 中的图像 2,2
    • Use a JIS 000 screwdriver or an official iFixit PH 000 driver to remove the two 3.8 mm center screws on the sides of the device (one on each side).

  6. Nintendo Switch Heat Sink Replacement: 步骤 6 中的图像 1,2 Nintendo Switch Heat Sink Replacement: 步骤 6 中的图像 2,2
    • Use your finger to flip up the kickstand on the back of the device.

    • If there's a microSD card in the microSD card slot, remove it now before you continue to the next step.

  7. Nintendo Switch Heat Sink Replacement: 步骤 7 中的图像 1,1
    • Use a JIS 000 screwdriver or an official iFixit PH 000 driver to remove the 1.6 mm screw in the kickstand well.

    • Close the kickstand.

  8. Nintendo Switch Heat Sink Replacement: 步骤 8 中的图像 1,3 Nintendo Switch Heat Sink Replacement: 步骤 8 中的图像 2,3 Nintendo Switch Heat Sink Replacement: 步骤 8 中的图像 3,3
    • Open the game card cartridge flap.

    • The game card cartridge flap attaches to the other half of the plastic shell, preventing you from completely lifting up the rear panel if it's closed.

    • Lift the rear panel up from the bottom of the device and remove it.

  9. Nintendo Switch Heat Sink Replacement, Remove the microSD card reader: 步骤 9 中的图像 1,1
    • Use a JIS 000 screwdriver or an official iFixit PH 000 driver to remove the 3.1 mm screw securing the microSD card reader to the device.

  10. Nintendo Switch Heat Sink Replacement: 步骤 10 中的图像 1,2 Nintendo Switch Heat Sink Replacement: 步骤 10 中的图像 2,2
    • Use your fingers or a pair of tweezers to lift the microSD card reader straight up from the device to disconnect and remove it.

    • During reassembly, make sure the press connector underneath the foam pad is firmly connected to the motherboard. It may help to remove the foam pad before reinstalling the card reader.

  11. Nintendo Switch Heat Sink Replacement, Remove the shield plate: 步骤 11 中的图像 1,1
    • Use a JIS 000 screwdriver or an official iFixit PH 000 driver to remove the six 3 mm screws securing the shield plate to the device.

  12. Nintendo Switch Heat Sink Replacement: 步骤 12 中的图像 1,2 Nintendo Switch Heat Sink Replacement: 步骤 12 中的图像 2,2
    • Use your fingers or a pair of tweezers to peel back the piece of foam on the top edge of the device near the fan exhaust port.

    • If the foam doesn't easily peel away, don't force it as it might end up tearing. Carefully peel at different spots to pull back the foam.

  13. Nintendo Switch Heat Sink Replacement: 步骤 13 中的图像 1,3 Nintendo Switch Heat Sink Replacement: 步骤 13 中的图像 2,3 Nintendo Switch Heat Sink Replacement: 步骤 13 中的图像 3,3
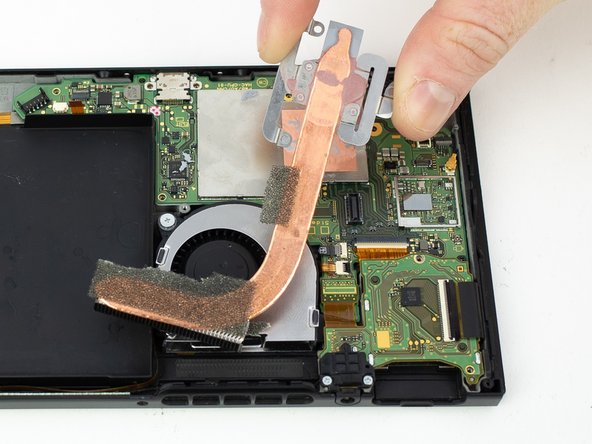
    • Insert a spudger underneath the shield plate along the edge of the device.

    • Pry up to lift the shield plate and remove it from the device.

    • You may feel a bit of resistance. This is normal, since the shield plate is slightly bonded to the heat sink with thermal paste.

    • A thick pink thermal compound bridges the gap between the shield plate and the copper heat sink underneath. This helps prevent the Switch from overheating.

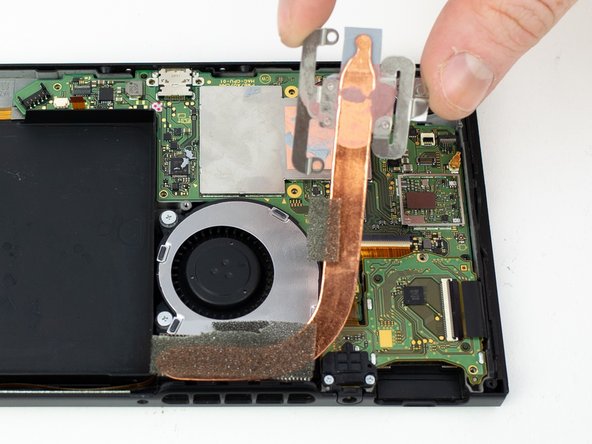
    • You can reuse the pink thermal compound if you're careful. Keep the compound clean and make sure it makes solid contact between the heat sink and the shield during reassembly.

    • If you need to replace it, refer to our thermal paste guide to remove the old thermal compound and replace it with an appropriate compound, such as K5 Pro, during reassembly.

  14. Nintendo Switch Heat Sink Replacement, Disconnect the battery: 步骤 14 中的图像 1,2 Nintendo Switch Heat Sink Replacement, Disconnect the battery: 步骤 14 中的图像 2,2
    • Use the point of a spudger to pry the battery connector straight up and out of its socket on the motherboard.

  15. Nintendo Switch Heat Sink Replacement, Heat Sink: 步骤 15 中的图像 1,1
    • Remove the three 3.1mm Phillips #000 screws from the heatsink.

  16. Nintendo Switch Heat Sink Replacement: 步骤 16 中的图像 1,3 Nintendo Switch Heat Sink Replacement: 步骤 16 中的图像 2,3 Nintendo Switch Heat Sink Replacement: 步骤 16 中的图像 3,3
    • Pull the heatsink up 45 degrees and rotate it to the right to remove.

    • Before reassembly, follow the thermal paste guide.

    • Clean all the thermal paste off the underside of the heat sink using isopropyl alcohol (>90%) or Artic Silver ArctiClean.

    • Clean and replace the thermal paste on the processor cover.

结论

To reassemble your device, follow these instructions in reverse order.

48等其他人完成本指南。

Blake Klein

于01/29/17注册

70,510 声望

创作了50篇指南

9条评论

I couldn’t even get past the first step because my screws were in so tight I made them threadbare trying to get them out. I did use the iFixit toolkit so I was using the right head but taking the screws out is not as easy as demonstrated lol

Nate Topical - 回复

same mines are stripped

Luigi Igii -

Same happened to me :( I was able to file down the screwdriver I was given and it worked on three of the screws before they’d stripped too much. The fourth screw I couldn’t remove so I was able to slightly bend and turn the backing enough to access the fan. I also wasn’t able to peel the tape back without it completely disintegrating. Haha guess I don’t have the magic touch.

Angela Evans -

Do you need the K5 thermal peas or is the Arctic silver 5 thermal paste enough?

Carlos O - 回复

You just need a good thermal paste

Daniele Carminati -

添加评论

浏览统计数据:

过去 24 小时: 39

过去 7 天: 236

过去 30 天: 1,317

总计 73,466