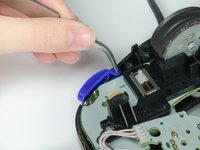
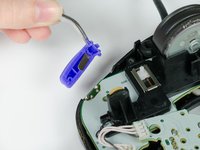
跳转到主内容

Nintendo GameCube Controller Directional Pad Replacement

你所需要的

  1. Nintendo GameCube Controller Directional Pad Replacement, Back Panel: 步骤 1 中的图像 1,1
    • Place the controller (buttons down) on a solid surface.

    • Remove the six 9.2mm Tri-wing Y0 screws that hold the back panel in place.

  2. Nintendo GameCube Controller Directional Pad Replacement: 步骤 2 中的图像 1,1
    • Gently lift the back panel up, separating it from the front panel.

    • Some of the buttons may fall out if they are knocked around.

  3. Nintendo GameCube Controller Directional Pad Replacement, Z Button: 步骤 3 中的图像 1,2 Nintendo GameCube Controller Directional Pad Replacement, Z Button: 步骤 3 中的图像 2,2
    • Grab the Z-button by the peg with tweezers and lift it out of the controller.

    • During re-assembly, make sure the plastic rim and spring fit into the slot provided, or else the case will not shut.

  4. Nintendo GameCube Controller Directional Pad Replacement, Circuit Board: 步骤 4 中的图像 1,1
    • Carefully unhook the cable that is looped around the peg.

  5. Nintendo GameCube Controller Directional Pad Replacement: 步骤 5 中的图像 1,1
    • Lift the circuit board out of the controller.

    • Do not grab the rumble motor to lift the circuit board as shown in the picture. It will in many cases just remove the rumble motor. Instead, grab the edges of the board.

  6. Nintendo GameCube Controller Directional Pad Replacement, Directional Pad: 步骤 6 中的图像 1,1
    • Remove the rubber backing with tweezers.

  7. Nintendo GameCube Controller Directional Pad Replacement: 步骤 7 中的图像 1,1
    • Use tweezers to grab the center peg of the directional pad and lift it out of its socket.

结论

To reassemble your device, follow these instructions in reverse order.

5等其他人完成本指南。

Sean Michel

于01/14/13注册

2,496 声望

创作了8篇指南

团队

Cal Poly, Team 19-44, Regan Winter 2013 Cal Poly, Team 19-44, Regan Winter 2013 的会员

CPSU-REGAN-W13S19G44

4 名成员

创作了26篇指南

0条评论

添加评论

浏览统计数据:

过去 24 小时: 0

过去 7 天: 8

过去 30 天: 37

总计 6,555