跳转到主内容

当前版本的文档还未经巡查,您可以查看最新的已查核版本

你所需要的

  1. 这个步骤还没有翻译 帮忙翻译一下

    : 步骤 1 中的图像 1,2 : 步骤 1 中的图像 2,2
    • Remove the six 13.25mm Phillips screws on the bottom of the game console with a #2.5 flathead screwdriver.

    • The screws are recessed about 40 mm.

    • Flip the game console right side up and take off the top by pulling it up and away from the rest of the device with your hands.

  2. 这个步骤还没有翻译 帮忙翻译一下

    : 步骤 2 中的图像 1,2 : 步骤 2 中的图像 2,2
    • Remove the seven 13.25mm Phillips screws from the metal cover with a Phillips head #2 screwdriver.

    • Remove the metal cover by pulling it up and away from the rest of the console with your hands.

  3. 这个步骤还没有翻译 帮忙翻译一下

    : 步骤 3 中的图像 1,3 : 步骤 3 中的图像 2,3 : 步骤 3 中的图像 3,3
    • Remove the two silver 17.45mm Phillips screws from the cartridge tray using a Phillips head #2 screwdriver.

    • Remove the two bronze 13.25mm Phillips screws from the cartridge tray using a Phillips head #2 screwdriver.

    • Slide the cartridge tray toward you, away from the 72-PIN connector, and off the motherboard assembly.

  4. 这个步骤还没有翻译 帮忙翻译一下

    : 步骤 4 中的图像 1,2 : 步骤 4 中的图像 2,2
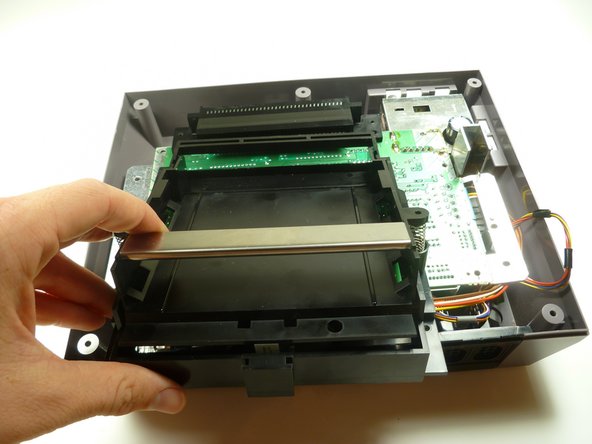
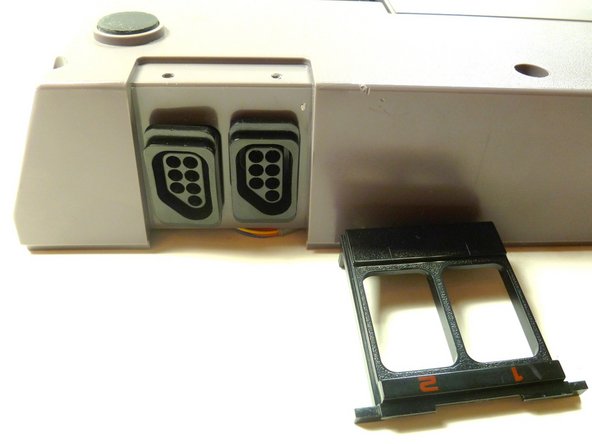
    • Note: Underneath the cartridge tray is a black trapezoid-shaped tab/lip (see marker). When properly assembled this tab/lip goes below the motherboard and shielding as seen here.

    • During reassembly, make sure you orient this tab underneath the motherboard in addition to orienting the tray on top. Failure to do so will bow the cartridge tray and place stress on the component, causing the cartridge spring mechanism to bind.

  5. 这个步骤还没有翻译 帮忙翻译一下

    : 步骤 5 中的图像 1,3 : 步骤 5 中的图像 2,3 : 步骤 5 中的图像 3,3
    • Remove the three 13.25mm Phillips screws that secure the motherboard to the lower case with a Phillips head #2 screwdriver.

    • Pull the motherboard assembly straight up and out of the plastic case with your hands.

    • Turn the motherboard assembly over so the metal cover is facing you.

  6. 这个步骤还没有翻译 帮忙翻译一下

    : 步骤 6 中的图像 1,1
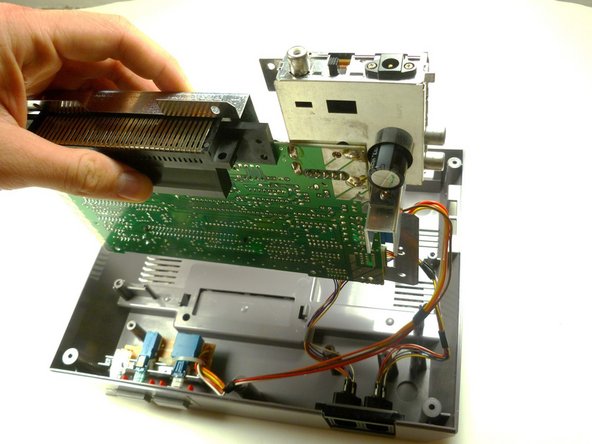
    • Disconnect the wire harnesses from the motherboard assembly:

    • Player 1

    • Player 2

    • Power

    • Make sure you remember where player 1 and player 2 cables are plugged in; do not mix them up. A good technique would be to write each title on a piece of tape and wrap them around the appropriate wire.

  7. 这个步骤还没有翻译 帮忙翻译一下

    : 步骤 7 中的图像 1,3 : 步骤 7 中的图像 2,3 : 步骤 7 中的图像 3,3
    • Lift off the EMI shield (metal cover) from the motherboard assembly.

    • Turn over the motherboard assembly so the 72-PIN connector is on the top of the motherboard assembly.

  8. 这个步骤还没有翻译 帮忙翻译一下

    : 步骤 8 中的图像 1,3 : 步骤 8 中的图像 2,3 : 步骤 8 中的图像 3,3
    • Flip the bottom cover of the game console over.

    • Remove the two 7.6mm Phillips screws that secure the plastic controller outlet cover with a Phillips head #2 screwdriver.

    • Pull the plastic cover off of the plastic NES case with your hands.

  9. 这个步骤还没有翻译 帮忙翻译一下

    : 步骤 9 中的图像 1,2 : 步骤 9 中的图像 2,2
    • Pull the controller outlet straight out with your hands, leaving an open hole in the plastic NES case.

终点

7等其他人完成本指南。

nicholasweiser

于09/22/10注册

2,634 声望

创作了6篇指南

团队

Cal Poly, Team 14-40, Forte Fall 2010 Cal Poly, Team 14-40, Forte Fall 2010 的会员

CPSU-FORTE-F10S14G40

4 名成员

创作了20篇指南

一条评论

I have the Mario track and duck hunt game but when j plug in the remote it switches from super Mario to the track meet but I can't control the remote ?

oh Dice - 回复

添加评论

浏览统计数据:

过去 24 小时: 0

过去 7 天: 11

过去 30 天: 47

总计 15,874