当前版本的文档还未经巡查,您可以查看最新的已查核版本。
你所需要的
-
这个步骤还没有翻译 帮忙翻译一下
-
Insert the spudger in between the lower casing and lower panel near the top right corner of the DSi.
-
Carefully run the spudger along the edge of the outer casing, creating an opening between the body and the casing.
-
Continue running the spudger around the body of the DSi until the majority of the lower case has been separated.
-
-
-
这个步骤还没有翻译 帮忙翻译一下
-
The connector is two pieces -- a white "male" piece (connected to the wires), and a beige "female" part (soldered to the main board).
-
There is a small "notch" in the female part, to give you a place to insert a small flat-head screwdriver. Put the corner of your screwdriver in there, and twist it gently to push the white part up (away from the main board). Do not try to pull it to the right (towards the battery board).
-
-
这个步骤还没有翻译 帮忙翻译一下
-
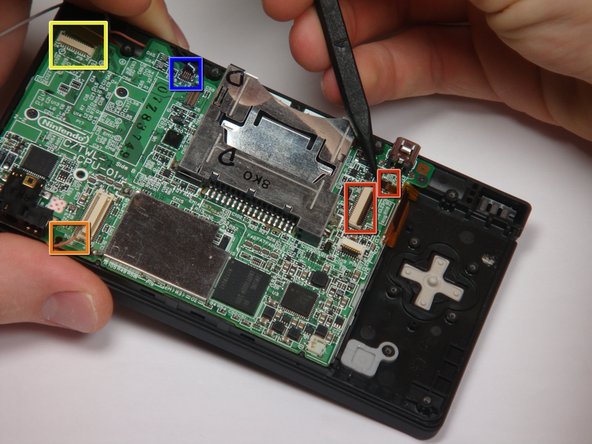
If you have not already done so, disconnect the two bottom-LCD ribbon cables from the main board by prying up the black latches and pulling the cable out to the side.
-
The ribbon cable (marked in blue) for the touch screen is particularly thin and fragile; be careful to avoid bending it more than necessary.
-
Flip up the latch and remove the touch screen cable.
-
Flip up the latch and remove the top-screen ribbon cable.
-
Pry up on the orange cable to disconnect it from the main board, much like the antenna cable on the Wi-Fi module.
-


2等其他人完成本指南。
团队

Cal Poly, Team 6-1, Maness Fall 2009 Cal Poly, Team 6-1, Maness Fall 2009 的会员
CPSU-MANESS-F09S6G1
5 名成员
创作了4篇指南
一条评论
the screwdriver needed is not a phillips #00, but a phillips #0000. I went down to Sears with my DSi and the Craftsman #00 was too large, the Craftsman #0000 (item 41645) fit perfectly, and was only two bucks