跳转到主内容

此翻译可能不反映源指南的最新更新。 帮助更新翻译查看源指南

任天堂 3DS XL 遥杆

你所需要的

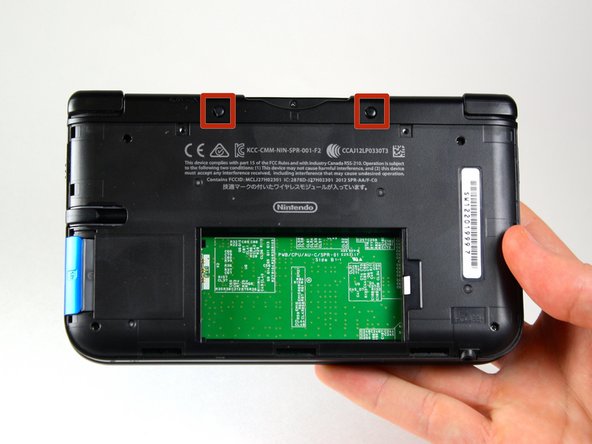
  1. 任天堂 3DS XL 遥杆, 电池: 步骤 1 中的图像 1,2 任天堂 3DS XL 遥杆, 电池: 步骤 1 中的图像 2,2
    • 拧下后壳顶部上的两颗4.2mm螺丝。

    • 这些螺丝有锁紧垫圈。可以防止螺丝从后壳上脱落。 本指南中不需要拆下这些垫圈。

  2. 任天堂 3DS XL 遥杆: 步骤 2 中的图像 1,2 任天堂 3DS XL 遥杆: 步骤 2 中的图像 2,2
    • 握住设备,使盖子朝上。

    • 使用塑料打开工具,从右上角开始撬开盖子。

    • 握住盖子的边缘以确保卡扣不会重新意外连接。

    • 寻找手写笔隔层下面的小部分。 如果仍然固定着,请撬开盖子。

    • 取下设备的盖子并放在一边。

  3. 任天堂 3DS XL 遥杆: 步骤 3 中的图像 1,3 任天堂 3DS XL 遥杆: 步骤 3 中的图像 2,3 任天堂 3DS XL 遥杆: 步骤 3 中的图像 3,3
    • 在电池右侧的缺口处插入塑料打开工具。

    • 将电池从底壳中撬起。

    • 从外壳中提起电池将其放置一边。

  4. 任天堂 3DS XL 遥杆, 遥杆: 步骤 4 中的图像 1,2 任天堂 3DS XL 遥杆, 遥杆: 步骤 4 中的图像 2,2
    • 在顶部游戏插卡槽的位置两边使用镊子将两个橡胶垫取出。

  5. 任天堂 3DS XL 遥杆: 步骤 5 中的图像 1,2 任天堂 3DS XL 遥杆: 步骤 5 中的图像 2,2
    • 使用#00十字螺丝刀卸下6颗 6.2mm 螺丝。

  6. 任天堂 3DS XL 遥杆: 步骤 6 中的图像 1,1
    • 使用#00 十字螺丝刀来卸下一颗位于游戏插卡槽顶部的2.3mm螺丝。

  7. 任天堂 3DS XL 遥杆: 步骤 7 中的图像 1,3 任天堂 3DS XL 遥杆: 步骤 7 中的图像 2,3 任天堂 3DS XL 遥杆: 步骤 7 中的图像 3,3
    • 使用塑料打开工具从底部边缘位置开始环绕一周来撬开底壳。

    • 两条排线将壳子与电路板相连。 小心不要用力拉动壳子和排线。

  8. 任天堂 3DS XL 遥杆: 步骤 8 中的图像 1,3 任天堂 3DS XL 遥杆: 步骤 8 中的图像 2,3 任天堂 3DS XL 遥杆: 步骤 8 中的图像 3,3
    • 使用塑料打开工具来拆下位于左右缓冲垫两边的排线电缆底座上的线缆。

    • 完全地将底壳从设备上移走,放到一边。

  9. 任天堂 3DS XL 遥杆: 步骤 9 中的图像 1,2 任天堂 3DS XL 遥杆: 步骤 9 中的图像 2,2
    • 将游戏卡插槽面向上放置。

    • 找到设备右侧的遥杆。

    • 拆下左上角和右下角的两个7.5 mm螺丝。

  10. 任天堂 3DS XL 遥杆: 步骤 10 中的图像 1,2 任天堂 3DS XL 遥杆: 步骤 10 中的图像 2,2
    • 使用塑料打开工具撬出遥杆。

    • 使用塑料打开工具时切勿过度用力。 这里遥杆任然与主板通过线缆连接。

    • 遥杆垫与遥杆之间有一个容易松动的垫圈,小心不要弄丢了。

  11. 任天堂 3DS XL 遥杆: 步骤 11 中的图像 1,2 任天堂 3DS XL 遥杆: 步骤 11 中的图像 2,2
    • 使用撬棒扁平一端来将连接到主板上的排线撬起。

    • 取下排线和遥杆。

结论

要重新组装您的设备,请按照本指南的相反顺序进行操作。

95等其他人完成本指南。

由衷感谢以下译者:

en zh

91%

Leon赵国鑫正在帮助我们修复这个世界! 您也想加入吗?
开始翻译 ›

Charlene Donlon

于04/08/14注册

10,215 声望

创作了8篇指南

团队

Cal Poly, Team 9-13, Regan Spring 2014 Cal Poly, Team 9-13, Regan Spring 2014 的会员

CPSU-REGAN-S14S9G13

5 名成员

创作了44篇指南

28条评论

Thank you very much.Perfect repair the circle pad.

The circle pad link:http://www.ebay.com/itm/Genuine-New-Anal...?

mouyi chen - 回复

Great guide, just upgraded my joystick. Bought my replacement from shapeways. The replacement is metal so it won't break like the last one. Also it's a lot more comfortable.

Anyway highly recommend this replacement:

https://www.shapeways.com/product/76RHQ7...

Omniwheel -

I'm having trouble removing the plastic case in step 7, it seems it refuses to come apart at the SD card part. What should I do? What is holding it down?

brittanylikespie1 - 回复

Remove the SD card

Daniel Sze -

My son broke the circle pad on his 3DS XL while playing Super Smash Bros.. I purchased 2 circle pads just in-case from http://www.ebay.com/itm/Genuine-New-Anal...

Excellent replacement, just like the original circle pad. The write-up and pics were very helpful. Highly recommend for anyone needing to buy and replace the circle button on a 3DS XL.

RickyB - 回复

添加评论

浏览统计数据:

过去 24 小时: 43

过去 7 天: 287

过去 30 天: 1,378

总计 176,254