跳转到主内容

当前版本的文档还未经巡查,您可以查看最新的已查核版本

你所需要的

  1. , 背盖: 步骤 1 中的图像 1,1
    • 拧松位于背盖顶部的四颗 Phillips #00 螺丝。

    • 螺丝内侧有垫圈固定,因此它们不会从背盖上脱离。

    • 评论区中充满不幸的拆机经历,他们会告诉你螺丝十分容易在拆解过程中磨坏。请用力按压,并慢慢地拧动。

  2. : 步骤 2 中的图像 1,2 : 步骤 2 中的图像 2,2
    • 一只手握住设备,然后将其翻过来。

    • 用另外一只手抓住背盖的顶部边缘,这样背盖就不会落入原位。

    • 再次将3DS翻转,此时背盖应当朝上。

    • 向远离设备的方向拉动背盖,将其从设备上拆下。

  3. , 电池: 步骤 3 中的图像 1,3 , 电池: 步骤 3 中的图像 2,3 , 电池: 步骤 3 中的图像 3,3
    • 将塑料拆机工具插入位于电池与电池仓之间的凹槽中。

    • 用塑料拆机工具撬起电池。

    • 抓住电池的顶部边缘,将其从电池仓中抬起。

  4. 这个步骤还没有翻译 帮忙翻译一下

    : 步骤 4 中的图像 1,1
    • Remove the nine 6.3 mm black Phillips screws from the lower case.

    • These screws will strip very easily unless you use the correct size bit. Apply pressure to the screws while turning to avoid stripping them.

    • Remove the 2.4 mm silver Phillips screw above the game cartridge slot.

  5. 这个步骤还没有翻译 帮忙翻译一下

    : 步骤 5 中的图像 1,3 : 步骤 5 中的图像 2,3 : 步骤 5 中的图像 3,3
    • Lift the bottom edge of the lower case off the rest of the 3DS.

    • There are still two ribbon cables connecting the mother board to the case, so be sure not to pull the lower case all the way off.

    • Use a plastic opening tool to pry the shoulder button ribbon cables off their sockets on the motherboard.

    • Remove the lower case from the device.

  6. 这个步骤还没有翻译 帮忙翻译一下

    : 步骤 6 中的图像 1,1
    • Remove the two 7.7 mm Phillips screws securing the back of the Circle Pad to the motherboard.

  7. 这个步骤还没有翻译 帮忙翻译一下

    : 步骤 7 中的图像 1,3 : 步骤 7 中的图像 2,3 : 步骤 7 中的图像 3,3
    • Use the flat end of a spudger to pry the back of the Circle Pad off the motherboard.

    • Lift the Circle Pad joystick off the motherboard and lay it on its back so that the ribbon cable connector is accessible.

  8. 这个步骤还没有翻译 帮忙翻译一下

    : 步骤 8 中的图像 1,3 : 步骤 8 中的图像 2,3 : 步骤 8 中的图像 3,3
    • Use the flat end of a spudger or your fingernail to flip up the retaining flap on the Circle Pad ribbon cable ZIF socket.

    • Be sure you are prying up on the hinged retaining flap, not the socket itself.

    • Lift the Circle Pad joystick off the motherboard.

  9. 这个步骤还没有翻译 帮忙翻译一下

    : 步骤 9 中的图像 1,2 : 步骤 9 中的图像 2,2
    • To decrease the chance of losing it during repairs, you may want to remove the two thin pads underneath the Circle Pad joystick.

    • Use a spudger or screwdriver to lift the pads up and remove them from the device.

  10. 这个步骤还没有翻译 帮忙翻译一下

    : 步骤 10 中的图像 1,1
    • Remove the two 4.5 mm Phillips screws securing the SD board to the motherboard.

  11. 这个步骤还没有翻译 帮忙翻译一下

    : 步骤 11 中的图像 1,2 : 步骤 11 中的图像 2,2
    • Use the flat end of a spudger to pry the SD board ribbon cable connector off its socket on the motherboard.

  12. 这个步骤还没有翻译 帮忙翻译一下

    : 步骤 12 中的图像 1,3 : 步骤 12 中的图像 2,3 : 步骤 12 中的图像 3,3
    • Insert the flat end of a spudger between the SD board and the motherboard.

    • Pry up slowly to loosen the SD board from the RF shield underneath it. If you pry too quickly, you may tear the shield or break its solder points.

    • Run the spudger along the sides of the SD board to free it from the adhesive holding it in place.

    • Once completely freed, lift the SD board straight off the motherboard.

  13. 这个步骤还没有翻译 帮忙翻译一下

    : 步骤 13 中的图像 1,2 : 步骤 13 中的图像 2,2
    • Slide the flat end of a spudger under the corner of the Wi-Fi board, and lift it away from the motherboard.

    • The Wi-Fi antenna cable is still connected to the Wi-Fi board, so you cannot completely remove the Wi-Fi board yet.

  14. 这个步骤还没有翻译 帮忙翻译一下

    : 步骤 14 中的图像 1,3 : 步骤 14 中的图像 2,3 : 步骤 14 中的图像 3,3
    • Lift the Wi-Fi board off the motherboard and rotate it so that the bottom side is facing up.

    • Use the flat end of a spudger to pry the Wi-Fi antenna cable connector off its socket on the Wi-Fi board.

    • Remove the Wi-Fi board from the device.

  15. 这个步骤还没有翻译 帮忙翻译一下

    : 步骤 15 中的图像 1,2 : 步骤 15 中的图像 2,2
    • Grasp the microphone ribbon cable near the microphone with a pair of tweezers.

    • Pull the microphone straight up out of the upper case.

  16. 这个步骤还没有翻译 帮忙翻译一下

    : 步骤 16 中的图像 1,3 : 步骤 16 中的图像 2,3 : 步骤 16 中的图像 3,3
    • Use the flat end of a spudger or your fingernail to flip up the retaining flap on the speaker assembly ribbon cable ZIF socket.

    • Be sure you are prying up on the hinged retaining flap, NOT the socket itself. Damaging the socket or cable will result in a 3DS that will blink its power LED when you press the power button - and do nothing else.

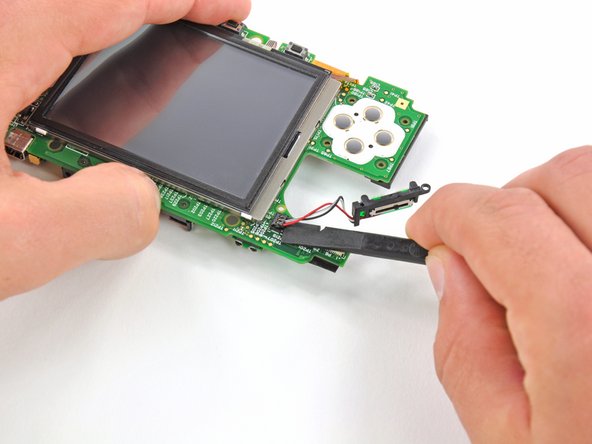
    • Disconnect the speaker assembly ribbon cable with a pair of tweezers.

  17. 这个步骤还没有翻译 帮忙翻译一下

    : 步骤 17 中的图像 1,2 : 步骤 17 中的图像 2,2
    • Use the flat end of a spudger or your fingernail to flip up the retaining flap on the camera ribbon cable ZIF socket.

    • Be sure you are prying up on the hinged retaining flap, not the socket itself.

    • When reassembling, note that the gold contacts face toward the motherboard (as opposed to the camera cable's gold contacts facing away).

  18. 这个步骤还没有翻译 帮忙翻译一下

    : 步骤 18 中的图像 1,3 : 步骤 18 中的图像 2,3 : 步骤 18 中的图像 3,3
    • Remove seven Phillips screws securing the motherboard to the upper case:

    • Four 2.5 mm gold screws

    • Two 3.5 mm black screws

    • One 2.5 mm silver screw

    • When you remove this screw the volume slider can fall out.

    • Lift the side of the motherboard that sits along the bottom edge of the 3DS.

  19. 这个步骤还没有翻译 帮忙翻译一下

    : 步骤 19 中的图像 1,3 : 步骤 19 中的图像 2,3 : 步骤 19 中的图像 3,3
    • Continue lifting the motherboard assembly and rotate it until it is resting next to the rest of the device.

    • Use the flat end of a spudger or your fingernail to flip up the retaining flap on the LCD ribbon cable ZIF socket.

    • Be sure you are prying up on the hinged retaining flap, not the socket itself. Damaging the socket or cable will result in a 3DS that won't have a functional top screen.

  20. 这个步骤还没有翻译 帮忙翻译一下

    : 步骤 20 中的图像 1,1
    • Remove the motherboard assembly from the rest of the device.

  21. 这个步骤还没有翻译 帮忙翻译一下

    : 步骤 21 中的图像 1,2 : 步骤 21 中的图像 2,2
    • Use the flat end of a spudger to pry the volume switch connector out of its socket on the motherboard.

  22. 这个步骤还没有翻译 帮忙翻译一下

    : 步骤 22 中的图像 1,1
    • Remove the volume switch from the motherboard.

终点

3等其他人完成本指南。

David Hodson

于04/13/10注册

150,458 声望

创作了127篇指南

2条评论

What are all the tools I'd need to complete this repair? And where can I buy them?

Saiph Ichkuro - 回复

“Follow this guide in reverse” - I’m sorry, but that’s not helpful at all, the volume switch is near-impossible to put back in once fully removed from the motherboard!

Lucy - 回复

添加评论

浏览统计数据:

过去 24 小时: 7

过去 7 天: 38

过去 30 天: 218

总计 19,385