跳转到主内容

当前版本的文档还未经巡查,您可以查看最新的已查核版本

你所需要的

  1. , 背盖: 步骤 1 中的图像 1,1
    • 拧松位于背盖顶部的四颗 Phillips #00 螺丝。

    • 螺丝内侧有垫圈固定,因此它们不会从背盖上脱离。

    • 评论区中充满不幸的拆机经历,他们会告诉你螺丝十分容易在拆解过程中磨坏。请用力按压,并慢慢地拧动。

  2. : 步骤 2 中的图像 1,2 : 步骤 2 中的图像 2,2
    • 一只手握住设备,然后将其翻过来。

    • 用另外一只手抓住背盖的顶部边缘,这样背盖就不会落入原位。

    • 再次将3DS翻转,此时背盖应当朝上。

    • 向远离设备的方向拉动背盖,将其从设备上拆下。

  3. , 电池: 步骤 3 中的图像 1,3 , 电池: 步骤 3 中的图像 2,3 , 电池: 步骤 3 中的图像 3,3
    • 将塑料拆机工具插入位于电池与电池仓之间的凹槽中。

    • 用塑料拆机工具撬起电池。

    • 抓住电池的顶部边缘,将其从电池仓中抬起。

  4. 这个步骤还没有翻译 帮忙翻译一下

    : 步骤 4 中的图像 1,1
    • Remove the nine 6.3 mm black Phillips screws from the lower case.

    • These screws will strip very easily unless you use the correct size bit. Apply pressure to the screws while turning to avoid stripping them.

    • Remove the 2.4 mm silver Phillips screw above the game cartridge slot.

  5. 这个步骤还没有翻译 帮忙翻译一下

    : 步骤 5 中的图像 1,3 : 步骤 5 中的图像 2,3 : 步骤 5 中的图像 3,3
    • Lift the bottom edge of the lower case off the rest of the 3DS.

    • There are still two ribbon cables connecting the mother board to the case, so be sure not to pull the lower case all the way off.

    • Use a plastic opening tool to pry the shoulder button ribbon cables off their sockets on the motherboard.

    • Remove the lower case from the device.

  6. 这个步骤还没有翻译 帮忙翻译一下

    : 步骤 6 中的图像 1,1
    • Remove the two 7.7 mm Phillips screws securing the back of the Circle Pad to the motherboard.

  7. 这个步骤还没有翻译 帮忙翻译一下

    : 步骤 7 中的图像 1,3 : 步骤 7 中的图像 2,3 : 步骤 7 中的图像 3,3
    • Use the flat end of a spudger to pry the back of the Circle Pad off the motherboard.

    • Lift the Circle Pad joystick off the motherboard and lay it on its back so that the ribbon cable connector is accessible.

  8. 这个步骤还没有翻译 帮忙翻译一下

    : 步骤 8 中的图像 1,3 : 步骤 8 中的图像 2,3 : 步骤 8 中的图像 3,3
    • Use the flat end of a spudger or your fingernail to flip up the retaining flap on the Circle Pad ribbon cable ZIF socket.

    • Be sure you are prying up on the hinged retaining flap, not the socket itself.

    • Lift the Circle Pad joystick off the motherboard.

  9. 这个步骤还没有翻译 帮忙翻译一下

    : 步骤 9 中的图像 1,2 : 步骤 9 中的图像 2,2
    • To decrease the chance of losing it during repairs, you may want to remove the two thin pads underneath the Circle Pad joystick.

    • Use a spudger or screwdriver to lift the pads up and remove them from the device.

  10. 这个步骤还没有翻译 帮忙翻译一下

    : 步骤 10 中的图像 1,1
    • Remove the two 4.5 mm Phillips screws securing the SD board to the motherboard.

  11. 这个步骤还没有翻译 帮忙翻译一下

    : 步骤 11 中的图像 1,2 : 步骤 11 中的图像 2,2
    • Use the flat end of a spudger to pry the SD board ribbon cable connector off its socket on the motherboard.

  12. 这个步骤还没有翻译 帮忙翻译一下

    : 步骤 12 中的图像 1,3 : 步骤 12 中的图像 2,3 : 步骤 12 中的图像 3,3
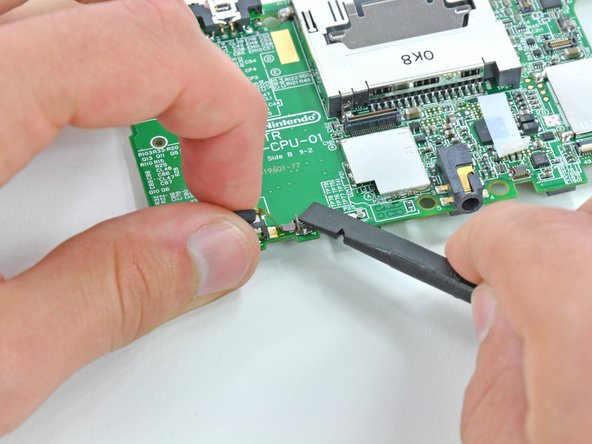
    • Insert the flat end of a spudger between the SD board and the motherboard.

    • Pry up slowly to loosen the SD board from the RF shield underneath it. If you pry too quickly, you may tear the shield or break its solder points.

    • Run the spudger along the sides of the SD board to free it from the adhesive holding it in place.

    • Once completely freed, lift the SD board straight off the motherboard.

  13. 这个步骤还没有翻译 帮忙翻译一下

    : 步骤 13 中的图像 1,2 : 步骤 13 中的图像 2,2
    • Slide the flat end of a spudger under the corner of the Wi-Fi board, and lift it away from the motherboard.

    • The Wi-Fi antenna cable is still connected to the Wi-Fi board, so you cannot completely remove the Wi-Fi board yet.

  14. 这个步骤还没有翻译 帮忙翻译一下

    : 步骤 14 中的图像 1,3 : 步骤 14 中的图像 2,3 : 步骤 14 中的图像 3,3
    • Lift the Wi-Fi board off the motherboard and rotate it so that the bottom side is facing up.

    • Use the flat end of a spudger to pry the Wi-Fi antenna cable connector off its socket on the Wi-Fi board.

    • Remove the Wi-Fi board from the device.

  15. 这个步骤还没有翻译 帮忙翻译一下

    : 步骤 15 中的图像 1,2 : 步骤 15 中的图像 2,2
    • Grasp the microphone ribbon cable near the microphone with a pair of tweezers.

    • Pull the microphone straight up out of the upper case.

  16. 这个步骤还没有翻译 帮忙翻译一下

    : 步骤 16 中的图像 1,3 : 步骤 16 中的图像 2,3 : 步骤 16 中的图像 3,3
    • Use the flat end of a spudger or your fingernail to flip up the retaining flap on the speaker assembly ribbon cable ZIF socket.

    • Be sure you are prying up on the hinged retaining flap, NOT the socket itself. Damaging the socket or cable will result in a 3DS that will blink its power LED when you press the power button - and do nothing else.

    • Disconnect the speaker assembly ribbon cable with a pair of tweezers.

  17. 这个步骤还没有翻译 帮忙翻译一下

    : 步骤 17 中的图像 1,2 : 步骤 17 中的图像 2,2
    • Use the flat end of a spudger or your fingernail to flip up the retaining flap on the camera ribbon cable ZIF socket.

    • Be sure you are prying up on the hinged retaining flap, not the socket itself.

    • When reassembling, note that the gold contacts face toward the motherboard (as opposed to the camera cable's gold contacts facing away).

  18. 这个步骤还没有翻译 帮忙翻译一下

    : 步骤 18 中的图像 1,3 : 步骤 18 中的图像 2,3 : 步骤 18 中的图像 3,3
    • Remove seven Phillips screws securing the motherboard to the upper case:

    • Four 2.5 mm gold screws

    • Two 3.5 mm black screws

    • One 2.5 mm silver screw

    • When you remove this screw the volume slider can fall out.

    • Lift the side of the motherboard that sits along the bottom edge of the 3DS.

  19. 这个步骤还没有翻译 帮忙翻译一下

    : 步骤 19 中的图像 1,3 : 步骤 19 中的图像 2,3 : 步骤 19 中的图像 3,3
    • Continue lifting the motherboard assembly and rotate it until it is resting next to the rest of the device.

    • Use the flat end of a spudger or your fingernail to flip up the retaining flap on the LCD ribbon cable ZIF socket.

    • Be sure you are prying up on the hinged retaining flap, not the socket itself. Damaging the socket or cable will result in a 3DS that won't have a functional top screen.

  20. 这个步骤还没有翻译 帮忙翻译一下

    : 步骤 20 中的图像 1,1
    • Remove the motherboard assembly from the rest of the device.

  21. 这个步骤还没有翻译 帮忙翻译一下

    : 步骤 21 中的图像 1,3 : 步骤 21 中的图像 2,3 : 步骤 21 中的图像 3,3
    • Set the motherboard assembly down so that the lower LCD is side-by-side with the motherboard.

    • Use the tip of a spudger or your fingers to peel back the white tape covering the touchscreen ribbon cable connector.

  22. 这个步骤还没有翻译 帮忙翻译一下

    : 步骤 22 中的图像 1,2 : 步骤 22 中的图像 2,2
    • Use the flat end of a spudger or your fingernail to flip up the retaining flap on the touchscreen ribbon cable ZIF socket.

    • Be sure you are prying up on the hinged retaining flap, not the socket itself.

  23. 这个步骤还没有翻译 帮忙翻译一下

    : 步骤 23 中的图像 1,3 : 步骤 23 中的图像 2,3 : 步骤 23 中的图像 3,3
    • Use the flat end of a spudger or your fingernail to flip up the retaining flap on the lower LCD power ribbon cable ZIF socket.

    • Be sure you are prying up on the hinged retaining flap, not the socket itself.

    • Pull the ribbon cable out of the connector with a pair of tweezers.

    • Grasp the ribbon cable as close to the connector as possible with the tweezers to avoid tearing it.

  24. 这个步骤还没有翻译 帮忙翻译一下

    : 步骤 24 中的图像 1,2 : 步骤 24 中的图像 2,2
    • Use the flat end of a spudger or your fingernail to flip up the retaining flap on the lower LCD data ribbon cable ZIF socket.

    • Be sure you are prying up on the hinged retaining flap, not the socket itself.

  25. 这个步骤还没有翻译 帮忙翻译一下

    : 步骤 25 中的图像 1,1
    • Grasp the lower display assembly and pull it directly away from the motherboard.

  26. 这个步骤还没有翻译 帮忙翻译一下

    : 步骤 26 中的图像 1,2 : 步骤 26 中的图像 2,2
    • Use the flat end of a spudger or your fingernail to flip up the retaining flap on the microphone ribbon cable ZIF socket.

    • Be sure you are prying up on the hinged retaining flap, not the socket itself.

  27. 这个步骤还没有翻译 帮忙翻译一下

    : 步骤 27 中的图像 1,1
    • Lift the microphone and its attached ribbon cable off the motherboard.

  28. 这个步骤还没有翻译 帮忙翻译一下

    : 步骤 28 中的图像 1,2 : 步骤 28 中的图像 2,2
    • Turn the motherboard over.

    • Use the flat end of a spudger to pry the volume switch connector out of its socket on the motherboard.

  29. 这个步骤还没有翻译 帮忙翻译一下

    : 步骤 29 中的图像 1,1
    • Remove the volume switch from the motherboard.

  30. 这个步骤还没有翻译 帮忙翻译一下

    : 步骤 30 中的图像 1,1
    • The motherboard remains.

终点

37等其他人完成本指南。

David Hodson

于04/13/10注册

150,458 声望

创作了127篇指南

11条评论

This guide seriously helped me get a broken 3DS and replace the motherboard to make it a working one. Thank you for doing this guide, you are awesome. :)

Mr Blubird - 回复

I can't thank you enough for this guide! My 3 year old submerged my 8yr olds coveted 3DS in the toilet yesterday...I frantically took it apart as soon as I found it (knew not to turn it on) and wisely took pics on my phone as I frantically took apart each piece to get it dried....was however up all night dreading my ability to put it back together again...until I found this awesome step by step guide. Won't try to put it back together for another few days, but I will update my post and let you know if I got it working again:) Thanks so much!

abdefreitas - 回复

I need help!

My 3DS is acting alone directional up!

I opened the device and realized that there is a short between TP85 and ground !

I need to know what CI is responsible for the control functions !

Thanks!

Rilson da Silva Ferraz - 回复

The control functions are on the back of the motherboard facing the lower screen. It is the 4 white buttons right below the huge gap where the circular pad goes

afdflol82 -

Excellent guide. This is an incredibly frustrating device to take apart and get back together.

Probably the toughest part is the ribbon cables. They're positively tiny and some of them force you to insert them without much space to work. The best strategy I've found is to use a small poking tool like a pen cap clip to nudge them very patiently into place. First one corner in the socket so it doesn't fly back out, then nudge it along and get the other corner. Then straighten it out to line up perfectly. Being extremely patient and gentle are key -- if you even slightly bend a corner without damaging the wires, it becomes infinitely harder to get it in successfully. Most of the ribbons have small notches you can use to help you push them in and judge how far in they are.

Also if the wifi antenna wire gets loose when you're putting it back together, you'll have to undo everything to get it back into the right spot.

Chupi - 回复

添加评论

浏览统计数据:

过去 24 小时: 14

过去 7 天: 165

过去 30 天: 682

总计 78,518