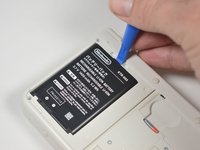
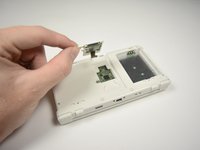
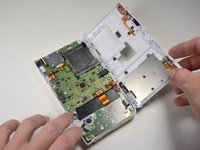
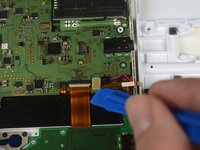
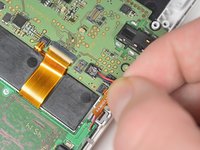
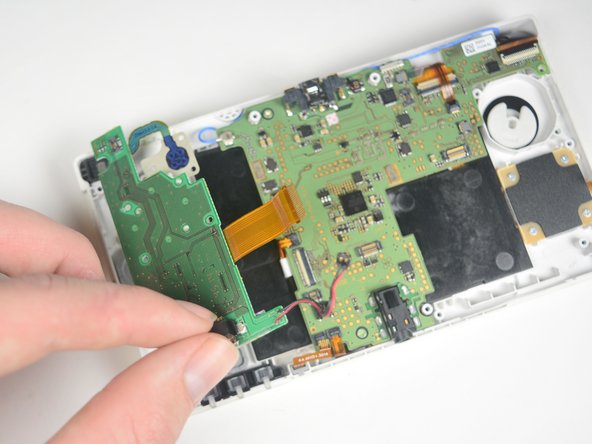
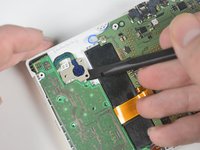
跳转到主内容

Nintendo 3DS 2015 C-Stick Replacement

你所需要的

  1. Nintendo 3DS 2015 C-Stick Replacement, Battery: 步骤 1 中的图像 1,1
    • Unscrew the two 3mm Phillips #0 head screws along the top edge of the device.

    • The screws on the back panel strip easily. Go slowly and press down firmly.

    • The screws on the back panel are held in by locking washers, so they won't come out of the back panel.

  2. Nintendo 3DS 2015 C-Stick Replacement: 步骤 2 中的图像 1,2 Nintendo 3DS 2015 C-Stick Replacement: 步骤 2 中的图像 2,2
    • Pull the top corner tabs of the front face plate outward and towards you.

    • Pull the faceplate up and out of the slots at the bottom of the device.

    • Set aside the back faceplate.

  3. Nintendo 3DS 2015 C-Stick Replacement: 步骤 3 中的图像 1,3 Nintendo 3DS 2015 C-Stick Replacement: 步骤 3 中的图像 2,3 Nintendo 3DS 2015 C-Stick Replacement: 步骤 3 中的图像 3,3
    • Insert a plastic opening tool into the notch at the top of the battery.

    • Pry the battery up with the plastic opening tool.

  4. Nintendo 3DS 2015 C-Stick Replacement, SD Card Reader: 步骤 4 中的图像 1,1
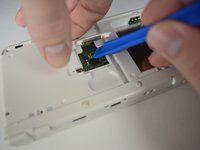
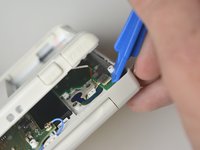
    • Unscrew the three 3mm Y0 screws along the right and bottom of the SD card reader.

    • The bottom of the SD card reader should slightly pop out after removing the screws.

  5. Nintendo 3DS 2015 C-Stick Replacement: 步骤 5 中的图像 1,1
    • Pull the SD card reader from the edge with two holes gently to free the tab at the top of the SD card reader.

    • Don't completely pull the SD card out of the device yet. There is a ribbon cable connected under the SD card reader.

    • Reorient the device so that the power jack faces you.

  6. Nintendo 3DS 2015 C-Stick Replacement: 步骤 6 中的图像 1,2 Nintendo 3DS 2015 C-Stick Replacement: 步骤 6 中的图像 2,2
    • Lift the SD card reader gently.

    • Use a plastic opening tool to pry the SD card ribbon cable off the socket on the motherboard.

    • Lift the SD card reader out off of the lower casing.

  7. Nintendo 3DS 2015 C-Stick Replacement, Lower Case: 步骤 7 中的图像 1,3 Nintendo 3DS 2015 C-Stick Replacement, Lower Case: 步骤 7 中的图像 2,3 Nintendo 3DS 2015 C-Stick Replacement, Lower Case: 步骤 7 中的图像 3,3
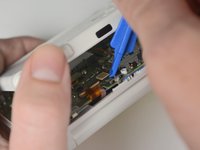
    • Reorient the device so that the game slot now faces you.

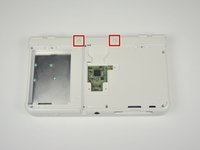
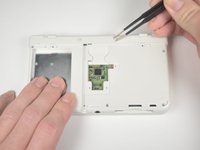
    • Remove the two rubber bumpers along the top of the device using tweezers.

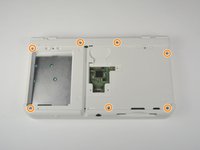
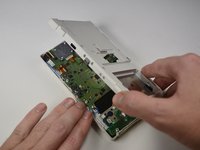
    • Unscrew the seven 6mm Phillips #00 screws along the top and bottom of the 3DS.

  8. Nintendo 3DS 2015 C-Stick Replacement: 步骤 8 中的图像 1,2 Nintendo 3DS 2015 C-Stick Replacement: 步骤 8 中的图像 2,2
    • Lift the top edge of the lower case slightly off on the 3DS.

    • Don't pull the lower casing completely off, you may break those connections. There are ribbon cables that must be disconnected first.

    • Pry the ribbon cable socket under the right trigger using a plastic opening tool.

    • Pry the ribbon cable socket under the infrared receiver cover using a plastic opening tool.

  9. Nintendo 3DS 2015 C-Stick Replacement: 步骤 9 中的图像 1,3 Nintendo 3DS 2015 C-Stick Replacement: 步骤 9 中的图像 2,3 Nintendo 3DS 2015 C-Stick Replacement: 步骤 9 中的图像 3,3
    • Open the device slowly from its top edge. Be careful not to tug the ribbon cable connected near the bottom edge of the device.

    • Pry the last ribbon cable attached to the lower case using a plastic opening tool.

  10. Nintendo 3DS 2015 C-Stick Replacement, C-Stick: 步骤 10 中的图像 1,1
    • Remove the four 3mm Phillips #00 screws.

    • Remove the three 3mm Phillips #00 screws.

  11. Nintendo 3DS 2015 C-Stick Replacement: 步骤 11 中的图像 1,3 Nintendo 3DS 2015 C-Stick Replacement: 步骤 11 中的图像 2,3 Nintendo 3DS 2015 C-Stick Replacement: 步骤 11 中的图像 3,3
    • Pull up gently on power cable to loose it from the motherboard.

    • Pull the ribbon cable, connected to the mic, gently towards you with a pair of tweezers.

    • Lift the tab to free the large ribbon cable on just above the power connector.

  12. Nintendo 3DS 2015 C-Stick Replacement: 步骤 12 中的图像 1,2 Nintendo 3DS 2015 C-Stick Replacement: 步骤 12 中的图像 2,2
    • Pry the C-Stick from its plastic housing with the flat side of a spudger.

    • Lift the assembly gently out of the device from the battery connector at the bottom of the leftmost circuit board.

  13. Nintendo 3DS 2015 C-Stick Replacement: 步骤 13 中的图像 1,2 Nintendo 3DS 2015 C-Stick Replacement: 步骤 13 中的图像 2,2
    • Flip the board over to reveal the connector for the C-stick's ribbon cable.

    • Lift the tab on the ZIF connector securing the C-Stick to the board.

    • Separate the C-Stick from the board.

结论

To reassemble your device, follow these instructions in reverse order.

2等其他人完成本指南。

Tyler Starr

于10/06/16注册

1,500 声望

创作了7篇指南

团队

Cal Poly, Team 4-6, Livingston Fall 2016 Cal Poly, Team 4-6, Livingston Fall 2016 的会员

CPSU-LIVINGSTON-F16S4G6

4 名成员

创作了35篇指南

3条评论

What do I do if two of my screws were stripped when I got my system? I need to fix my cstick desperately but I cant get inside of my 3ds. Anything at all would help.

~Akiru

Darian Morales - 回复

Hello Akiru! Stripped screws can be a bugger, but you do have some options. I could outline some of your options here, but iFixit has a good article for this one. Go ahead and take a look at the article on iFixit titled "How to Remove a Stripped Screw", it should help you out.

Have a Good One.

Tyler

Tyler Starr -

you do have the option of just ripping it out

Deo Padilla - 回复

添加评论

浏览统计数据:

过去 24 小时: 11

过去 7 天: 80

过去 30 天: 306

总计 10,269