跳转到主内容

当前版本的文档还未经巡查,您可以查看最新的已查核版本

你所需要的

  1. , 电池: 步骤 1 中的图像 1,1
    • 在D70的下方用指尖向下拨动电池释放卡的中心。

    • 打开电池仓。

  2. 这个步骤还没有翻译 帮忙翻译一下

    : 步骤 2 中的图像 1,1
    • Pull the battery out of the D70.

    • It may be necessary to wiggle the battery while pulling to free it from its pocket in the case.

  3. 这个步骤还没有翻译 帮忙翻译一下

    : 步骤 3 中的图像 1,1
    • Remove the following eight screws securing the bottom cover to the D70:

    • Six 5.8 mm Phillips screws

    • One 10.7 mm Phillips screws

    • One 8.2 mm Phillips screws

  4. 这个步骤还没有翻译 帮忙翻译一下

    : 步骤 4 中的图像 1,2 : 步骤 4 中的图像 2,2
    • Carefully pull the bottom cover to separate it from the body of the D70.

    • Remove the bottom cover from the D70.

  5. 这个步骤还没有翻译 帮忙翻译一下

    : 步骤 5 中的图像 1,3 : 步骤 5 中的图像 2,3 : 步骤 5 中的图像 3,3
    • Remove the four ZIF ribbon cables highlighted in red by using the following procedure:

    • Use your fingernail to flip up the ZIF cable retaining flap on each socket.

    • Be sure you are prying up the retaining flap, not the socket.

    • Pull the ribbon cable straight out of its socket.

  6. 这个步骤还没有翻译 帮忙翻译一下

    : 步骤 6 中的图像 1,1
    • Carefully peel back the piece of tape covering the Compact Flash ribbon cable socket.

    • It is not necessary to completely remove this piece of tape.

  7. 这个步骤还没有翻译 帮忙翻译一下

    : 步骤 7 中的图像 1,3 : 步骤 7 中的图像 2,3 : 步骤 7 中的图像 3,3
    • Use your fingernails to carefully pull the ZIF cable lock away from its socket.

    • Do not try to completely remove the ZIF cable lock. It will move about 1 mm and stop.

    • Use a pair of tweezers to pull the Compact Flash ribbon cable out of its socket.

  8. 这个步骤还没有翻译 帮忙翻译一下

    : 步骤 8 中的图像 1,1
    • Be sure not to lose the small iron core around the DC-In ribbon cable.

  9. 这个步骤还没有翻译 帮忙翻译一下

    : 步骤 9 中的图像 1,1
    • Remove the four 4.3 mm Phillips screws securing the memory compression board to the D70.

  10. 这个步骤还没有翻译 帮忙翻译一下

    : 步骤 10 中的图像 1,1
    • Use a pair of tweezers to pull the USB connector bracket away from the edge of the memory compression board.

  11. 这个步骤还没有翻译 帮忙翻译一下

    : 步骤 11 中的图像 1,2 : 步骤 11 中的图像 2,2
    • Grab the memory compression board by its edges at the position shown in the first picture.

    • Pull the memory compression board straight up off the DC/DC board to avoid damaging the connector on the underside of the memory compression board.

  12. 这个步骤还没有翻译 帮忙翻译一下

    : 步骤 12 中的图像 1,2 : 步骤 12 中的图像 2,2
    • De-route the two leads routed over the connector boxed in yellow.

    • Use your thumbnails to push the connector out of its socket.

  13. 这个步骤还没有翻译 帮忙翻译一下

    : 步骤 13 中的图像 1,1
    • Remove the two Phillips screws securing the grip side of the rear cover to the D70.

  14. 这个步骤还没有翻译 帮忙翻译一下

    : 步骤 14 中的图像 1,1
    • Remove the two Phillips screws securing the DC-In side of the rear cover to the D70.

  15. 这个步骤还没有翻译 帮忙翻译一下

    : 步骤 15 中的图像 1,2 : 步骤 15 中的图像 2,2
    • Carefully pull the sides of the rear cover away from the body of the D70.

    • Pull the rear cover off the body of the D70, minding the LCD board ribbon cable that may get caught.

  16. 这个步骤还没有翻译 帮忙翻译一下

    : 步骤 16 中的图像 1,1
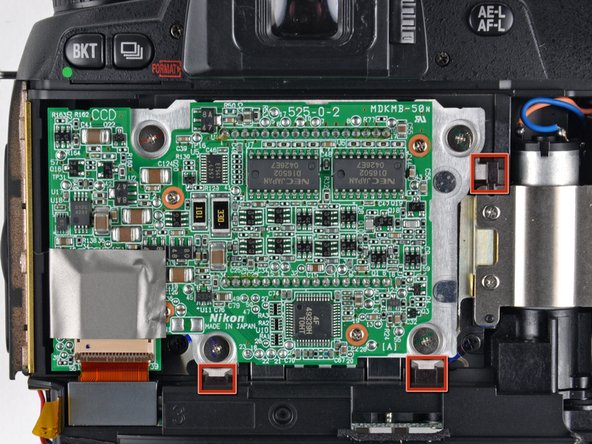
    • At this point, the capacitor is visible and its exposed contacts are boxed in red. Even though they are recessed, be careful not to touch the contacts to avoid shocking yourself.

  17. 这个步骤还没有翻译 帮忙翻译一下

    : 步骤 17 中的图像 1,1
    • Peel back the piece of tape connecting the iron core around the CCD board ribbon cable to the inner case.

  18. 这个步骤还没有翻译 帮忙翻译一下

    : 步骤 18 中的图像 1,1
    • Remove the four 4.8 mm Phillips screws securing the CCD board to the D70.

  19. 这个步骤还没有翻译 帮忙翻译一下

    : 步骤 19 中的图像 1,2 : 步骤 19 中的图像 2,2
    • Remove the CCD board from the D70, minding any cables that may get caught.

    • When reinstalling the CCD board, be sure to press the alignment posts on the right and bottom edges of the board up against the guides machined into the case while tightening the screws down.

终点

25等其他人完成本指南。

2条评论

Great instructions.

One important note: When re-installing the CCD board ribbon cable into the CCD board, the cable will go into the connector about 2mm and feel like it's seated. However, the cable must go 3mm-4mm into the connector. Otherwise, you will get a "This Card Cannot Be Used" error message each time you depress the shutter button.

Ross Edmond - 回复

添加评论

浏览统计数据:

过去 24 小时: 1

过去 7 天: 9

过去 30 天: 38

总计 31,205