跳转到主内容

Nikon D5200 Motherboard Or Camera Back Replacement

你所需要的

  1. Nikon D5200 Motherboard Or Camera Back Replacement, Remove Battery, SD Card, Bottom Screws.: 步骤 1 中的图像 1,1
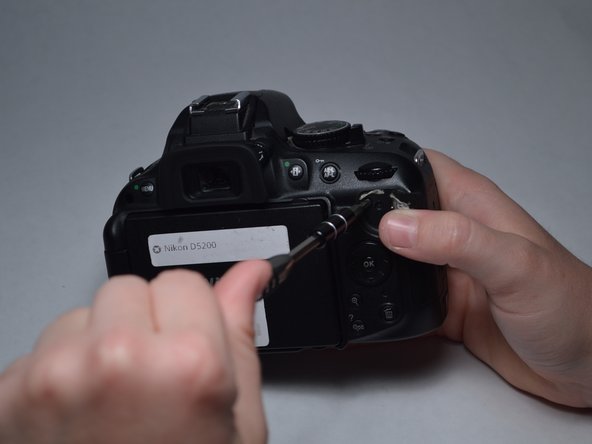
    • Remove the three 3.5-mm screws from the underside of the camera that are circled.

    • Remove the battery, and any SD card that is in the camera.

  2. Nikon D5200 Motherboard Or Camera Back Replacement: 步骤 2 中的图像 1,2 Nikon D5200 Motherboard Or Camera Back Replacement: 步骤 2 中的图像 2,2
    • Remove the 7-mm screws from either side of the camera.

  3. Nikon D5200 Motherboard Or Camera Back Replacement: 步骤 3 中的图像 1,2 Nikon D5200 Motherboard Or Camera Back Replacement: 步骤 3 中的图像 2,2
    • Gently pry back the rubber pad on the back of the camera with a metal spudger or other tool, or your fingernail, to reveal a hidden screw.

    • Remove the 4-mm screw.

  4. Nikon D5200 Motherboard Or Camera Back Replacement: 步骤 4 中的图像 1,3 Nikon D5200 Motherboard Or Camera Back Replacement: 步骤 4 中的图像 2,3 Nikon D5200 Motherboard Or Camera Back Replacement: 步骤 4 中的图像 3,3
    • If a rubber guard is present around the viewfinder, press upward on the guard to remove it.

    • Remove the three 7mm screws around the viewfinder.

  5. Nikon D5200 Motherboard Or Camera Back Replacement: 步骤 5 中的图像 1,3 Nikon D5200 Motherboard Or Camera Back Replacement: 步骤 5 中的图像 2,3 Nikon D5200 Motherboard Or Camera Back Replacement: 步骤 5 中的图像 3,3
    • Carefully use a metal spudger to remove the cap from the dioptric adjustment dial to reveal a screw. Note that you are only removing the cover -- the insert on the dial that has the "+/-" on it -- not the entire knurled ring.

    • Remove the 12-mm screw.

  6. Nikon D5200 Motherboard Or Camera Back Replacement: 步骤 6 中的图像 1,3 Nikon D5200 Motherboard Or Camera Back Replacement: 步骤 6 中的图像 2,3 Nikon D5200 Motherboard Or Camera Back Replacement: 步骤 6 中的图像 3,3
    • Once all screws have been removed, carefully pull the casing apart. Take care not to pull any wires apart.

  7. Nikon D5200 Motherboard Or Camera Back Replacement: 步骤 7 中的图像 1,3 Nikon D5200 Motherboard Or Camera Back Replacement: 步骤 7 中的图像 2,3 Nikon D5200 Motherboard Or Camera Back Replacement: 步骤 7 中的图像 3,3
    • Use a plastic opening tool to unplug the two ribbon cables connecting the two parts of the casing.

    • The orange-brown ribbon cable has a tiny brown plastic latch/door that flips up to release the cable. The silver ribbon is simply pressed into place; the ends are the safest point to gently pry it off to avoid damaging its wires.

    • If you are only replacing the camera back, stop here and reverse the preceding steps to install the new back.

  8. Nikon D5200 Motherboard Or Camera Back Replacement: 步骤 8 中的图像 1,3 Nikon D5200 Motherboard Or Camera Back Replacement: 步骤 8 中的图像 2,3 Nikon D5200 Motherboard Or Camera Back Replacement: 步骤 8 中的图像 3,3
    • Remove the 3.5-mm screws around the edges of the metal plate covering the motherboard.

    • Pull the metal plate off and away from the motherboard.

  9. Nikon D5200 Motherboard Or Camera Back Replacement: 步骤 9 中的图像 1,3 Nikon D5200 Motherboard Or Camera Back Replacement: 步骤 9 中的图像 2,3 Nikon D5200 Motherboard Or Camera Back Replacement: 步骤 9 中的图像 3,3
    • Use tweezers to remove the small cable in the top-left corner of the motherboard from its socket.

    • Use a plastic opening tool to unplug the remaining ribbon cables.

  10. Nikon D5200 Motherboard Or Camera Back Replacement: 步骤 10 中的图像 1,3 Nikon D5200 Motherboard Or Camera Back Replacement: 步骤 10 中的图像 2,3 Nikon D5200 Motherboard Or Camera Back Replacement: 步骤 10 中的图像 3,3
    • Remove the motherboard from its seat and lift it up.

    • Unplug the red and blue wires from their socket.

  11. Nikon D5200 Motherboard Or Camera Back Replacement: 步骤 11 中的图像 1,2 Nikon D5200 Motherboard Or Camera Back Replacement: 步骤 11 中的图像 2,2
    • Desolder the small wires in the upper-left corner of the motherboard.

    • Soldering irons become very hot when in use. Take all necessary precautions to avoid injury.

结论

To reassemble your device, follow these instructions in reverse order.

16等其他人完成本指南。

Alexander Corn

于08/26/15注册

1,282 声望

创作了5篇指南

团队

USF Tampa, Team 3-1, Eyestone Fall 2015 USF Tampa, Team 3-1, Eyestone Fall 2015 的会员

USFT-EYESTONE-F15S3G1

4 名成员

创作了5篇指南

7条评论

How did you remove the cap from dioptric adjustment dial without braking the cap in step5?

cghh dbv - 回复

there is a sticker above it you've to remove the sticker not the whol cap, the under the sticker you will see the screw

prince.x96 -

I soaked the back of my camera, which fried the LCD and one of the buttons. Bought a new back on eBay for $60 and used this to replace it in about an hour. This might be the preferred way to replace the LCD for some folks, to avoid having to what appears to be a fairly delicate desolder-resolder to replace only the LCD. As of the time of this comment, the parts cost a little bit more -- like $20 for LCD vs $60 for the full back, but not prohibitively so.

Joseph Morris - 回复

Does the motherboard which I ordered from aliexpress work in a camera which i bought in moscow russia??

Mathias - 回复

Does the motherboard which i ordered from aliexpress work with a camera nikon d5200 which i bought in moscow russia?

Mathias - 回复

添加评论

浏览统计数据:

过去 24 小时: 0

过去 7 天: 14

过去 30 天: 75

总计 10,254