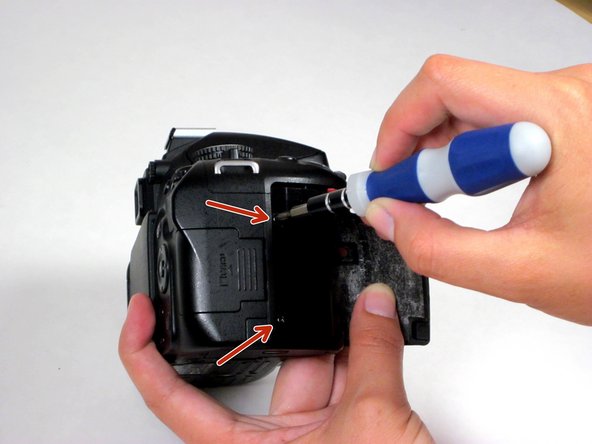
跳转到主内容

Nikon D5100 Rear Panel Replacement

你所需要的

  1. Nikon D5100 Rear Panel Replacement, Rear Panel: 步骤 1 中的图像 1,2 Nikon D5100 Rear Panel Replacement, Rear Panel: 步骤 1 中的图像 2,2
    • Remove the five screws around the camera using a Phillips #00 screwdriver.

    • Remember that we're removing the rear panel, so for this step, only remove screws on the appropriate side of the seam separating the rear and front panels.

    • The D5100 is held together by a large number of screws, which come in several sizes. Make sure to keep your screws organized so that you don't lose or misplace them!

  2. Nikon D5100 Rear Panel Replacement: 步骤 2 中的图像 1,1
    • Use your fingernail to gently peel back the black rubber thumb grip, attached to the chassis with a strong adhesive.

    • Use the Phillips #00 to remove the screw underneath the black rubber grip.

  3. Nikon D5100 Rear Panel Replacement: 步骤 3 中的图像 1,2 Nikon D5100 Rear Panel Replacement: 步骤 3 中的图像 2,2
    • Carefully peel back the black rubber hand grip, which is attached to the chassis with a strong adhesive.

    • Use the Phillips #00 to remove two screws beneath the handgrip.

  4. Nikon D5100 Rear Panel Replacement: 步骤 4 中的图像 1,2 Nikon D5100 Rear Panel Replacement: 步骤 4 中的图像 2,2
    • Using a spudger, pry off the diopter adjustment dial cover and remove the screw underneath.

    • Be sure to remove the very thin cover from the dial, and not the dial itself.

    • The dial cover is not shown in this picture.

    • Next, using a Phillips #00 screwdriver, remove the three Phillips screws around the viewfinder.

  5. Nikon D5100 Rear Panel Replacement: 步骤 5 中的图像 1,1
    • Carefully separate the rear panel from the camera body.

    • You will notice some resistance because the two pieces of the camera fit together tightly.

    • Be careful not to damage the chassis or ribbon cables. Use a firm grip to pull the two halves apart.

  6. Nikon D5100 Rear Panel Replacement: 步骤 6 中的图像 1,2 Nikon D5100 Rear Panel Replacement: 步骤 6 中的图像 2,2
    • Remove the dark orange ribbon cable attaching the rear panel to the motherboard by flipping the black plastic clasp up, away from the motherboard, and pull the cable out of its white casing in the direction of the cable.

    • Using the flat edge of a spudger can help with this delicate task.

  7. Nikon D5100 Rear Panel Replacement: 步骤 7 中的图像 1,2 Nikon D5100 Rear Panel Replacement: 步骤 7 中的图像 2,2
    • Remove the silver 16-pin cable by pulling gently upwards, away from the inside of the camera, until it separates from its port.

    • At this point, the rear panel is fully separated from the main body of the camera.

结论

To reassemble your device, follow these instructions in reverse order.

7等其他人完成本指南。

Liz

于04/25/14注册

1,311 声望

创作了5篇指南

团队

Cal Poly, Team 10-54, Amido Spring 2014 Cal Poly, Team 10-54, Amido Spring 2014 的会员

CPSU-AMIDO-S14S10G54

4 名成员

创作了5篇指南

一条评论

Any ideas of why the screen looks yellowish with a green stripe? :(

kuin_v - 回复

添加评论

浏览统计数据:

过去 24 小时: 0

过去 7 天: 2

过去 30 天: 5

总计 5,162