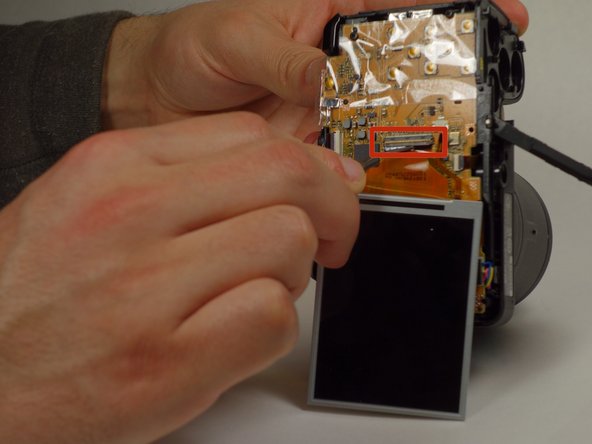
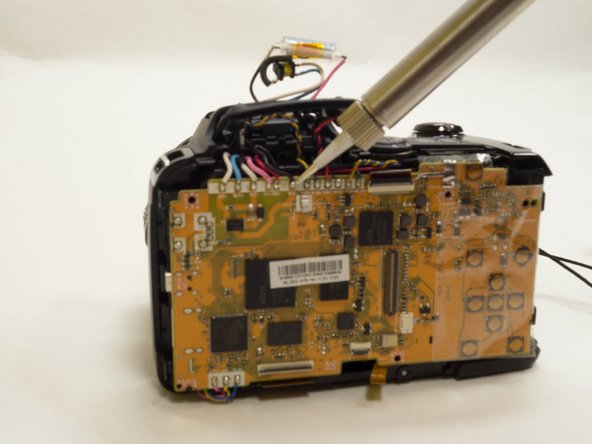
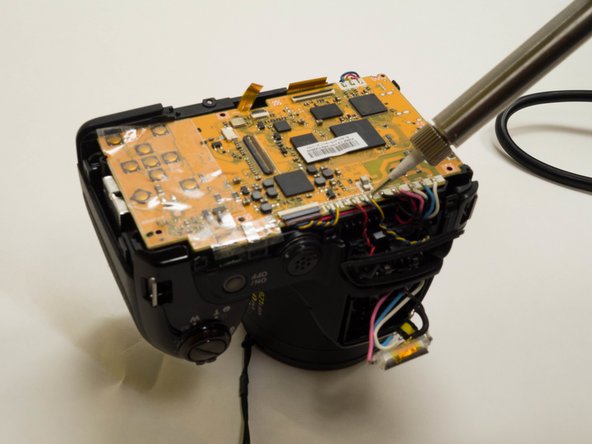
跳转到主内容

Nikon Coolpix L810 Motherboard Replacement

你所需要的

  1. Nikon Coolpix L810 Motherboard Replacement, LCD: 步骤 1 中的图像 1,2 Nikon Coolpix L810 Motherboard Replacement, LCD: 步骤 1 中的图像 2,2
    • Remove two 5 mm Phillips #000 screws on the right hand side of the camera located near the power button.

    • Use of precision tweezers to help remove loosened screws is suggested.

  2. Nikon Coolpix L810 Motherboard Replacement: 步骤 2 中的图像 1,2 Nikon Coolpix L810 Motherboard Replacement: 步骤 2 中的图像 2,2
    • Remove two 5 mm Phillips #000 screws near the audio/video inputs on the opposite side near the flash component.

  3. Nikon Coolpix L810 Motherboard Replacement: 步骤 3 中的图像 1,2 Nikon Coolpix L810 Motherboard Replacement: 步骤 3 中的图像 2,2
    • Remove three 5 mm Phillips #000 screws on the bottom end of the camera.

  4. Nikon Coolpix L810 Motherboard Replacement: 步骤 4 中的图像 1,1
    • Carefully detach the back side of the camera by lifting both ends, with moderate force wobble until loosened enough to remove.

  5. Nikon Coolpix L810 Motherboard Replacement: 步骤 5 中的图像 1,2 Nikon Coolpix L810 Motherboard Replacement: 步骤 5 中的图像 2,2
    • With the LCD screen facing towards you, flip the screen to the right.

  6. Nikon Coolpix L810 Motherboard Replacement: 步骤 6 中的图像 1,3 Nikon Coolpix L810 Motherboard Replacement: 步骤 6 中的图像 2,3 Nikon Coolpix L810 Motherboard Replacement: 步骤 6 中的图像 3,3
    • Remove three 5 mm Phillips #000 screws located on the bracket.

    • Hold the camera with the lens facing downward to prevent the bracket from falling off once all screws are removed.

  7. Nikon Coolpix L810 Motherboard Replacement: 步骤 7 中的图像 1,2 Nikon Coolpix L810 Motherboard Replacement: 步骤 7 中的图像 2,2
    • Disconnect the ribbons that connect the LCD screen to the camera gently using precision tweezers or fingers.

  8. Nikon Coolpix L810 Motherboard Replacement, Motherboard: 步骤 8 中的图像 1,3 Nikon Coolpix L810 Motherboard Replacement, Motherboard: 步骤 8 中的图像 2,3 Nikon Coolpix L810 Motherboard Replacement, Motherboard: 步骤 8 中的图像 3,3
    • Remove three 5 mm Phillips #000 screws bordering the motherboard.

  9. Nikon Coolpix L810 Motherboard Replacement: 步骤 9 中的图像 1,1
    • Remove the plastic component located directly behind the flash from its rubberized holder.

  10. Nikon Coolpix L810 Motherboard Replacement: 步骤 10 中的图像 1,1
    • Remove the electric tape covering the wires.

  11. Nikon Coolpix L810 Motherboard Replacement: 步骤 11 中的图像 1,3 Nikon Coolpix L810 Motherboard Replacement: 步骤 11 中的图像 2,3 Nikon Coolpix L810 Motherboard Replacement: 步骤 11 中的图像 3,3
    • Unsolder all the wires that are on the top of the motherboard near the flash component.

  12. Nikon Coolpix L810 Motherboard Replacement: 步骤 12 中的图像 1,1
    • Unsolder the wires on the bottom end of the motherboard.

结论

To reassemble your device, follow these instructions in reverse order.

2等其他人完成本指南。

Emilio Mena

于01/14/15注册

752 声望

创作了4篇指南

团队

UW Tacoma, Team 3-1, Rose Winter 2015 UW Tacoma, Team 3-1, Rose Winter 2015 的会员

UWT-ROSE-W15S3G1

4 名成员

创作了8篇指南

4条评论

The guide is incomplete! Do not try to remove the mobo for it is soldered to some other tiny board under the on/off switch. Trying to remove the mobo after just unscrewing it, may guide to certain and permanent destruction of both PCBs!!!

symeonleriou - 回复

any clue how to get tiny mobo out with mobo after taking screw out of tiny one at on/off switch?

jon baker - 回复

This guide should be for beginners, Mr. Symeon Leriou, and you will not only write "Mobo", but also motherboard or Mainboard or Hauptplatine (deutsch)

But I agree with you that it is not complete.

The motherboard is soldered to the on / off board (power supply for the batteries).

Soldering again is almost impossible ...

lothar4460 - 回复

Exactly! The guide is GOOD but it is incomplete!

The solder removal is insufficient to release de motherboard.

How to do it?

ramos.eng - 回复

添加评论

浏览统计数据:

过去 24 小时: 1

过去 7 天: 2

过去 30 天: 22

总计 3,092