跳转到主内容

当前版本的文档还未经巡查,您可以查看最新的已查核版本

你所需要的

  1. 这个步骤还没有翻译 帮忙翻译一下

    : 步骤 1 中的图像 1,2 : 步骤 1 中的图像 2,2
    • Use your finger tip to slide the battery release tab toward the battery symbol on the E5700.

    • Open the battery door.

  2. 这个步骤还没有翻译 帮忙翻译一下

    : 步骤 2 中的图像 1,1
    • Pull the battery out of the E5700.

    • It may be necessary to wiggle the battery while pulling to free it from its pocket in the case.

  3. 这个步骤还没有翻译 帮忙翻译一下

    : 步骤 3 中的图像 1,1
    • Turn to the bottom of the camera.

    • Remove the two Phillips screws located directly below the back monitor

  4. 这个步骤还没有翻译 帮忙翻译一下

    : 步骤 4 中的图像 1,2 : 步骤 4 中的图像 2,2
    • Turn the camera to the side with the memory card slot and open the compartment for the CF card.

    • Remove the top two Phillips screws closest to the back panel.

  5. 这个步骤还没有翻译 帮忙翻译一下

    : 步骤 5 中的图像 1,1
    • Turn to the back of the camera.

    • Remove the top most Phillips screw on the back panel.

  6. 这个步骤还没有翻译 帮忙翻译一下

    : 步骤 6 中的图像 1,1
    • Turn to the last side of the back panel.

    • Remove the Phillips screw below the eyepiece.

    • Remove the Phillips screw located above the speaker.

  7. 这个步骤还没有翻译 帮忙翻译一下

    : 步骤 7 中的图像 1,2 : 步骤 7 中的图像 2,2
    • Gently begin to remove the back panel.

    • Caution: There are two bundles of wires connecting the back panel to the camera. Be sure not to pull too hard and yank these out.

  8. 这个步骤还没有翻译 帮忙翻译一下

    : 步骤 8 中的图像 1,2 : 步骤 8 中的图像 2,2
    • Now gently unplug the two wires at the bottom of the panel.

  9. 这个步骤还没有翻译 帮忙翻译一下

    : 步骤 9 中的图像 1,1
    • Finish pulling away the back panel.

    • Turn the camera to its non-grip side.

    • Remove the Phillips screw located above the strap holder.

  10. 这个步骤还没有翻译 帮忙翻译一下

    : 步骤 10 中的图像 1,2 : 步骤 10 中的图像 2,2
    • Open the CF card slot.

    • Remove the Phillips screw near the top of the camera.

  11. 这个步骤还没有翻译 帮忙翻译一下

    : 步骤 11 中的图像 1,1
    • Turn to the front of the camera.

    • Lift up the corner of the grip pad nearest to the flash bulb.

    • Remove the Phillips screw underneath the grip pad.

  12. 这个步骤还没有翻译 帮忙翻译一下

    : 步骤 12 中的图像 1,2 : 步骤 12 中的图像 2,2
    • Lift up the flash bulb container.

    • Remove the two Phillips screws located near the base of the section.

  13. 这个步骤还没有翻译 帮忙翻译一下

    : 步骤 13 中的图像 1,2 : 步骤 13 中的图像 2,2
    • Open the battery compartment.

    • Remove the Phillips screw located at the bottom of the battery compartment.

  14. 这个步骤还没有翻译 帮忙翻译一下

    : 步骤 14 中的图像 1,1
    • Begin to lift the top cover from the rest of the camera.

    • Be careful when doing this because many wires are connecting the top piece to the camera. Pulling too hard may pull these wires out.

  15. 这个步骤还没有翻译 帮忙翻译一下

    : 步骤 15 中的图像 1,1
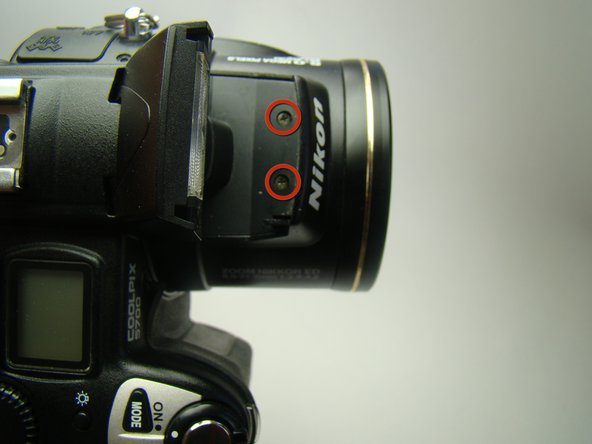
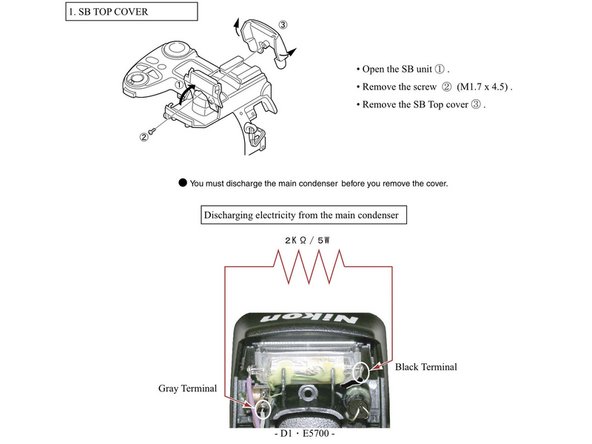
    • In order to pull the top panel without removing the flash unit. You must remove the flash top cover, taking away the screw under the bulb (see image). then gently remove the plastic top cover. IMPORTANT: discharge the condenser as soon as possible (the flash wires are now exposed, and dangerous ).

  16. 这个步骤还没有翻译 帮忙翻译一下

    : 步骤 16 中的图像 1,2 : 步骤 16 中的图像 2,2
    • Unplug the orange ribbon wire from the back of the camera.

    • Unplug the two blue ribbon wires from the back of the camera.

  17. 这个步骤还没有翻译 帮忙翻译一下

    : 步骤 17 中的图像 1,2 : 步骤 17 中的图像 2,2
    • Remove the Phillips screws on both sides of the flash bulb mount.

  18. 这个步骤还没有翻译 帮忙翻译一下

    : 步骤 18 中的图像 1,2 : 步骤 18 中的图像 2,2
    • Lift the top panel up and pull the flash bulb housing away from the rest of the top panel.

    • Note: The top panel will be difficult to separate from the flash bulb housing. Place your hands as shown in the picture and push upward with your thumb while holding the flash bulb housing stationary

  19. 这个步骤还没有翻译 帮忙翻译一下

    : 步骤 19 中的图像 1,1
    • Unplug the orange ribbon and the other wires and finish carefully removing the top panel.

  20. 这个步骤还没有翻译 帮忙翻译一下

    : 步骤 20 中的图像 1,1
    • Remove all four of the screws on the bottom of the camera.

  21. 这个步骤还没有翻译 帮忙翻译一下

    : 步骤 21 中的图像 1,1
    • Remove the two Phillips screws located underneath the CF card cover.

  22. 这个步骤还没有翻译 帮忙翻译一下

    : 步骤 22 中的图像 1,1
    • Remove the two screws on the left side of the camera.

  23. 这个步骤还没有翻译 帮忙翻译一下

    : 步骤 23 中的图像 1,2 : 步骤 23 中的图像 2,2
    • Unplug the blue and grey set of wires near the top of the grip.

    • Unplug the blue ribbon wire located at the bottom-left side of the camera.

  24. 这个步骤还没有翻译 帮忙翻译一下

    : 步骤 24 中的图像 1,3 : 步骤 24 中的图像 2,3 : 步骤 24 中的图像 3,3
    • Remove the front cover slowly.

    • Be sure that the front cover is not attached to anything or caught on anything when pulling it away from the rest of the camera.

  25. 这个步骤还没有翻译 帮忙翻译一下

    : 步骤 25 中的图像 1,1
    • Remove the two screws on the bottom of the camera near the tripod mount.

  26. 这个步骤还没有翻译 帮忙翻译一下

    : 步骤 26 中的图像 1,1
    • Remove the silver tripod mount by sliding it towards the speaker.

  27. 这个步骤还没有翻译 帮忙翻译一下

    : 步骤 27 中的图像 1,2 : 步骤 27 中的图像 2,2
    • Unplug the red and black wire couple at the bottom of the camera.

  28. 这个步骤还没有翻译 帮忙翻译一下

    : 步骤 28 中的图像 1,1
    • Remove the screw above the speaker

  29. 这个步骤还没有翻译 帮忙翻译一下

    : 步骤 29 中的图像 1,1
    • Separate the plastic housing of the speaker and the speaker from the rest of the camera

终点

另外一个人完成了本指南。

Kyle Sitton

于04/17/11注册

351 声望

创作了7篇指南

团队

Cal Poly, Team 24-58, Amido Spring 2011 Cal Poly, Team 24-58, Amido Spring 2011 的会员

CPSU-AMIDO-S11S24G58

4 名成员

创作了18篇指南

0条评论

添加评论

浏览统计数据:

过去 24 小时: 1

过去 7 天: 5

过去 30 天: 5

总计 1,871