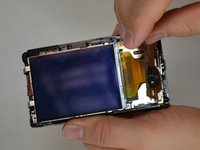
跳转到主内容

Nikon COOLPIX S9500 LCD Screen Replacement

你所需要的

  1. Nikon COOLPIX S9500 LCD Screen Replacement, Removing Screws: 步骤 1 中的图像 1,1
    • Remove the three 4 mm screws from the bottom of the camera using a #00 Phillips screwdriver.

    • Remove the single 3.5 mm screw from the bottom of the camera using a #00 Phillips screwdriver.

  2. Nikon COOLPIX S9500 LCD Screen Replacement: 步骤 2 中的图像 1,2 Nikon COOLPIX S9500 LCD Screen Replacement: 步骤 2 中的图像 2,2
    • With the bottom of the camera facing you, slide the latch on the compartment to the left.

    • Swing the battery compartment door open.

    • Remove the 3.5 mm screw from the inside with a #00 Phillips screwdriver.

  3. Nikon COOLPIX S9500 LCD Screen Replacement: 步骤 3 中的图像 1,1
    • With the screen facing you, locate the two 3.5 mm screws on the left face of the camera. Remove them using a #00 Phillips screwdriver.

  4. Nikon COOLPIX S9500 LCD Screen Replacement: 步骤 4 中的图像 1,1
    • With the screen facing you, locate the three 3.5 mm screws on the right face of the camera. Remove them with a #00 Phillips screwdriver.

    • Two of the screws are located under the port tabs.

  5. Nikon COOLPIX S9500 LCD Screen Replacement: 步骤 5 中的图像 1,2 Nikon COOLPIX S9500 LCD Screen Replacement: 步骤 5 中的图像 2,2
    • Locate the crease where the case comes together.

    • Using a plastic prying tool, pry at the line to remove the camera case.

    • It may take several attempts to remove the case. Remember to pry at all the crease locations on the camera, and not just one spot.

  6. Nikon COOLPIX S9500 LCD Screen Replacement, Navigation Panel Removal: 步骤 6 中的图像 1,3 Nikon COOLPIX S9500 LCD Screen Replacement, Navigation Panel Removal: 步骤 6 中的图像 2,3 Nikon COOLPIX S9500 LCD Screen Replacement, Navigation Panel Removal: 步骤 6 中的图像 3,3
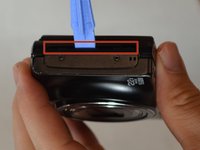
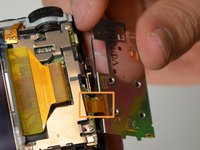
    • Slide the yellow navigation panel to the right so that it can be lifted up.

    • It may take a little pressure to get the panel to separate.

    • Be careful not to damage the ribbon cable that is still attached to the camera.

  7. Nikon COOLPIX S9500 LCD Screen Replacement: 步骤 7 中的图像 1,1
    • Remove the three 4 mm screws with a #00 Phillips screwdriver.

  8. Nikon COOLPIX S9500 LCD Screen Replacement: 步骤 8 中的图像 1,1
    • Locate the magnet and copper tape on the left side of the camera.

    • Gently pull the copper tape off of the metal plate.

    • The copper tape is attached with some glue, so a little force will be needed to detach it.

  9. Nikon COOLPIX S9500 LCD Screen Replacement: 步骤 9 中的图像 1,3 Nikon COOLPIX S9500 LCD Screen Replacement: 步骤 9 中的图像 2,3 Nikon COOLPIX S9500 LCD Screen Replacement: 步骤 9 中的图像 3,3
    • Lift the screen up and swing it to the right, exposing the circuit board underneath.

    • The navigation panel should still be attached to the circuit board with a ribbon cable as indicated in red.

    • Detach the ribbon cable that is connecting the LCD screen and the circuit board.

结论

To reassemble your device, follow these instructions in reverse order.

3等其他人完成本指南。

Jim Bui

于01/20/15注册

811 声望

创作了6篇指南

团队

USF Tampa, Team 1-4, Blackwell Winter 2015 USF Tampa, Team 1-4, Blackwell Winter 2015 的会员

USFT-BLACKWELL-W15S1G4

4 名成员

创作了12篇指南

一条评论

In step 9, you should mention the small circuit board that has to be released from the screen on the top right of the screen.  (It can been seen in the step 6 picture.)   It would also been helpful if you mentioned the flange on the ribbon cable connector that should be loosened to allow the cable to be disconnected.   The guide allowed me to disassemble and reassemble the unit with a new screen, but the camera was totally inoperative afterwards (would not turn on or charge at all) so I can’t say the guide was helpful.

John Bolland - 回复

添加评论

浏览统计数据:

过去 24 小时: 0

过去 7 天: 7

过去 30 天: 20

总计 3,109