视频概述
-
-
Nexus 6 技术参数:
-
5.96 英寸 AMOLED 屏幕,分辨率 1440×2560 (2K, PenTile RGBG 像素排列,493 PPI),康宁大猩猩 3 代玻璃覆盖
-
高通骁龙 805 处理器(四核 Krait 450 2.7 GHz CPU + Adreno 420 GPU),3 GB LPDDR3 内存
-
32 / 64 GB 内部存储
-
Android 5.0 "Lollipop" 系统,官方支持升级至 Android 7.1.1 "Nougat"
-
802.11ac 2×2(MIMO) WiFi + 蓝牙 4.1 + NFC
-
3220 mAh 内置不可拆卸电池
-
1300 万像素后置光学防抖摄像头 + 200 万像素前置摄像头
-
-
-
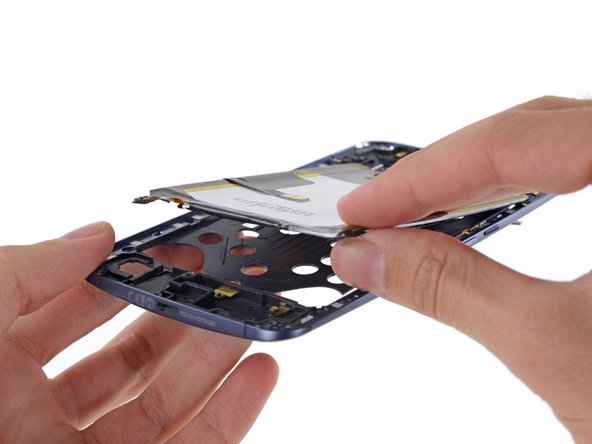
由于没有可见的螺丝,我们先用翘片沿着边缘撬开后盖。
-
缺点:没有方便拆卸的缺口,而且后壳与中框间的空隙太小,用指甲无法完成这项工作。
-
优点:用于贴合后盖的粘胶不是很强力,一旦撬开一个缝隙,就可以把整片后盖剥离开来。
-
问题:即使打开了后盖,也没有暴露任何内部组件。不过所有的螺丝都已经出现。
everyone! open the sim tray and you will see a hole there through wich you can push the plastic back with a sim removal tool!
Thank you very much for the tip, you save me a lot of time !!!
-
-
-
是时候卸下这 22 个 T3 梅花螺丝了。
-
我们发现了一个隐藏的盖子,内部有一个隐藏的排线接口。
-
在多孔的中框下闪闪发亮的铜线圈吸引力我们的注意力。在拆开手机后,我们一定会仔细研究它。
How do you reconnect the small ribbon cable connector? I can't get mine to reconnect, is there a trick to it?
I believe you just push it back on. I had no trouble with mine.
Mike -
Which way do I turn the screws to loosen them up
Which way do i turn the screws to loosen them
Why does this guide say to use a t3 screwdriver and others say to use a t4? I have screenshots but don't think this site allows for those in comments.
Others are wrong, it is t3.
-
-
-
-
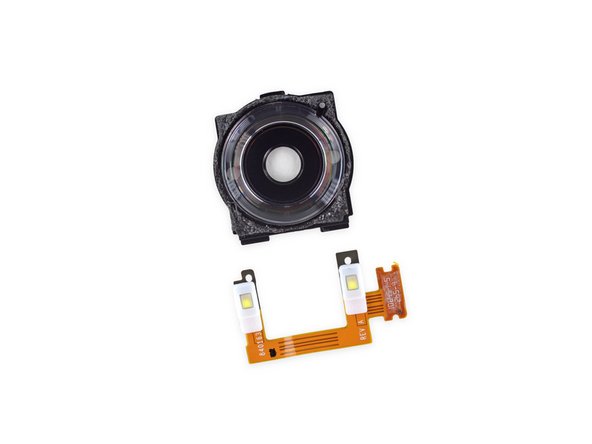
刚刚看到的铜线圈实际上是无线充电的接收线圈。
-
剥离这个线圈,我们可以看到 3.8 V, 3220 mAh (12.2 Wh) 的电池。
-
这比 iPhone 6 Plus 的 11.1 Wh 电池高出一截,但是对 Nexus 6 的续航却没有多少影响。
what is that cable extending upwards?
there's inconsistent specs on the battery, official numbers saying 3220mAh capacity, but the EZ30 battery is only 3025mAh. I assume the battery they are listing in official specs is the EK-MTN6 battery from the XT1100 global version of the phone. XT1103 is the US version. the EX30 battery is listed as compatible with both EX1103 and XT1100, but not sure on the EK-MTN6 version, as there's few sites that sell it.
-
-
-
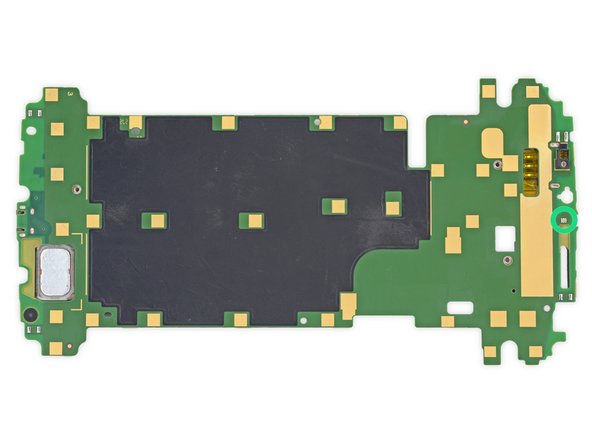
一眼看上去,主板和 Moto X 颇为相似:巨大,绿色,还有很多小的 EMI 屏蔽触点。
-
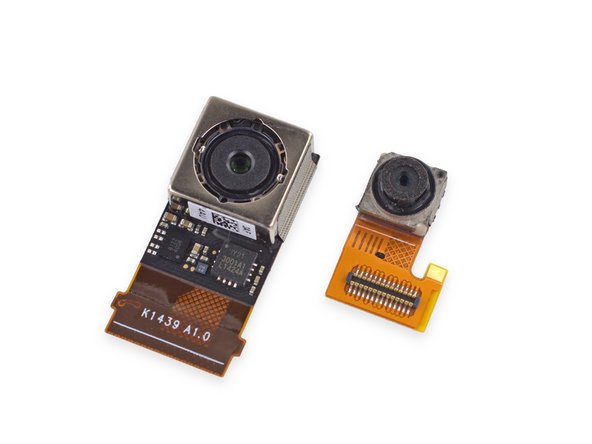
一把镊子就可以轻松拔出前置和后置摄像头。
-
Nexus 6 在相机方面的配置相当豪华。采用 索尼 Exmor IMX 214 CMOS 传感器的 1300 万像素后置摄像头,这和一加 One 一样。
How is the rear camera cable attached to the mobo? Mine is somehow coming loose every so many days, causing the camera app and flashlight widget to stop working and/or disappear. If I press hard on the back cover just below the lens (and reboot) the camera starts showing up and working again - for a day or two usually.
Anyway, just trying to figure out if tearing the phone apart is worth the effort to fix this.
Chris Weis - 回复
The camera cable slides down into a ZIF connector. It isn't too difficult to get to, and you might get somewhere by cleaning the cable with isopropyl alcohol and reseating it in the connector, but it sounds unlikely that it would just come loose in there. A poor solder joint securing the connector to the motherboard might explain why pushing down helps, but that'll be a much more difficult problem to deal with.
-
-
-
取下主板后,我们看到一个单独的集成芯片:
-
Atmel MXT640T CCU 1424D TW QLR64 触摸屏控制器
-
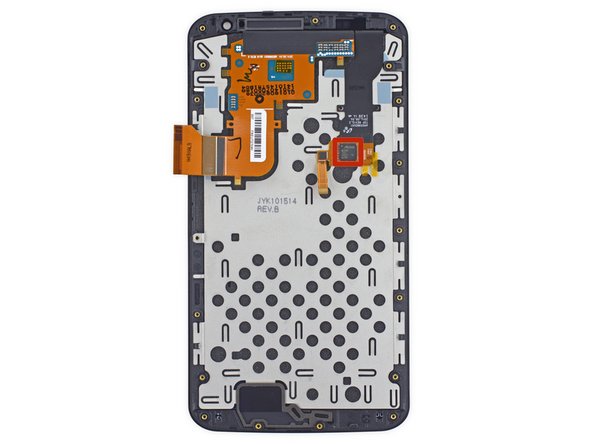
就是这样!显示组件是裸露的,没有任何额外组件。我们相当容易就将其拆解完毕。
it's time to have guides on unfusing the display and glass cover panel, since so many displays are now fused.
just habe to use heat to soften the OCA glue and cut through the glue with a thin strong wire
-
-
-
更多的芯片:
-
高通 SMB1359 充电管理芯片
-
博通 BCM4356 802.11ac + 蓝牙 4.1 芯片
-
RF Micro Devices RF7389EU F14NRC2 包络跟踪功放芯片
-
扬声器格栅 RGB LED 通知灯
-
恩智浦 TFA9890A D 类音频放大器
-
高通 QFE1100 LTE 包络跟踪芯片
You've identified the Audio Amplifier, but what's the quality of the DAC sending signal out through the 3.5mm? I'm too lazy to walk around with a portable external DAC and AMP via USB OTG, but I'd still like to have a halfway decent experience listening to my lossless audio with my Sennheisers. I'm in between the Nexus 6 and the Note 4 for my next handset, and I'll just pick the one with the best audio experience.
Phone novice here, but the charge port on my Nexus 6 is bad to the point where I have to angle the mini usb to get it to charge. Is the charging port one of the infamous soldered components?
It looks like it from the picture, though I haven't taken my Nexus apart to see myself. That's not much help, I know, but I didn't see anyone else responding yet.
However, it's also got QI charging, so you could do your charging with that (It'd be slower to charge, but it'd keep you in power).
I have nexus 6 which is not showing network, the carrier is showing but no signal strength, where is the network antenna connection?
-
-
-
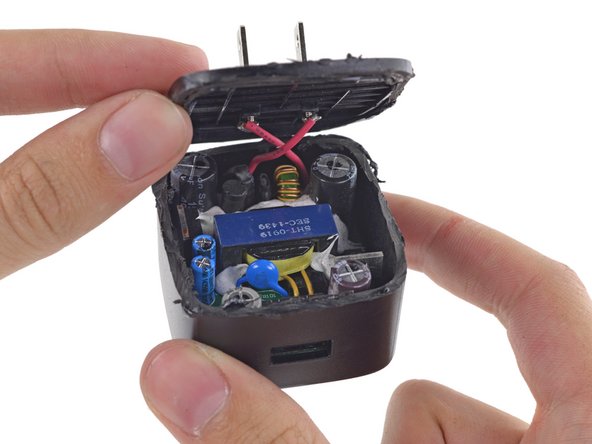
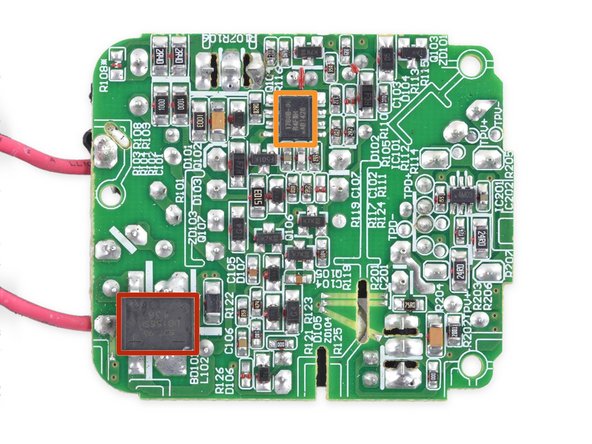
在 PCB 的一面,一个变压器被几个普通的电解电容、稳压芯片和一个 USB 端口所包围,空隙中涂抹了大量环氧树脂避免电流高频振动噪声。
-
在另一面,一大堆焊点和贴片元件中,我们找到了:
-
桥式整流器,负责 AC - DC 转换
-
Dialogue iW1760B 电源控制芯片,显然是控制输出的核心
-
-
-
Google Nexus 6 易维修度得分:7 / 10 分(10 分最易维修)。
-
压力触点和排线端子使得模块化组件(相机、按键、耳机插孔等)易于更换。
-
Nexus 6 整机只使用了一种螺丝,虽然规格相当罕见(T3)。
-
大量螺丝来将中框固定在合适的位置,这使得移除它较为繁琐,但也意味着不需要卡扣或者胶粘剂来将其固定到前面板上。
-
胶粘固定的电池并不是很方便拆卸,但可以更换。
-
多个组件(震动马达、SIM 插槽、扬声器、USB 端口)直接焊接在了主板上。相比于通过排线连接,它们更加难以更换。
-
一体化的内外屏提升了屏幕维修成本,但很方便拆卸。
with this much glue and the fact that you need to remove the motherboard to access the screen i think 7/10 is a little too much...
The Nexus 4 also got a 7/10, and with much of it being glued/adhered together it was much more difficult both to take apart and to properly put back together than this sounds. And you had to remove the motherboard to get at the screen with the Nexus 4 too. So if anything I'd almost argue that it's too low, comparatively.
keithzg -
-


42条评论
Step 12, the chip above the orange one, Broadcom BCM20795 NFC controller chip.
Frank Chen - 回复
So is it possible to put back the back cover or it need some kind of glue ?
th3d3vi0us - 回复
It's still pretty sticky, so it ought to go back on and stay without any additional adhesive.
I'm struggling to stick mine back on, what adhesive can I use?
Is it possible to upgrade to upgrade the storage?
Yeah, I was wondering that too given that AT&T currently only offers the 32gb model. However, it looks like that SanDisk chip is soldered in place, so not upgrade-able.
Any information about speakers?
Since they're front-firing, I believe they're fused with the rest of the display assembly.
I wonder what the SOT23-6 device marked 4M03 in the charger is. Looks to be connected to the USB data lines which makes me think it might have something to do with the QuickCharge protocol. Maybe it's a 6-pin uController (Atmel/TI/Microchip)?
Nir Tasher - 回复
I'm told the two lines framing each corner on the outer edges are the antenna? Is this true?
Good question. i also want to know where the GSM antenna is ?
sean -
I have cracked the screen on mine, phone still works perfectly , how is easy it to buy a replacement glass and fix it?
I recently shattered mine and went to the phone doctor. the screen was over 200 bucks installed. It seemed to cause them a lot of issues to install as well. took a lot longer than usual.
Can someone please help. I need the plastic frame/ screw mount. Every screen replacement dose not come with the plastic frame metal frame or foam.
Hi Martin,
Could you find frame? - I also tried to find it.
Sergo
Sergo -
where would i be able to buy a replacement nexus 6 battery? im in dire need of one?even its not an OEM which obviously it wouldnt be but where would i be able to buy a replacement one?
Ryan Evans - 回复
I just ordered a replacement battery from this site. Looks they have quite a few replacement parts.
Mike -
For some reason, I thought it said the screws were T4 when I read this yesterday, so I thought I was lucky when I found a screwdriver set at Home Depot today with a size that small (I would have gotten one with anything smaller if they carried one). I was momentarily disappointed when I opened this guide back up, but happy again when the T4 worked perfectly.
Is this guide wrong, is the label on the screwdriver set wrong, or are T4 and T3 known to be interchangeable?
No information about the headphone connector?
claudiounb - 回复
Where can I buy T3 screw's, 17 were stripped in my phone?
so were you able to remove the stripped screws from the phone? I'm trying to do that right now
bob kwan -
where can I buy the T3 screws?
saw them on ebay, type "nexus 6 screw set". all from US though, don't know if thats a problem for you
It seems that the microphones are intolerant to moisture. I changed the microphone and still no working mic. Then I noticed that there are two more to the left and right of the microphone that I changed. I got the one in the middle from Digikey, but I can not identify the other two. Does anyone have a schematic or know where to find these other two microphones?
I spilled coffee and microphone and earpice are not working. Does any know where I find instruction and parts? zb11
banjanin -
Is there someone who knows where are the sensors placed? (gyro, accelerometer, etc)
My daughter dropped the Nexus 6 phone and there are no cracks on the screen, but the display is not working? Is it possible to replace the digitizer without replacing the screen? Or Do I need to replace the Motorola Nexus 6 LCD Screen and Digitizer?
How do we change the metal pieces at the bottom and top of the screen? they are both between the glass and the backing part of the screen and is not easy to get to.
If someone needs to know: two metal pieces at top and bottom of screen glass can be pulled out from the front (with difficulty, since they're fixed in well) and can be pressed into a new screen, they clip into place. good design.
Does anyone know where the GPS sensor is and how to test if it works?
vpaday -
i really dislike the low volume of this phone, can not hear anything if in a crowd...forget it
Excuse the trivial question, but would you tell me which of these chips performs as a GNSS receiver?
What is the rectangular metal piece on the bottom left corner of the motherboard? I purchased a motherboard from Motorola and it does not have this.
What is the rectangular metal piece in the bottom left corner of the motherboard? I purchased a motherboard from Motorola and it does not have this.
it’s the bottom speaker
This guide does not cover the hole to dislodge the rear cover through the sim slot area, or the connecting wire for the buttons, bad teardown…
Feel free to contribute a better one.
Can the proximity sensor be replaced? The screen goes black after replacing the screen
I lost the drop braket that holdsin the motherboard
My Nexus 6 will no longer charge - both wireless and USB charging will not register with chargers and will not result in a charged phone after some time left connected. A repair shop claimed to have ordered several parts but were unable to find the correct one for my “ATT” version of the phone.
Any idea what part he was talking about?
Is it possible to open the phone and touch wires from a cut USB cable directly to battery leads (or some other internal component) to charge it, bypassing whatever is broken?
THANK YOU!!
I noticed that the author of this post started to explain the charging process and rectification. I think it might be helpful for those who are learning electrical engineering to learn more about the rectification process. Rectification is the process in which AC current is converted into DC current. Rectification is caused by an electronic component known as a Rectifier. A Rectifier is made up of one or more diodes that are configured in order to allow current to flow only in one direction. Rectifiers are what are in many battery chargers and allow us to get DC current for our various devices. Here is an article that explains more about rectification, how it works and also its different applications in daily life. Specifically this touches on Bridge Rectifiers which are found in power supplies. Anyway it's a great read. I would check this out if your inetersted in learning more ++https://www.derf.com/how-a-bridge-rectif... . Hope you find it helpful.