简介
再开始操作前,请务必关闭手机并且把SIM卡移除
你所需要的
-
-
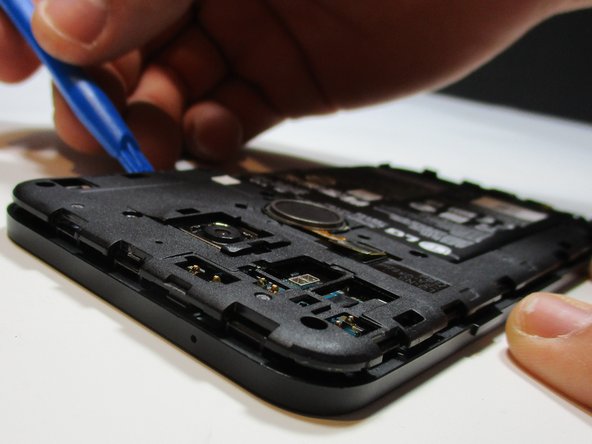
从SIM卡插槽开始,将塑料打开工具放在后面板和手机之间。
-
将开启器工具轻轻地滑动到手机周围,直到听到咔嗒声,并且明显地看到与手机主体与背板分开。
-
在手机的每个边缘继续进行此过程,直到指纹识别处。
Here’s a photo of the location of the 18 tabs that hold the back cover in place
Twisting sideways didn’t do it for me, but sliding along the edge did. However, at first I didn’t realize that the pick was between the motherboard and midframe, rather than between midframe and back cover like it was supposed to. This led to breaking off a spring-loaded connector on the motherboard, connecting to an antenna (I guess) in the back cover. So far I haven’t noticed any reception issues, but I can’t say for sure.
In essence: be careful to get the pick towards the back cover, and not “straight in” under the midframe.
-
-
-
-
从底部开始,使用塑料开启工具来把中面板翘起。
The photo seems to show that the person is opening from the top, which is the opposite of your advice. So, just want to be clear.
yes, open from bottom first... the pic above shows the finished product after reaching top of phone. I found it best to actually start close to the right of the usbC connector. Pushing inbetween the 2 tabs and up will release the shell.. then work clockwise.
Chris, your advice to start to the right of the usbC connector was excellent, thank you!
I found that my middle panel was already broken at the narrowest part just to the left of the 2-D scan code on the battery, perhaps from some ham-fisted previous repair. This seems of little consequence, there do not seem to be any electrical connections running through this part.
After a long amount of prying, I discoved that, if used gently, a jimmy can really help get the plastic off
I could not remove the cover with the opening tool but had success with the opening picks (the triangle parts). Just slide them under the cover and gently bend and twist the pick to release the cover from the locks. By the way: it’s perfectly normal for the bottom cover part to come loose from the top cover part. It’s designed that way (they interlock).
Here’s a photo of the location of the 20 tabs that hold the middle assembly in place, and the pry angle needed.
This is the scariest part but it is the same process of taking a bike tire off the rim: lift up one part of the cover then put a wedge under the lifted section to hold it up then continue around the frame lifting it up and holding it up with the blue picks. You’ll find that after you life the bottom you can wriggle free the rest by hand.
The 10 screws came out quickly using the IFIXIT.com magnetic screwdriver.
-
-
-
使用iOpener 工具箱(或者其他类似产品)来加热手机以便使胶水松动。
-
小心地把一个平的尼龙撬棒插入电池的下方。
-
施加足够的里来把电池从占有胶水的手机中分离。
And all that in 3 minutes.
No way!!!
Yeah, three minutes is probably not very realistic. I updated the time estimate to something a bit more conservative. :)
The adhesive on mine was also really strong.
I had to use a heat gun at about ~110F while applying pressure to get the battery to release
Seriously? All this, just to change the battery?
Your comment only makes sense in 2017.
Krzeszny -
I was able to spudge the battery out from the bottom edge using a “custom” tool made from an old credit card cut to a width slightly less than the bottom of the battery.
Great tip - I used a credit card too without the need for a heat gun.
No need to remove the battery if you only want to get the mainboard out. Just release all the connectors
I’d recommend trying to remove the battery without using heat as my phone failed with the infamous “boot loop” problem less than a week after I changed the battery.
Following these helpful comments, I used isopropyl alcohol and the spudge to get the battery loose, no heat.
Another data point: to be safe, I used the iOpener according to instructions (30s, ~900W microwave, the iOpener just started to expand a bit) and added some isopropyl alcohol. The battery came out without too much effort in a few minutes. No reheating needed, used the spudger from the kit.
The pre-exiting adhesive seemed good enough still, so I didn’t bother removing and re-applying.
I also used isopropyl alcohol only without heat. I got the spluger into the corner just a little to give a small space between the battery and the surrounding plastic enclosure for the battery. Then soaked a corner of a paper towel with a little alcohol. Tipped the phone and squeezed some of the alcohol into the space and let it drain down the edge of the battery. Waited about 60 seconds and then pryed gently with the spluger on that side. It came up pretty easily. Once I got one side of the battery up, I soaked the paper towel again tipped the phone so the edge that was still stuck was down, and squeezed alcohol all along the edge that was freed to let alcohol get down to the tape that was still holding. Waited another minute and then pried gently again and the rest of the battery came right up. The whole procedure took maybe 4-5 minutes.
-


若要重新组装你的设备,按照以下步骤逆序操作。
若要重新组装你的设备,按照以下步骤逆序操作。
120等其他人完成本指南。


团队

Metro State, Team 1-1, Carpenter Spring 2016 Metro State, Team 1-1, Carpenter Spring 2016 的会员
MSU-CARPENTER-S16S1G1
4 名成员
创作了7篇指南
30条评论
I replaced the battery, but I'm still not getting an led or anything on the screen to show it's charging. What else could be the issue?
All went smooth here. Pulled the mainboard out and was able to gently pry the battery free without heat. Rapid charging is working fine. I got an LG battery off Amazon. Didn't cost much more than knock-offs.
worked great for me, in the end used brute force to get the battery off with a terrifying crack.
I replaced screen + battery at the same time (using ifixit replacement battery and display assembly). All went well, pretty easy to do, and the new display looks great. However, my battery appears to be stuck at 50%. I suppose I can pop loose and then try to re-seat the connector. Probably won't help. Has anyone else experienced this issue? Any hints/ideas on how to fix it? Thx
dave white - 回复
Great guide - I used a hairdryer for the heat... Was quite concerned the phone was getting very hot but in the end the battery did start to become unstuck. I also removed the motherboard (disconnecting the two connectors to do so) following Andrew's comment, but had to use heat in the end. Patience is a virtue... All working once back together again; I got a genuine LG replacement on eBay for £15. Hopefully the battery will last a day now - time will tell!
thank you,,,, your instructions were clear and to the tee. Worked like a dream. It was a little scary at first, however, I took my time and did it! thank you again.
TracyN
Thank you … your instructions were clear and to the tee. It was a little intimidating at first, however, I took my time and was able to switch out my old battery for the new one without any problems. Thank you again.
Thank you very much! Very clear instructions.
I didn’t have a iOpener kit, so I used the kind of things to keep you warm that you put in the microwave. It’s not too hot so it can’t damage the phone but warm enough for the glue to slightly melt. Then I used a dental floss to separate the adhesive from the battery.
But when I reassembled the phone the fingerprint reader was not working. It was because I damaged the connections which are on the top left above the battery (opposite side of where the battery is connected (step 6). I managed to fix it but I’d advise to be very careful any time you manipulate the phone when removing the battery.
Thanks for the guide. I replaced the battery (official LG replacement) last week and so far everything is working properly. Overall it’s not difficult. The only step which is a bit more challenging, is removing the battery itself as it’s “squishy” and the adhesive is rather strong.
But nevertheless I would only do it if really is needed & make sure to take enough time to follow the process carefully. After all it’s clear the phone is not made to dis/re-assemble often as it has a lot of fragile parts (in particular in step 5)
Worth noting that the flat cable between battery and main board is slightly longer than required and arrives straight.
You need to put a fold in it for it to fit, which is easier to do before you place the replacement battery in the sticky slot.
Also that the back panel clips to the camera, not the finger print panel
I was able to slightly pry up one side of the battery, and then used a small hairdryer to loosen the rest of the glue. By slowly and gently prying as I heated the battery, it released from the glue without damage to t he phone. I proceeded with that step very carefully and it all went well. The instructions were very helpful. Everything is working perfectly.
Gary Dolan - 回复
Did everything, no sweat. Battery level now stuck at 50%. Ideas?
Just a thank you. Good job
Same here. Battery level stuck at 50% after battery replacement.
Geht keine 5 Minuten, Danke!
It took less than half an hour to do this, and the phone is back up and running like it was never taken apart.
Outstanding tutorial. The only tip I can really suggest, is take your time, and be patient. It also might help to carefully use an IFixit prying tool to work the corners of the outer case loose, very carefully.
Thanks :)
Took about 15 minutes. Thanks so very much. With your info I was not treading into the unknown. P.S. I found it easier to to connect the battery and then put the battery into the case.
Much easier than I expected. Took about 10 minutes.
Using a credit card as a spudger to remove the old battery worked like a charm. Didn’t need to use any heat!
Thanks to all for the great suggestions.
This worked great for me as well, however now suddenly the sim slot does not detect my sim card anymore :(
Replaced with battery from iFixit. Remains to see if capacity improved. Volume down button did not work after the replacement. Upon further inspection, I found a dislocated resistor on my desk while cleaning up. Sad days.
Opened the sim tray with a 0.1” pin header. Opened back cover clips with the back lever of a pair of nail clippers. Removed battery by heating it with a soldering station heat gun on the lowest setting for a few seconds, then prying it up starting under the flex cable. Experienced the “terrifying crack” mentioned by another commentor.
On the volume button, looks like this reddit commentor had the same issue: https://old.reddit.com/r/nexus5x/comment...
So please be careful with the volume buttons if you’re doing this replacement.
It seemed to me that the biggest trick to completing this was getting the metal ribbon on the battery to connect precisely to that spot on the phone. It took me several tries to get the ribbon in the right spot to make the connection. A tip… I could tell that it wasn’t connected properly when I couldn’t turn the phone on, but I also wondered maybe the battery wasn’t “pre-charged” enough to register… I plugged the phone in and got the lightning bolt, but it did not indicate it was charging, and so I tried again to connect the ribbon correctly. It took several tries before I saw that the lightning bolt indicator showed it was charging before I reassembled the rest of the phone.
This is a superb guide - thanks so much for pulling it together! I did it step by step with my 10 year old son, revitalising my 5 year old Nexus to hand down to him. It’s a good lesson all-round. Spend $25 for an original LG battery (rather than $500 of my hard earned wage), use this excellent and easy to follow guide and keep another perfectly usable piece of tech out of landfill. I didn’t use any heat guns, just a basic spudger that came with the battery, a guitar pic for the SIM slot and no shortage of patience with firm but supple pressure - both to get the case off and the battery out. Successful rapid charging of the battery and all working as expected. Really happy with it. Thanks again!
I have a tray full of tools for this work - following the instructions in sequence took less than 30 minutes with no problems at all and the phone is now fully functional again. The internal design of the Nexus 5X phone is much better than more modern phones and the battery replacement is relatively simple and easy.
everything you just said. Wish all modern phones were this easy
Worked great, thank you. As I'm getting into repair this was a nice easy guide to follow. My first battery replacement, happy days
Gavin Plow - 回复