跳转到主内容

当前版本的文档还未经巡查,您可以查看最新的已查核版本

你所需要的

  1. 这个步骤还没有翻译 帮忙翻译一下

    : 步骤 1 中的图像 1,2 : 步骤 1 中的图像 2,2
    • Power off the device by holding the power button until the "Power Off" popup appears. Tap the popup and wait for the device to turn off.

    • Insert a SIM card eject tool or a paper clip into the hole next to the SIM card slot, which is located just under the power button. Do not force the paper clip if it is too thick; instead use the head of a sewing needle.

    • Push the tool into the hole until you see the card pop out.

  2. 这个步骤还没有翻译 帮忙翻译一下

    : 步骤 2 中的图像 1,1
    • Gently remove the SIM card with your fingers, or a pair of tweezers if the SIM holder does not fully eject.

    • Make sure the chip is facing the rear of the phone when reinserting the SIM card.

  3. , 后盖: 步骤 3 中的图像 1,3 , 后盖: 步骤 3 中的图像 2,3 , 后盖: 步骤 3 中的图像 3,3
    在这个步骤中使用的工具:
    iFixit Opening Picks (Set of 6)
    $4.99
    购买
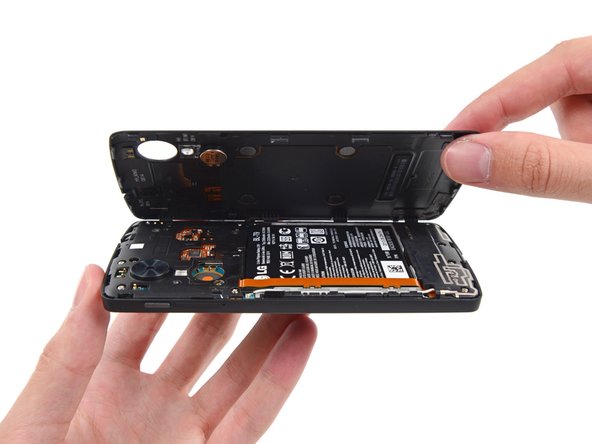
    • 用塑料撬棒来解开后盖顶部与侧边的卡扣。

    • 底部由海绵胶带固定于机身。完成前述步骤后,可使用三角撬片来最终取下后盖。

    • 因 SIM 卡插槽处的塑料非常薄,容易在拆解时断裂,请避免在 SIM 卡插槽附近撬开后盖。

  4. , 中框: 步骤 4 中的图像 1,1
    • 取下 6 个固定中框的4.0 mm 菲利普斯#00 号 螺丝。

  5. : 步骤 5 中的图像 1,2 : 步骤 5 中的图像 2,2
    • 拆下中框。

  6. , 电池: 步骤 6 中的图像 1,2 , 电池: 步骤 6 中的图像 2,2
    在这个步骤中使用的工具:
    Spudger
    $2.99
    购买
    • 使用撬棒平头那端来挑起电池接线。

  7. : 步骤 7 中的图像 1,2 : 步骤 7 中的图像 2,2
    • 使用撬棒平头来断开子板的排线,把它与电池剥离。

  8. : 步骤 8 中的图像 1,3 : 步骤 8 中的图像 2,3 : 步骤 8 中的图像 3,3
    • 用塑料撬棒撬起电池。

    • 电池背面有胶用于固定,挑起时可能需要使用加热枪对胶稍稍加热。

    • 请勿刺破或弯折电池

  9. 这个步骤还没有翻译 帮忙翻译一下

    : 步骤 9 中的图像 1,2 : 步骤 9 中的图像 2,2
    • Use the flat end of a spudger to disconnect the left antenna cable.

  10. 这个步骤还没有翻译 帮忙翻译一下

    : 步骤 10 中的图像 1,2 : 步骤 10 中的图像 2,2
    • Use the flat end of a spudger to disconnect the right antenna cable.

    • These must be firmly secured during reassembly. Failure to secure the antenna connections will affect your reception and call quality.

  11. 这个步骤还没有翻译 帮忙翻译一下

    : 步骤 11 中的图像 1,2 : 步骤 11 中的图像 2,2
    • Use the flat end of a spudger to disconnect the ribbon cable that connects rear-facing camera to the motherboard.

  12. 这个步骤还没有翻译 帮忙翻译一下

    : 步骤 12 中的图像 1,2 : 步骤 12 中的图像 2,2
    • Use the flat end of a spudger to disconnect the front camera ribbon cable.

  13. 这个步骤还没有翻译 帮忙翻译一下

    : 步骤 13 中的图像 1,2 : 步骤 13 中的图像 2,2
    • Gently lift the motherboard up and out of the device.

终点

31等其他人完成本指南。

Kyle Libby

于04/07/14注册

1,006 声望

创作了7篇指南

团队

Cal Poly, Team 7-23, Regan Spring 2014 Cal Poly, Team 7-23, Regan Spring 2014 的会员

CPSU-REGAN-S14S7G23

4 名成员

创作了19篇指南

12条评论

is the motherboard from the 32gb nexus 5, compatible for the nexus 5 16gb lcd??

Vandalismo Teevee - 回复

It should be, yes. I've chopped and changed loads of Nexus 5 phone around and haven't had a problem.

drunkenmenace -

Thanks for the repy. My Nexus 5 has some bootoop problems and when i go to the boot options, (the hold power and volume down), it says Lock State - LOCKED. so im thinking of replacing the motherboard. or is there a way to fix my problem? Thanks for the reply. I appreciate it.

Vandalismo Teevee - 回复

My Nexus 5 just switched off while i was recording a video. It isnt switching on now. How to bring it back to life??Any solution will b of great help. Thanks

Jasmine K - 回复

I just used this guide to quickly get at the motherboard to replace a faulty power button. It's tedious but not impossible with a very clean soldering iron tip, solder wick, and lots of flux. The replacement button and covers from iFixit were an exact match (I checked under a microscope).

Mark Renouf - 回复

添加评论

浏览统计数据:

过去 24 小时: 0

过去 7 天: 9

过去 30 天: 29

总计 35,275