跳转到主内容

Nest Hello Button Replacement

你所需要的

  1. Nest Hello Button Replacement, Casing and Faceplate: 步骤 1 中的图像 1,1
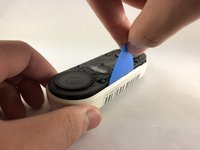
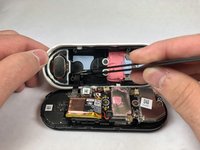
    • Insert the pick between the black faceplate and white casing of the Nest Hello.

    • Pry the faceplate away from the device with the opening pick.

    • If you have not opened the Nest Hello before, there will be a protective foam mesh that is glued to the plastic covering and the inside of the mesh, use a pick to cut through the mesh as much as possible.

    • Completely remove the faceplate from the device, do not be afraid to pull hard.

  2. Nest Hello Button Replacement: 步骤 2 中的图像 1,2 Nest Hello Button Replacement: 步骤 2 中的图像 2,2
    • Peel back the cover stickers and use the Phillips #000 screwdriver to remove the four screws.

  3. Nest Hello Button Replacement: 步骤 3 中的图像 1,3 Nest Hello Button Replacement: 步骤 3 中的图像 2,3 Nest Hello Button Replacement: 步骤 3 中的图像 3,3
    • Insert opening pick between the white casing and the black internal circuitry and pry it out.

    • There is a ribbon cable connecting the white casing to the circuit boards. Be careful not to tear out the cable while separating the casing from the circuit boards.

  4. Nest Hello Button Replacement, Motherboard: 步骤 4 中的图像 1,1
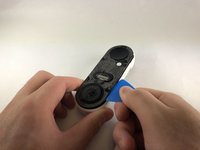
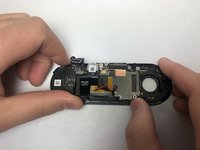
    • Use the Phillips #000 to remove the two screws holding the ribbon cable to the white casing.

  5. Nest Hello Button Replacement: 步骤 5 中的图像 1,2 Nest Hello Button Replacement: 步骤 5 中的图像 2,2
    • Grip the connector with the tweezers as shown and pull it away from the casing.

  6. Nest Hello Button Replacement: 步骤 6 中的图像 1,1
    • Remove the six smaller screws shown with the Phillips #000 screwdriver.

    • Remove the three larger screws shown with the Phillips #000 screwdriver.

  7. Nest Hello Button Replacement: 步骤 7 中的图像 1,2 Nest Hello Button Replacement: 步骤 7 中的图像 2,2
    • Holding the device as shown push the circuit board away from you and up to free it from the clips.

  8. Nest Hello Button Replacement: 步骤 8 中的图像 1,2 Nest Hello Button Replacement: 步骤 8 中的图像 2,2
    • Use the Phillips #000 screwdriver to remove the three screws holding the last circuit board to the black plastic housing.

  9. Nest Hello Button Replacement: 步骤 9 中的图像 1,1
    • Insert the pick underneath the black connectors and pry them upward to disconnect them from the circuit board.

    • Work your way around the device, prying the circuit board away from the housing.

    • Make sure to feed the wires when taking off the circuit board.

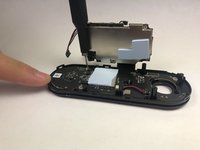
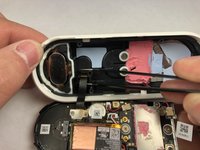
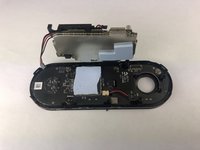
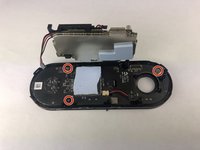
    • Once the circuitboard is free from the plastic housing, the button can be removed by pushing on it from the front side.

结论

To reassemble your device, follow these instructions in reverse order.

2条评论

Where do you get the parts. Google is no help. I’m trying to get the black faceplate from your first step. I can’t find it.

Ryan Gauder - 回复

Where do I buy a button?

Joel Lundi - 回复

添加评论

浏览统计数据:

过去 24 小时: 2

过去 7 天: 7

过去 30 天: 53

总计 2,585