跳转到主内容

NPET K10V3 Membrane Replacement

你所需要的

  1. NPET K10V3 Membrane Replacement, Key Cap: 步骤 1 中的图像 1,1
    • Remove the keyboard from its power source.

  2. NPET K10V3 Membrane Replacement: 步骤 2 中的图像 1,2 NPET K10V3 Membrane Replacement: 步骤 2 中的图像 2,2
    • Firmly grasp the key that will be removed.

    • Remove the keycap by pulling directly upward.

    • Not pulling straight upward or securely will cause damage to the device.

    • If your fingers cannot get a good grip the key cap, use a key cap puller in the same orientation as with fingers.

  3. NPET K10V3 Membrane Replacement, Membrane: 步骤 3 中的图像 1,1
    • Flip the keyboard over so the bottom is facing upwards.

    • Remove fifteen 4.5 mm screws using a Phillips #2 screwdriver.

    • Remove three 9 mm screws using a Phillips #2 screwdriver.

    • Remove the screws from the kickstand plate first followed by the remaining screws for removal of the backplate.

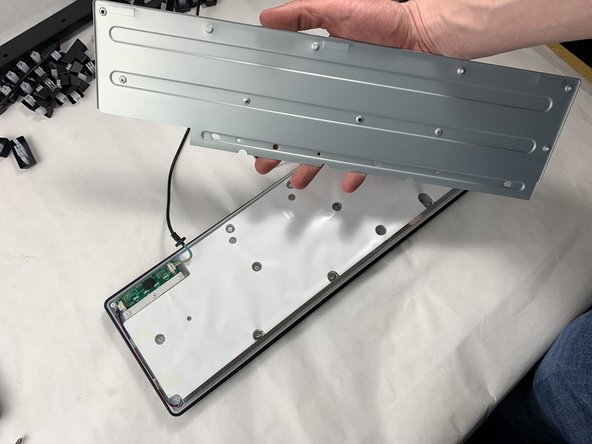
  4. NPET K10V3 Membrane Replacement: 步骤 4 中的图像 1,2 NPET K10V3 Membrane Replacement: 步骤 4 中的图像 2,2
    • Remove the kickstand.

    • Remove the back plate.

    • Keep in mind the location of the USB cable to ensure it is not damaged when re-assembling.

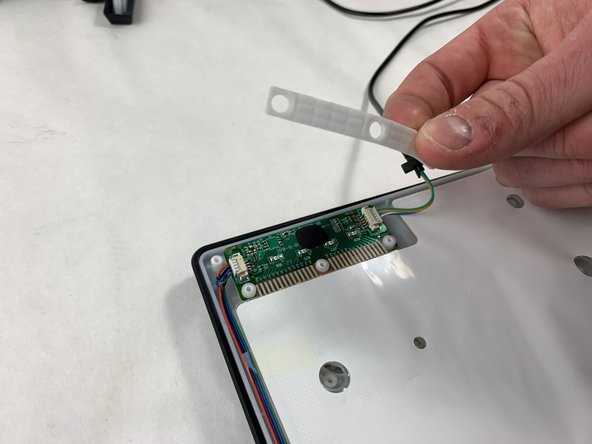
  5. NPET K10V3 Membrane Replacement: 步骤 5 中的图像 1,2 NPET K10V3 Membrane Replacement: 步骤 5 中的图像 2,2
    • Remove the rubber gasket that compresses the connections.

    • When removing the gasket, lift straight upward to avoid damage and snagging.

    • Clean the gasket if there is any dirt or debris.

    • Do not use chemicals or liquids when cleaning to avoid damage.

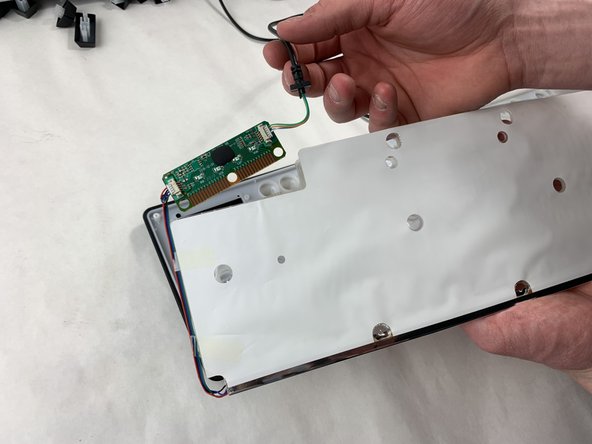
  6. NPET K10V3 Membrane Replacement: 步骤 6 中的图像 1,2 NPET K10V3 Membrane Replacement: 步骤 6 中的图像 2,2
    • Remove the membrane gently to reveal the copper connections for both motherboard and membrane.

    • Remove the motherboard from the membrane.

    • Remove the membrane out with the motherboard.

    • When removing both parts, lift straight upward to avoid damage and snagging.

  7. NPET K10V3 Membrane Replacement: 步骤 7 中的图像 1,1
    • Place the membrane with the motherboard on a clean surface.

    • If the membrane is dirty around the key gaskets, clean gently without chemicals or liquids.

结论

To reassemble your device, follow these instructions in reverse order.

另外一个人完成了本指南。

Matthew Costa

于03/18/24注册

343 声望

创作了2篇指南

团队

UMass Dartmouth, Team 2-6, Konn Spring 2024 UMass Dartmouth, Team 2-6, Konn Spring 2024 的会员

UMASSD-KONN-S24S2G6

5 名成员

创作了3篇指南

0条评论

添加评论

浏览统计数据:

过去 24 小时: 0

过去 7 天: 7

过去 30 天: 7

总计 84