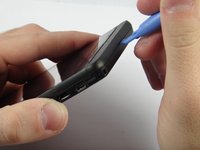
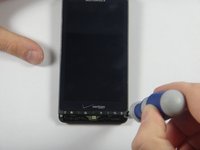
跳转到主内容
加入维修社区 - 创建账户

Motorola Droid X2 Screen Replacement

你所需要的

  1. Motorola Droid X2 Screen Replacement, Battery: 步骤 1 中的图像 1,3 Motorola Droid X2 Screen Replacement, Battery: 步骤 1 中的图像 2,3 Motorola Droid X2 Screen Replacement, Battery: 步骤 1 中的图像 3,3
    • Slide the plastic case off of the back of the phone, exposing the battery.

    询问修复机器人

    添加评论

  2. Motorola Droid X2 Screen Replacement: 步骤 2 中的图像 1,3 Motorola Droid X2 Screen Replacement: 步骤 2 中的图像 2,3 Motorola Droid X2 Screen Replacement: 步骤 2 中的图像 3,3
    • Pull up on the red battery release tab and pull the battery out of the phone.

    询问修复机器人

    添加评论

  3. Motorola Droid X2 Screen Replacement, Motherboard: 步骤 3 中的图像 1,2 Motorola Droid X2 Screen Replacement, Motherboard: 步骤 3 中的图像 2,2
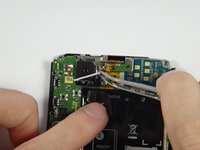
    • Remove the circled screws using a T-5 torques. These screws will be 4.3 millimeters in length.

    • Be careful to not strip any screws.

    询问修复机器人

    添加评论

  4. Motorola Droid X2 Screen Replacement: 步骤 4 中的图像 1,3 Motorola Droid X2 Screen Replacement: 步骤 4 中的图像 2,3 Motorola Droid X2 Screen Replacement: 步骤 4 中的图像 3,3
    • Using a prying tool, snap off the front casing on the top and bottom of the phone.

    • Be careful not to lose the small rubber piece that sits over the microphone.

    添加评论

  5. Motorola Droid X2 Screen Replacement: 步骤 5 中的图像 1,2 Motorola Droid X2 Screen Replacement: 步骤 5 中的图像 2,2
    • Remove the circled screws using a T-5 torques.. These screws should be 5.8 millimeters in length.

    询问修复机器人

    添加评论

  6. Motorola Droid X2 Screen Replacement: 步骤 6 中的图像 1,3 Motorola Droid X2 Screen Replacement: 步骤 6 中的图像 2,3 Motorola Droid X2 Screen Replacement: 步骤 6 中的图像 3,3
    • Using a plastic opening tool, snap open the phone. It should separate into a front piece with the hardware and a plastic backing.

    询问修复机器人

    添加评论

  7. Motorola Droid X2 Screen Replacement: 步骤 7 中的图像 1,3 Motorola Droid X2 Screen Replacement: 步骤 7 中的图像 2,3 Motorola Droid X2 Screen Replacement: 步骤 7 中的图像 3,3
    在这个步骤中使用的工具:
    Tweezers
    $4.99
    • Using tweezers, remove the white wire at the top of the phone near the camera.

    询问修复机器人

    添加评论

  8. Motorola Droid X2 Screen Replacement: 步骤 8 中的图像 1,2 Motorola Droid X2 Screen Replacement: 步骤 8 中的图像 2,2
    • Remove these nine screws using a T-3 torques. These screws should be 2.40 mm in length

    询问修复机器人

    添加评论

  9. Motorola Droid X2 Screen Replacement: 步骤 9 中的图像 1,2 Motorola Droid X2 Screen Replacement: 步骤 9 中的图像 2,2
    • Using tweezers, removed the white electrical tape on the motherboard.

    询问修复机器人

    添加评论

  10. Motorola Droid X2 Screen Replacement: 步骤 10 中的图像 1,2 Motorola Droid X2 Screen Replacement: 步骤 10 中的图像 2,2
    • Using the plastic opening tool, lift up to remove the connector.

    询问修复机器人

    添加评论

  11. Motorola Droid X2 Screen Replacement: 步骤 11 中的图像 1,2 Motorola Droid X2 Screen Replacement: 步骤 11 中的图像 2,2
    • Using a pry tool, lift the jawbone connector.

    询问修复机器人

    添加评论

  12. Motorola Droid X2 Screen Replacement: 步骤 12 中的图像 1,2 Motorola Droid X2 Screen Replacement: 步骤 12 中的图像 2,2
    • Using tweezers, carefully disconnect the cable connector by pulling the cable out.

    询问修复机器人

    添加评论

  13. Motorola Droid X2 Screen Replacement: 步骤 13 中的图像 1,3 Motorola Droid X2 Screen Replacement: 步骤 13 中的图像 2,3 Motorola Droid X2 Screen Replacement: 步骤 13 中的图像 3,3
    • Use a spudger to disconnect the cable connector.

    询问修复机器人

    添加评论

  14. Motorola Droid X2 Screen Replacement: 步骤 14 中的图像 1,3 Motorola Droid X2 Screen Replacement: 步骤 14 中的图像 2,3 Motorola Droid X2 Screen Replacement: 步骤 14 中的图像 3,3
    • Using a spudger, remove the camera. Lift up the motherboard and slide the spudger under the camera.

    询问修复机器人

    添加评论

  15. Motorola Droid X2 Screen Replacement, Screen: 步骤 15 中的图像 1,2 Motorola Droid X2 Screen Replacement, Screen: 步骤 15 中的图像 2,2
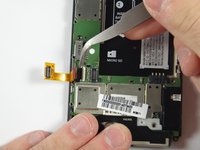
    • Remove the 4 screws using a T-3 torques.. These screws are 2.40 mm in length.

    • Be careful to not strip the screws.

    询问修复机器人

    添加评论

  16. Motorola Droid X2 Screen Replacement: 步骤 16 中的图像 1,3 Motorola Droid X2 Screen Replacement: 步骤 16 中的图像 2,3 Motorola Droid X2 Screen Replacement: 步骤 16 中的图像 3,3
    在这个步骤中使用的工具:
    Tweezers
    $4.99
    • Using tweezers, remove the white tape to reveal the connector

    询问修复机器人

    添加评论

  17. Motorola Droid X2 Screen Replacement: 步骤 17 中的图像 1,1
    • Using the plastic opening tool, lift the jawbone connector.

    询问修复机器人

    添加评论

  18. Motorola Droid X2 Screen Replacement: 步骤 18 中的图像 1,2 Motorola Droid X2 Screen Replacement: 步骤 18 中的图像 2,2
    • Using tweezers, remove cable from the connector

    询问修复机器人

    添加评论

  19. Motorola Droid X2 Screen Replacement: 步骤 19 中的图像 1,3 Motorola Droid X2 Screen Replacement: 步骤 19 中的图像 2,3 Motorola Droid X2 Screen Replacement: 步骤 19 中的图像 3,3
    • Using a plastic opening tool, lift the connector from the device

    询问修复机器人

    添加评论

  20. Motorola Droid X2 Screen Replacement: 步骤 20 中的图像 1,3 Motorola Droid X2 Screen Replacement: 步骤 20 中的图像 2,3 Motorola Droid X2 Screen Replacement: 步骤 20 中的图像 3,3
    • Lift the ribbon from the device

    • This does require some effort to remove.

    询问修复机器人

    添加评论

  21. Motorola Droid X2 Screen Replacement: 步骤 21 中的图像 1,3 Motorola Droid X2 Screen Replacement: 步骤 21 中的图像 2,3 Motorola Droid X2 Screen Replacement: 步骤 21 中的图像 3,3
    • Lift the screen off of the device

    询问修复机器人

    添加评论

  22. Motorola Droid X2 Screen Replacement: 步骤 22 中的图像 1,2 Motorola Droid X2 Screen Replacement: 步骤 22 中的图像 2,2
    • Using a heat gun, gently heat the edges of the screen

    • Be careful as overheating can damage the electronics.

    • The screen will be hot after.

    询问修复机器人

    添加评论

  23. Motorola Droid X2 Screen Replacement: 步骤 23 中的图像 1,3 Motorola Droid X2 Screen Replacement: 步骤 23 中的图像 2,3 Motorola Droid X2 Screen Replacement: 步骤 23 中的图像 3,3
    • Lift the screen from the frame.

    询问修复机器人

    添加评论

结论

To reassemble your device, follow these instructions in reverse order.

取消:我没有完成这个指南。

Aaron Mak

于10/29/14注册

658 声望

创作了4篇指南

团队

UMass Dartmouth, Team 4-3, Miles Fall 2014 UMass Dartmouth, Team 4-3, Miles Fall 2014 的会员

UMASSD-MILES-F14S4G3

3 名成员

创作了8篇指南

1指南评论

I recently ran into an interesting situation with the Droid X2 at my repair shop. I know this is an older device, but this is still a very important piece of information: there are 2 different types of digitizers and 2 different types of LCD's, depending on the Droid X2's transceiver number. Type A digitizer has a smaller front row button connector, Type B is larger. Same with the LCD, there is a Type A small connector and a Type B larger connector. Under the battery on the barcode sticker, right below the "MB870" barcode is the transceiver number, starting with "SJUG" and ending in either 6250 (type A) or 6065 (type B). Anyone buying a replacement LCD or digitizer needs to know which one to get, or else the connectors won't fit.

Andrew F - 回复 分享

添加评论

浏览统计数据:

过去 24 小时: 0

过去 7 天: 6

过去 30 天: 41

总计 1,464