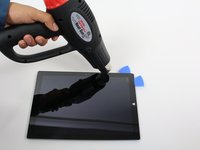
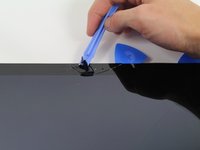
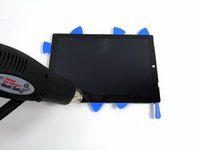
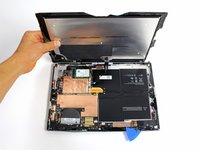
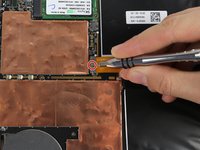
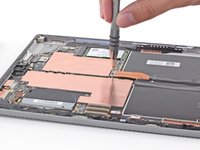
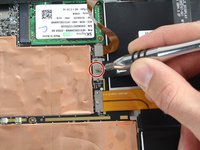
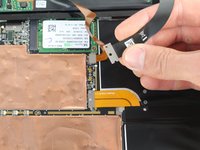
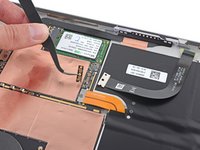
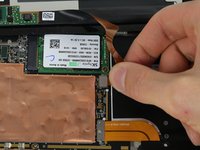
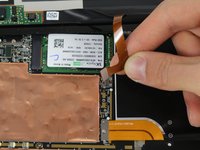
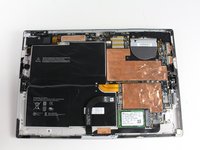
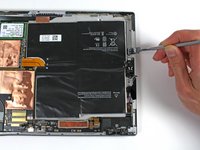
跳转到主内容

此翻译可能不反映源指南的最新更新。 帮助更新翻译查看源指南

Microsoft Surface Pro 3 电池更换

你所需要的

  1. Microsoft Surface Pro 3 电池更换, 显示屏: 步骤 1 中的图像 1,2 Microsoft Surface Pro 3 电池更换, 显示屏: 步骤 1 中的图像 2,2
    • 开始之前,请将 Surface Pro 的电池电量放电至 25% 以下。如果在维修过程中意外损坏,充电的锂离子电池可能会起火或爆炸。

    • 显示屏与设备边框紧密粘合。

    • 要移除显示屏,首先要加热软化粘合剂。可以使用热垫、热风枪或 iOpener。如沒有以上工具,也可以使用吹风机。

    • 使用热风枪时要小心,因为过热可能会永久损坏显示屏和电池。

    • 稳步均匀地加热显示屏四周,直到热到无法触摸为止,并尽量将温度维持几分钟。

  2. Microsoft Surface Pro 3 电池更换: 步骤 2 中的图像 1,2 Microsoft Surface Pro 3 电池更换: 步骤 2 中的图像 2,2
    • 用吸盘或iSlack拉起玻璃,在玻璃和金属框之间形成一个小缝隙。

    • 如果显示屏严重破裂,吸盘可能无法吸附。首先在显示屏上覆盖一层胶带可能会有帮助。或者,你也可以将吸盘粘在显示屏上。

    • 小心地将三角撬片插入屏幕和设备之间的缝隙中,切割粘合剂。

    • 在显示屏的侧面和底部滑动三角撬片以切割粘合剂。必要时再加热。

    • 小心操作—显示屏的玻璃很薄,如果用力很容易破裂。

    • Wi-Fi 天线粘在屏幕上沿的边框下面(在摄像头的两侧),很容易损坏。分离顶边时要格外小心,必要时要多加热。

  3. Microsoft Surface Pro 3 电池更换: 步骤 3 中的图像 1,3 Microsoft Surface Pro 3 电池更换: 步骤 3 中的图像 2,3 Microsoft Surface Pro 3 电池更换: 步骤 3 中的图像 3,3
    • 继续用热风枪加显示屏的各个部分。

    • 使用热风枪加热显示屏并且同时使用三角塑料撬片小心的撬开你的屏幕。

    • 显示屏极度容易破碎,小心处理破碎的玻璃。

  4. Microsoft Surface Pro 3 电池更换: 步骤 4 中的图像 1,2 Microsoft Surface Pro 3 电池更换: 步骤 4 中的图像 2,2
    • 小心提起已分离的屏幕。注意不要伤到连接线。

  5. Microsoft Surface Pro 3 电池更换: 步骤 5 中的图像 1,2 Microsoft Surface Pro 3 电池更换: 步骤 5 中的图像 2,2
    • 卸下固定电池的3 mm T3梅花螺丝,并断开电池连接器。

    • 小心不要弄丢连接线和接头之间的小型连接板。

  6. Microsoft Surface Pro 3 电池更换: 步骤 6 中的图像 1,3 Microsoft Surface Pro 3 电池更换: 步骤 6 中的图像 2,3 Microsoft Surface Pro 3 电池更换: 步骤 6 中的图像 3,3
    • 移除显示屏连接线上的 4mm T3 梅花螺丝。

    • 提起连接器以断开排线连接。

    • 小心不要弄丢连接线和接头之间的小型连接板。

  7. Microsoft Surface Pro 3 电池更换: 步骤 7 中的图像 1,3 Microsoft Surface Pro 3 电池更换: 步骤 7 中的图像 2,3 Microsoft Surface Pro 3 电池更换: 步骤 7 中的图像 3,3
    • 抓住银色连接器的橘黄色连接线

    • 小心地拔出橘黄色的连接线直到脱离连接器

    • 屏幕已完全断开连接

    • 用于替换的屏幕上可能没有所有需要安装回去的零件。保存好拆下的屏幕上所有的零件,如果需要的话将其替换到新屏幕上。

  8. Microsoft Surface Pro 3 电池更换, 电池: 步骤 8 中的图像 1,2 Microsoft Surface Pro 3 电池更换, 电池: 步骤 8 中的图像 2,2
    • 使用金属撬棒撬开设备中的电池

    • 这里会有一小点的粘结剂固定电池,确保你要非常小心的翘起电池。并且清除电池周围的粘结剂

    • 金属撬棒很可能会刺伤你的电池,配合使用塑料卡片可以更安全的移除电池

  9. Microsoft Surface Pro 3 电池更换: 步骤 9 中的图像 1,1
    • 从设备中移除电池

    • 跟随说明妥善的处理电池

结论

反向跟随这些说明安装你的设备

52等其他人完成本指南。

由衷感谢以下译者:

en zh

83%

CoikVollin正在帮助我们修复这个世界! 您也想加入吗?
开始翻译 ›

Erik Snyder

于10/01/15注册

5,214 声望

创作了5篇指南

团队

Cal Poly, Team 12-18, Maness Fall 2015 Cal Poly, Team 12-18, Maness Fall 2015 的会员

CPSU-MANESS-F15S12G18

5 名成员

创作了31篇指南

32条评论

Do you have to glue everything back together? Do you heat the parts back up to get the glue to stick again?

Danny O'Boyle - 回复

I slowly removed the old adhesive watching out for glass shards. A spundger and razer blade didn’t really help. In the end, I just used my fingernail and finger to roll the adhesive like I was removing rubber cement. It too about 30 minutes but I was able to get it cleaned off. I replaced the adhesive with 2 mm Tesa tape. This worked great.

michael jones -

Has anyone ever successfully opened a surface pro 3 without breaking the screen?

juliusmalexander - 回复

Yes I have successfully open the surface pro with out breaking the screen by using a heat gun, the islack and the using the picks around the screen as anchors, then use the islack as you will use it to replace the screen in the iphone. It takes time and patience and a lot of heat. It took me 25 minutes to remove the screen with out breaking it.

computertechomar -

Only wizards can accomplish this task without breaking the screen. Yes the screen must be reheated for the glue to stick again. A simple fix to avoid all of these problems is to switch to Apple products.

Erik Snyder - 回复

添加评论

浏览统计数据:

过去 24 小时: 31

过去 7 天: 205

过去 30 天: 979

总计 174,971