跳转到主内容

Microsoft Surface Laptop 3 13.5" LCD Assembly Replacement

你所需要的

  1. Microsoft Surface Laptop 3 13.5" LCD Assembly Replacement, LCD Assembly: 步骤 1 中的图像 1,1
    • It's far easier than any other Surface device.

  2. Microsoft Surface Laptop 3 13.5" LCD Assembly Replacement: 步骤 2 中的图像 1,1
    • From the bottom, carefully pry up the rubber feet on all 4 corners.

  3. Microsoft Surface Laptop 3 13.5" LCD Assembly Replacement: 步骤 3 中的图像 1,1
    • Using a T5 screwdriver remove the 4 screws on each corner.

  4. Microsoft Surface Laptop 3 13.5" LCD Assembly Replacement: 步骤 4 中的图像 1,1
    • Make sure the device is completely turned off before proceeding.

  5. Microsoft Surface Laptop 3 13.5" LCD Assembly Replacement: 步骤 5 中的图像 1,1
    • With the screen open, lift the keyboard out. It doesn't take much force as the part is only held in with magnets once the screws are removed.

  6. Microsoft Surface Laptop 3 13.5" LCD Assembly Replacement: 步骤 6 中的图像 1,2 Microsoft Surface Laptop 3 13.5" LCD Assembly Replacement: 步骤 6 中的图像 2,2
    • Invert the keyboard on itself and remove the unshielded keyboard assembly connector.

  7. Microsoft Surface Laptop 3 13.5" LCD Assembly Replacement: 步骤 7 中的图像 1,3 Microsoft Surface Laptop 3 13.5" LCD Assembly Replacement: 步骤 7 中的图像 2,3 Microsoft Surface Laptop 3 13.5" LCD Assembly Replacement: 步骤 7 中的图像 3,3
    • Remove the clip-on shields for the display assembly.

  8. Microsoft Surface Laptop 3 13.5" LCD Assembly Replacement: 步骤 8 中的图像 1,1
    • Unclip the connectors. They are pretty tight so I'd suggest using a spudger or 2.

  9. Microsoft Surface Laptop 3 13.5" LCD Assembly Replacement: 步骤 9 中的图像 1,2 Microsoft Surface Laptop 3 13.5" LCD Assembly Replacement: 步骤 9 中的图像 2,2
    • Using a T6 screwdriver, remove the 6 screws holding in the display.

  10. Microsoft Surface Laptop 3 13.5" LCD Assembly Replacement: 步骤 10 中的图像 1,2 Microsoft Surface Laptop 3 13.5" LCD Assembly Replacement: 步骤 10 中的图像 2,2
    • Lay the display on a heating pad being careful of the connectors. A heat gun would work too.

    • I used 60 Degrees C for around 15 minutes.

  11. Microsoft Surface Laptop 3 13.5" LCD Assembly Replacement: 步骤 11 中的图像 1,2 Microsoft Surface Laptop 3 13.5" LCD Assembly Replacement: 步骤 11 中的图像 2,2
    在这个步骤中使用的工具:
    Plastic Cards
    $2.99
    购买
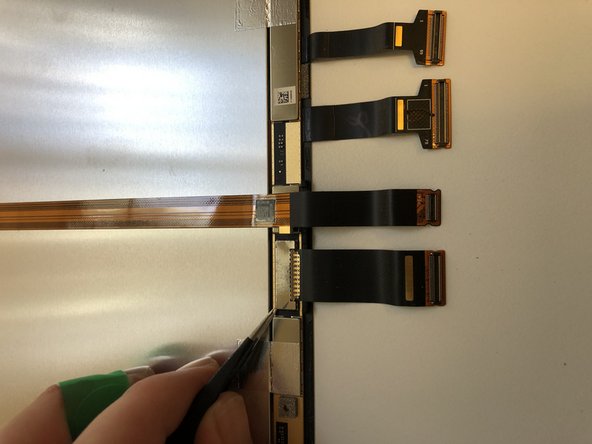
    • Use a metal card to get in between the glass and the housing. Swap to a plastic card to cut through the rest of the adhesive.

  12. Microsoft Surface Laptop 3 13.5" LCD Assembly Replacement: 步骤 12 中的图像 1,1
    • Watch out for the Sensors up the top. If you damage these the device will fail to turn on. It basically bricks completely without the sensors.

  13. Microsoft Surface Laptop 3 13.5" LCD Assembly Replacement: 步骤 13 中的图像 1,2 Microsoft Surface Laptop 3 13.5" LCD Assembly Replacement: 步骤 13 中的图像 2,2
    • Heat up the bottom of the display and horizontally pull the screen out. Try to leave the bottom adhesive intact as we are going to be using this later.

  14. Microsoft Surface Laptop 3 13.5" LCD Assembly Replacement: 步骤 14 中的图像 1,3 Microsoft Surface Laptop 3 13.5" LCD Assembly Replacement: 步骤 14 中的图像 2,3 Microsoft Surface Laptop 3 13.5" LCD Assembly Replacement: 步骤 14 中的图像 3,3
    • Remove one side of the plastic bar holding the cables in place. Slide the display out leaving the plastic bar intact.

  15. Microsoft Surface Laptop 3 13.5" LCD Assembly Replacement: 步骤 15 中的图像 1,1
    • Screen off. Time to move on.

  16. Microsoft Surface Laptop 3 13.5" LCD Assembly Replacement: 步骤 16 中的图像 1,2 Microsoft Surface Laptop 3 13.5" LCD Assembly Replacement: 步骤 16 中的图像 2,2
    • Remove the snap-on shield and cable. We will need this later.

  17. Microsoft Surface Laptop 3 13.5" LCD Assembly Replacement: 步骤 17 中的图像 1,2 Microsoft Surface Laptop 3 13.5" LCD Assembly Replacement: 步骤 17 中的图像 2,2
    • CAREFULLY loosen the sensor cable on the back of the display.

  18. Microsoft Surface Laptop 3 13.5" LCD Assembly Replacement: 步骤 18 中的图像 1,3 Microsoft Surface Laptop 3 13.5" LCD Assembly Replacement: 步骤 18 中的图像 2,3 Microsoft Surface Laptop 3 13.5" LCD Assembly Replacement: 步骤 18 中的图像 3,3
    • Heat the area around the sensors from the front. The adhesive here isn't very strong so you don't need loads of heat.

  19. Microsoft Surface Laptop 3 13.5" LCD Assembly Replacement: 步骤 19 中的图像 1,3 Microsoft Surface Laptop 3 13.5" LCD Assembly Replacement: 步骤 19 中的图像 2,3 Microsoft Surface Laptop 3 13.5" LCD Assembly Replacement: 步骤 19 中的图像 3,3
    • Remove the old adhesive and make sure it's clean. You really don't want to be removing this screen once it's set down.

  20. Microsoft Surface Laptop 3 13.5" LCD Assembly Replacement: 步骤 20 中的图像 1,2 Microsoft Surface Laptop 3 13.5" LCD Assembly Replacement: 步骤 20 中的图像 2,2
    • Install the new adhesive. Remove any large clumps on the bottom. We left the old stuff down there as it's a bit awkward to get to cleaning and reapplying-wise.

  21. Microsoft Surface Laptop 3 13.5" LCD Assembly Replacement: 步骤 21 中的图像 1,1
    • Test the new screen. Make sure you connect the sensors or it won't start or respond at all.

  22. Microsoft Surface Laptop 3 13.5" LCD Assembly Replacement: 步骤 22 中的图像 1,2 Microsoft Surface Laptop 3 13.5" LCD Assembly Replacement: 步骤 22 中的图像 2,2
    • Slide the cable back under the plastic bar and set it back in place. Lightly pull the cables to make sure there's no slack internally.

  23. Microsoft Surface Laptop 3 13.5" LCD Assembly Replacement: 步骤 23 中的图像 1,1
    • Remove the plastic layer on top of your adhesive and set the screen into the housing. You need to push the screen in quite a bit at the bottom to make it sit correctly.

  24. Microsoft Surface Laptop 3 13.5" LCD Assembly Replacement: 步骤 24 中的图像 1,3 Microsoft Surface Laptop 3 13.5" LCD Assembly Replacement: 步骤 24 中的图像 2,3 Microsoft Surface Laptop 3 13.5" LCD Assembly Replacement: 步骤 24 中的图像 3,3
    • Place the assembly in then screw it in. Connect the cables and replace the shields.

  25. Microsoft Surface Laptop 3 13.5" LCD Assembly Replacement: 步骤 25 中的图像 1,1
    • Install the screws and feet and you're done!

结论

Let me know how you got on. I think we can all agree this was much easier than a Book 1… lot less nerve-racking too.

9等其他人完成本指南。

Eric

于01/24/17注册

1,486 声望

撰写一个指南

团队

smashedit.co.nz smashedit.co.nz 的会员

Business

9 名成员

创作了3篇指南

2条评论

Real very helpful and very nicely explained

Praveen - 回复

Thanks Praveen

Eric -

添加评论

浏览统计数据:

过去 24 小时: 3

过去 7 天: 26

过去 30 天: 122

总计 8,679